Coconut Curry Lamb Stew
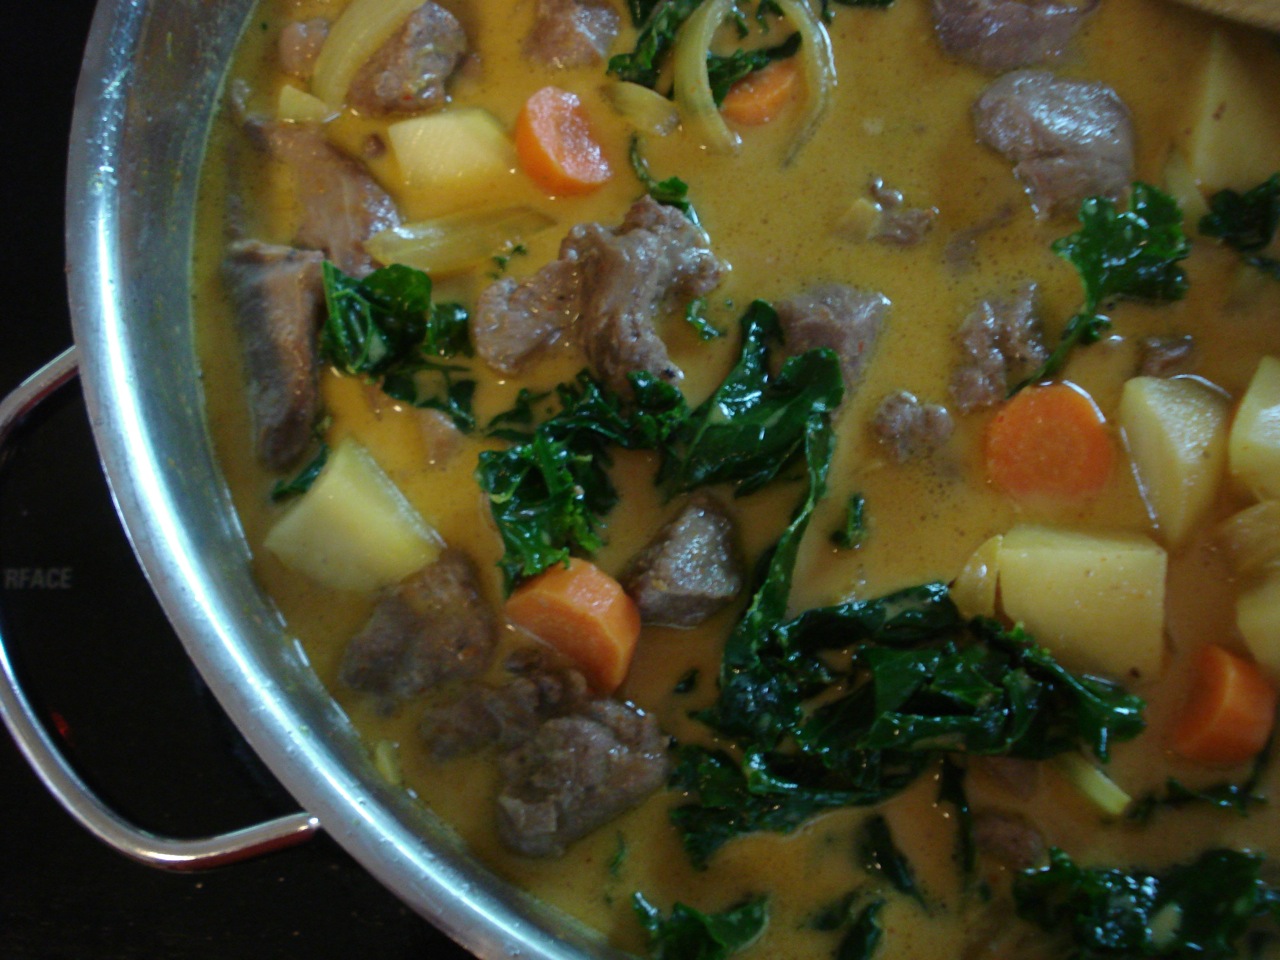

1 lamb shoulder roast, square-cut or rolled; or 1/2 leg of lamb roast, or 2 lbs lamb stew meat
pure salt and freshly ground black pepper to taste
3 TBSP coconut oil
2 medium onions, thinly sliced
2 tsp turmeric
3 medium boiling potatoes, peeled and roughly chopped
2 large carrots, cut into rounds
2 cans unsweetened coconut milk
1 & 1/2 cups water
4 TBSP red curry paste
4 TBSP tamari
5 TBSP natural sugar or 30 drops liquid stevia
4 oz kale, roughly chopped (optional)
- Preheat oven to 300 degrees.
- Bring the lamb to room temp (let sit out about an hour) and cut into stew chunks.
- Heat the oil in a large (5 qt), ovenproof saute pan over medium heat, add the lamb and sprinkle with salt and pepper.
- Brown the meat on all sides, about 3 mins per side, remove, and set aside.
- Toss the onions into the oil, and saute until translucent.
- Sprinkle onions with turmeric and saute 1 min longer.
- Turn the heat to low and add the potatoes, carrots, and lamb.
- Combine the coconut milk, water, curry paste, tamari, and sugar in a large measuring cup and pour into the saute pan.
- Cover tightly, and roast in the oven for 3 – 4 hours, or until the meat is fork-tender.
- When the stew is close to being done, add the kale and return to the oven for the remaining cook time (about 15 minutes longer).
_________________________________________________________________________
SIDE NOTES:
~ This is outstanding! I made some substantial changes to the original recipe which came from the Grassfed Gourmet. Though the first time I made it, I shortened the cook time and the meat wasn’t tender enough (I think I cooked it 90 mins that time). So it’s a good idea to plan to make this on a day you can do the prep work in the afternoon and just let it cook until dinner time (approx 3 hours). It really needs to stew to reach its full potential!
~ Technically, you don’t have to combine the sauce ingredients (coconut milk, etc…) in a separate bowl — that’s just my personal preference. You can put them directly into the saute pan one at a time if that works better for you.
Enjoy!
Grand Opening – New Location for Local Clients

Good morning!
I hope everyone had a great summer and that you’re all beginning to enjoy the steadier groove of autumn.
I have some news to share….
I’ve been invited to be house nutritionist at “Time For Me Wellness Center” in Clinton, NY. I’m very excited to have this opportunity to connect with more people in the local community, and thrilled to be able to do it from such a beautiful and serene Center.
http://www.timeformedayspa.
For anyone in the local community interested in visiting my new location and learning more about how I may be of service, I’ll be offering a free introductory presentation at Time For Me Wellness Center on the evening of Wednesday, October 9th at 6:30. If you’re nearby and have been contemplating seeking out the guidance of a nutritionist, I hope you’ll join us.
To register for this free event, click the following link and scroll down to the bottom of the page. For the appointment type, select “Free Introductory Presentation”, and choose October 9th / 6:30PM on my calendar. Feel free to forward this “sign up” link to any friends or family members you feel may be interested.
https://realfoodtastesgood.acu
Please keep in mind that space is limited (maximum of 20 guests), so sign up early to reserve your seat.
As of October 10th, I will be keeping office hours at Time For Me Wellness Center for local clients who prefer in-person meetings. Of course, for out of town clients and those who like the convenience of phone consultations, that service will still be available.
Special Offers:
All those who attend the October 9th gathering will be entitled to a $10 discount toward a new client consultation if scheduled within 30 days of the presentation. Please make note that you must be registered for the event to qualify, and only one discount may be applied per visit. To be fair to those who live out of town, the same $10 discount may be applied toward a new client phone consultation booked within the month of October.
If at any time you’d like to schedule an appointment, please use the same link posted above, choose the type of appointment you’re interested in (new client or follow up / phone or in-person), and select a day and time from my availability calendar.
For future reference, you can access my 24/7 online booking link directly from my website.
As a reminder… In my practice, this work does not solely revolve around changing what’s on the plate — but includes the other equally important and often neglected aspect of nutrition — addressing our relationship with food itself. We are not merely eating machines, but human beings with mind, body, heart and soul, all interconnected and dynamic in nature. There’s much more to nutrition than the *eat this, don’t eat that* type of approach we’ve come to expect.
For more information on my unique approach to nutrition and wellness: http://realfoodtastesgood.
Please don’t hesitate to reach out if I can be of service!
My best,
Diane
Potatoes & Eggs

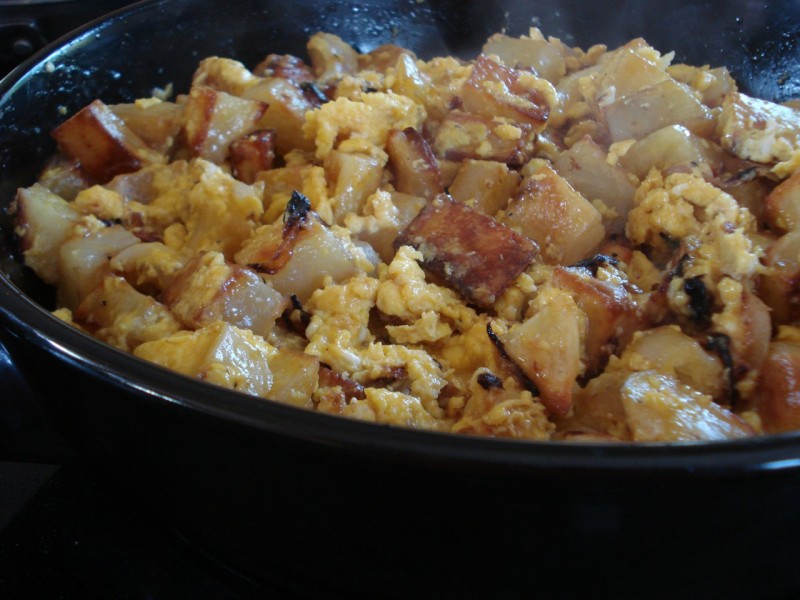
2 lbs potatoes
butter, ghee, or coconut oil
pure salt and freshly ground pepper to taste
1 onion
4 – 6 pastured eggs
- Preheat oven to 400 degrees.
- Peel potatoes, chop into bite-size chunks, and transfer to a bowl.
- Melt a generous amount of ghee (or butter / coconut oil) over low heat, pour over potato chunks, and toss well to coat.
- Spread potatoes in a single layer on a parchment paper covered baking sheet.
- Sprinkle with salt and pepper to taste.
- Bake until done to your liking (45 mins to 1 hour).
- When potatoes are almost done, begin to heat some coconut oil in a saute pan.
- Chop the onion and saute in the oil until beginning to brown.
- Add crispy potatoes to the pan and toss to combine.
- Crack the eggs into a separate bowl, sprinkle with salt & pepper, and scramble (with or without a little milk).
- Pour eggs into saute pan with potatoes and onions and toss until the eggs are cooked through.
- Serve immediately.
Serves 2 – 3.
_________________________________________________________________________________
SIDE NOTES:
~ Back in the day, my father used to make this all the time w/ his buddies at firehouse 253 in Brooklyn (and of course for us too!). Fugetaboutit. True comfort food….
~ You can really use as much potato and as many eggs as you’d like depending on the level of heartiness of your eaters. If you think 2 eggs per person is enough – so be it.
~ Technically, you can fry the potatoes stove top instead of roasting in the oven. I just find the potatoes stick to the pan this way which is a little annoying. Much easier for me cooking them separately in the oven, and then transferring the crispy potatoes to the saute pan — use whatever method appeals to you most.
~ I usually make this for dinner, but of course, it can work for any meal of the day. It’s simple and very satisfying. Just get those potatoes in the oven about an hour before you want to eat & the rest is a piece of cake. We usually eat this with a little puddle of high quality ketchup for dipping. Enjoy =)
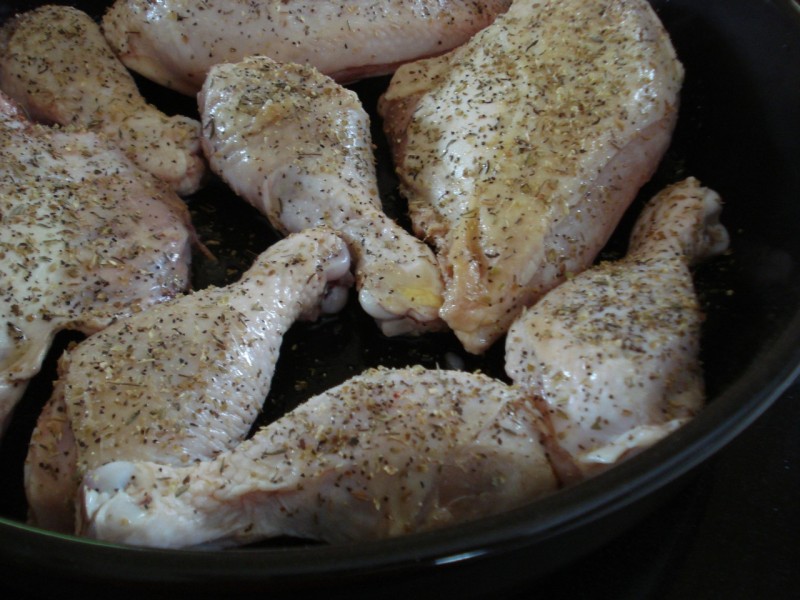
Roasted Chicken Parts

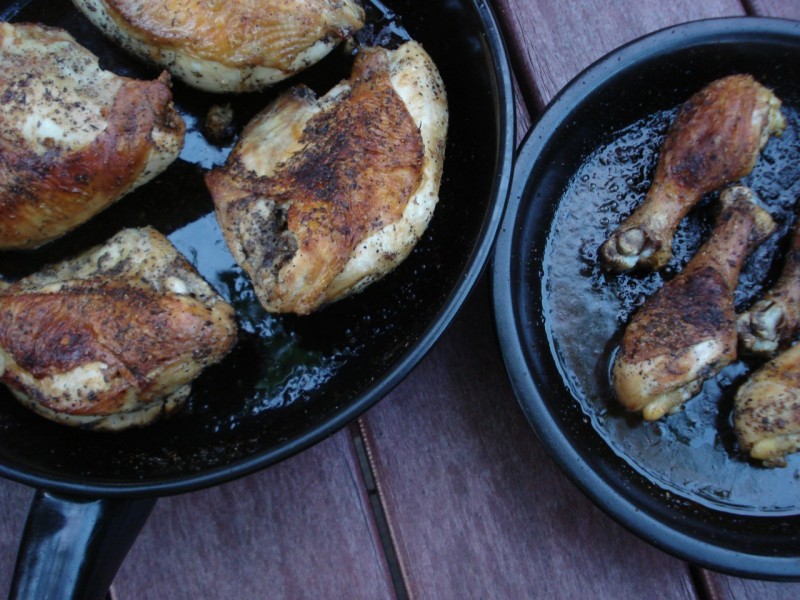
chicken parts (legs, breasts, thighs, wings)
coconut oil, ghee, or butter
chicken-herb-rub
- Preheat the oven to 400 degrees.
- Melt ghee in a large, oven-proof, saute pan over medium heat and coat the chicken parts.
- Sprinkle generously with chicken herb rub on both sides.
- Brown both sides of the chicken (about 5 minutes per side).
- Then transfer to the oven and roast 30 mins* or until cooked through.
*If it takes you a little longer to brown the chicken stove top, reduce the roasting time by a few minutes to avoid overcooking.
______________________________________________________________________________
SIDE NOTES:
~ To coat the chicken with the melted ghee, you can simply rub all sides of the chicken into the oily pan, or use a basting brush.
~ If you’d rather not have to click the link, the chicken herb rub is simply: 2 TBSP dried oregano, 1 TBSP dried thyme, 1 TBSP black pepper, 1/2 TBSP pure salt mixed together (if using coarse salt, use 1 full TBSP).
~ Aside from the very first time when it came out perfectly, I have had difficulty roasting whole chickens. Even if my meat thermometer was at the correct temperature, the meat closest to the bone would still be under-cooked. This has made dinner unpleasant on several occasions… having to put the chicken back and forth, in and out of the oven several times until it’s cooked all the way through. Whether you buy a pre-cut chicken, or break up the bird yourself – the cooking is a lot more manageable this way. Of course, buying a whole (uncut) chicken is less expensive and the advantage is that you have the back & neck to add to your stock pot (along with the rest of the left-over bones) for making a rich broth the following day.
~ Tim Hardiman — Owner & Chef at Utica, NY’s The Tailor & The Cook — had this to say when I asked him about my roasted chicken dilemma — “I believe a chicken should always be broken up and cooked separately…You wouldn’t cook a whole cow all at once!”
Here are the rest of the tips Tim generously shared with me back in May, and happily agreed to share with my readers as well…
- When roasting a whole chicken, 90 min is more than enough, though I don’t usually roast the whole bird because the breast doesn’t take as long as the leg, and when the leg is done the breast is overcooked.
- I like to break it down into 4 pieces — 2 leg and thigh, 2 breast and wing — though this requires a bit of knife work. You can give the leg/thigh 90 min at 375, but the breast/wing should be finished in 45 to 60.
- A really great trick is to remove the bird, put it on a white surface, poke it, and watch the juices flow out. If they are perfectly clear, the bird is done (any hint of pink means more cooking is required).
- Also, bring the bird (or any protein) up to room temperature before roasting. It wont go bad sitting on the counter for 4 hrs prior to roasting. Think about it… If it’s going stone cold into the oven, the first part of the cooking time is just bringing it up to room temp, then it begins cooking. You’ll get more even roasting if it starts off from, lets say, 60 degrees. This is also true with steaks.
- Lastly, I like to give the skin some color before roasting, by searing (stove top) in a very hot pan before the roast. Nothing worse than pallid skin. This step also brings up the internal temperature prior to roasting.
- Also, allowing the meat to rest for 10 min after removing from the oven is a great idea. It will continue to cook (carry over) as well as seal in the juices so that none seep out while carving.
- Use a good digital probe thermometer. The temps listed in your recipe are good (breast = 160 and thighs = 165 – 170), but remember, it will continue to cook after being removed from the oven.
If you’re based in the Utica, NY area or passing through, I highly recommend treating yourself to a special meal at The Tailor & The Cook. Not only is the food spectacular, Tim & Melissa take great pride in using the highest quality, local, organic ingredients. Enjoy!
Ice Cream Milkshake
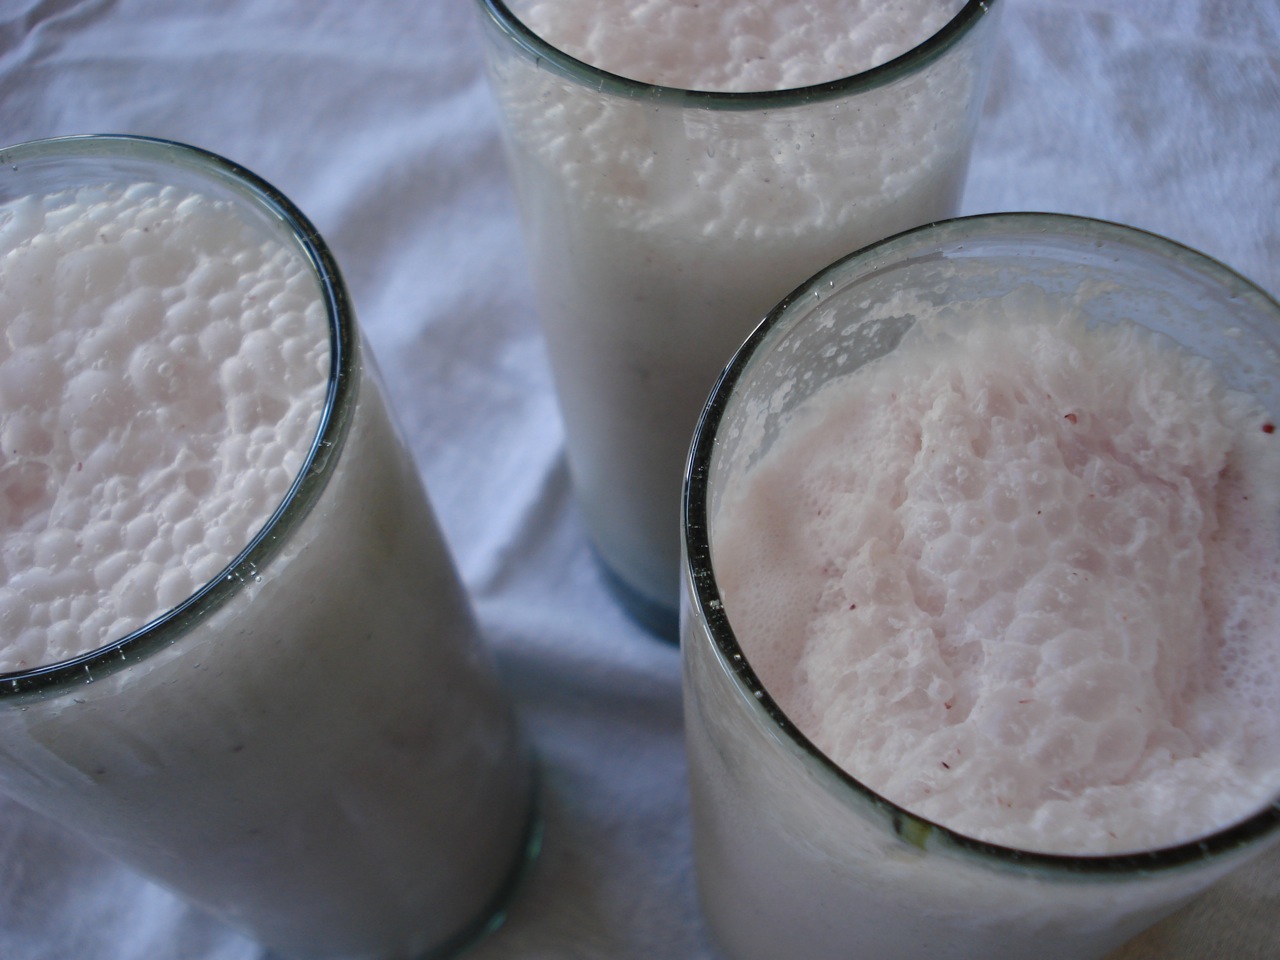

1 cup whole milk
1/2 cup high quality ice cream
- Fill blender up to the 1 cup line with milk.
- Add 1/2 cup ice cream (scoop it in until the liquid rises to 1 & 1/2 cups).
- Blend and enjoy!
Serves 1.
Optional add-ins:
- 1 or 2 egg yolks or 1 whole egg
- 1/2 of a banana (and/or other fruit of choice)
- 1 TBSP coconut oil, melted
- 1 or 2 TBSP high quality protein powder
________________________________________________________________________
SIDE NOTES:
~ This is a nice cool treat for summer — especially the exceptionally hot summer we’ve been having here in Upstate NY!
~ Pictured above with strawberry ice cream and several add-ins.
~ If consuming eggs raw, you need to know your source. In other words, they must be fresh and come from clean, healthy chickens. Get to know the local farmers in your area!
Dairy Free, Gluten Free, Egg Free, Nut Free, Sugar Free, Vegan, Grain Free, Raw
Buttery Rice w/ Greens
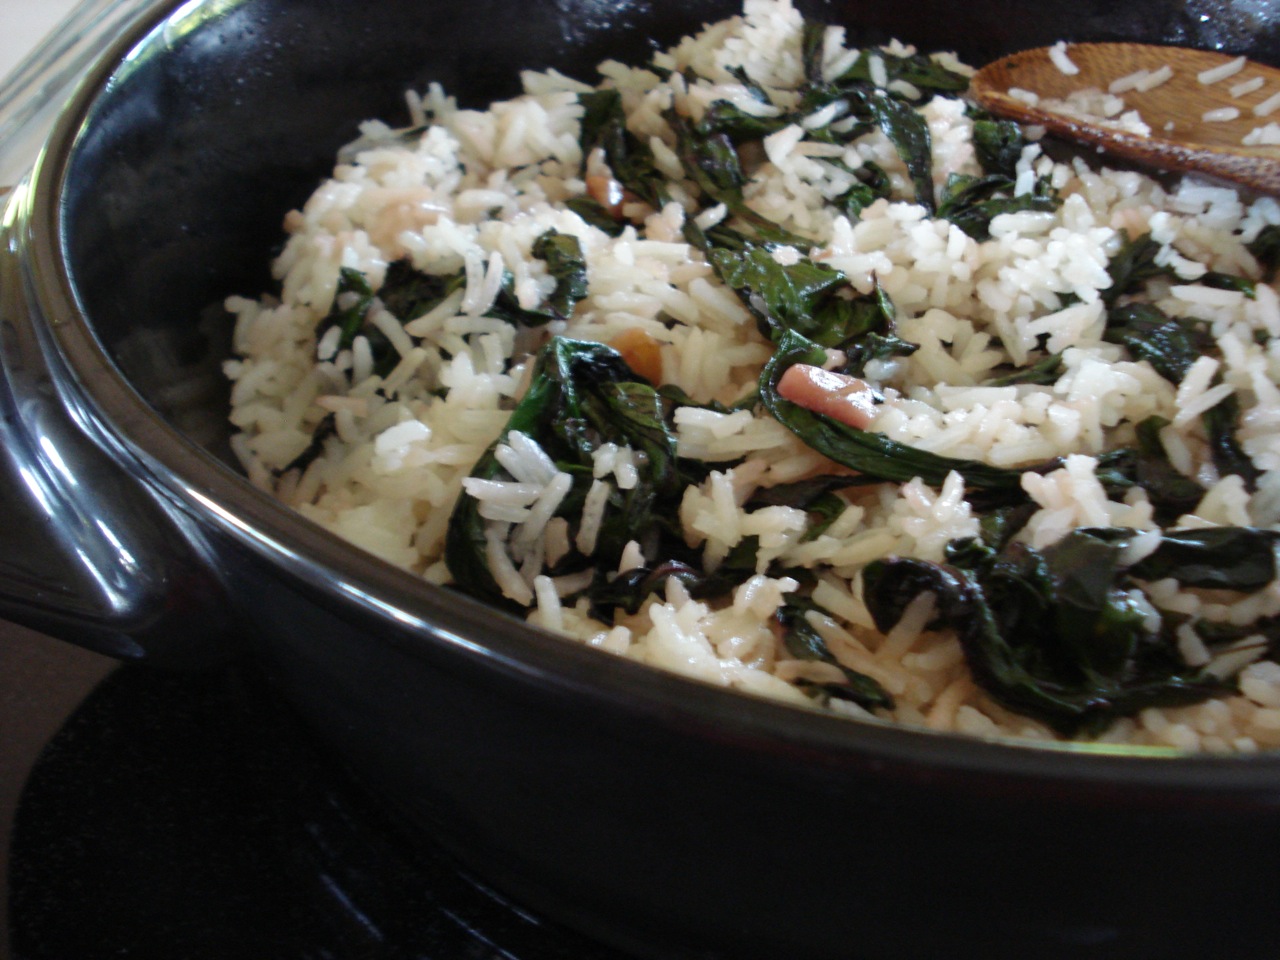

For the Rice:
1 cup dry basmati rice (or your favorite / whatever you have on hand)
1 & 1/2 cups water (or appropriate amount depending on type of rice used)
1 TBSP butter, ghee, or coconut oil
1/2 tsp pure salt
- Combine rice, water, ghee and salt in a small pot and bring to a boil.
- Stir once to dislodge any rice stuck to the bottom of the pot.
- Reduce heat to low and cook for the appropriate amount of time depending on the type of rice used.
For the Greens:
1 TBSP butter, ghee, or coconut oil
2 – 4 garlic cloves, roughly chopped
6 oz greens washed and roughly chopped
pure salt and freshly ground black pepper to taste
- While rice is cooking, prep greens (or grab a bag of your pre-washed & chopped greens).
- Melt ghee in saute pan and cook garlic for 2 mins until just beginning to color.
- Add greens, sprinkle in some salt and pepper, and cook until done to your liking.
- When rice is cooked, add it to the pan with greens and toss to combine.
Serves 3 – 4 as a side dish.
_________________________________________________________________________
SIDE NOTES:
~ A side of rice on its own and a side of greens on its own is not nearly as exciting as mixing them together.
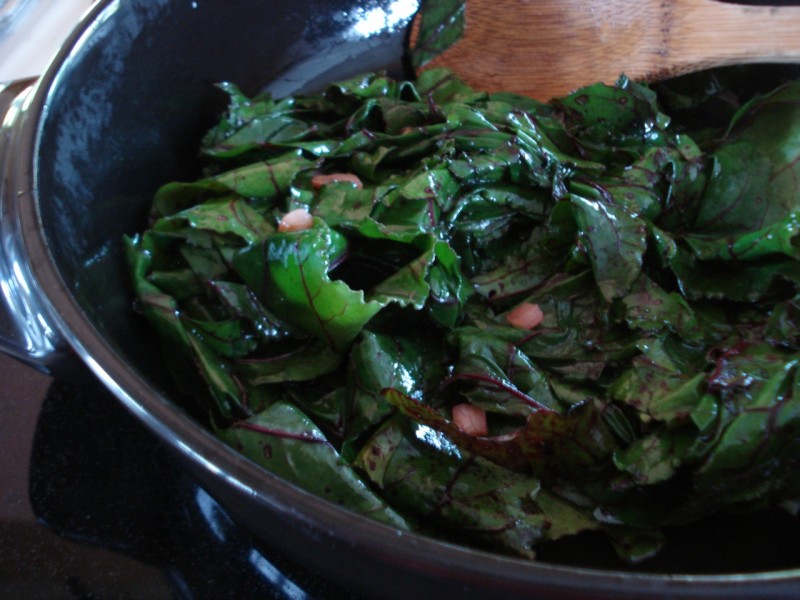
~ This time, I used beet greens (shown below).
Bison Burgers

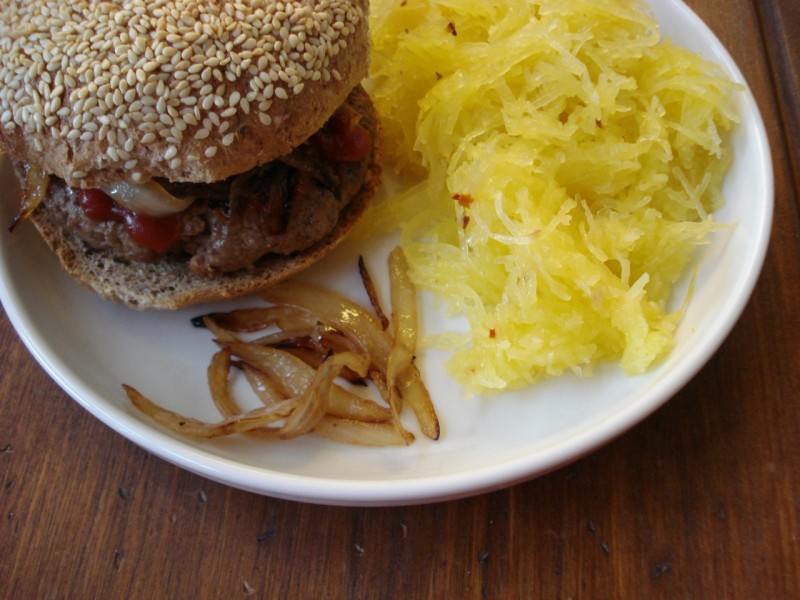
1 small egg
1 tsp dijon mustard
1 tsp worcestershire sauce
1/4 tsp black pepper
1/8 tsp pure salt
3 TBSP freshly grated parmesan cheese
1 lb pastured ground bison
- Lightly beat the egg in a large bowl.
- Add everything else and use your hands to combine well.
- Form into four patties.
- Pan grill several minutes on each side until done to your liking.
_________________________________________________________________________________
SIDE NOTES:
~ I’ve tried a few variations of bison burgers. This is the one we tend to gravitate toward & like the best.
~ Simply omit the cheese if you don’t do dairy.
~ Shown here smothered in grilled onions and with a side of spicy-sauteed-spaghetti-squash.
Enjoy!
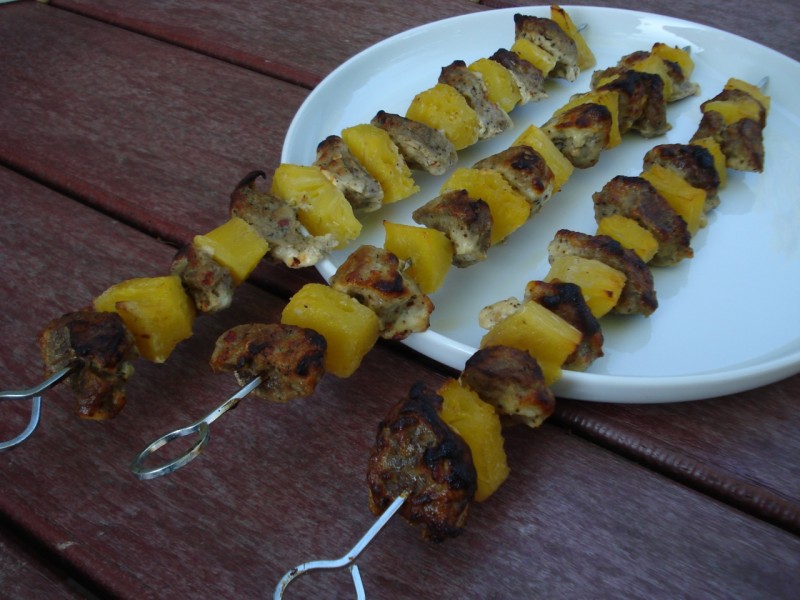
Lamb & Pineapple Kabobs

For the Kabobs:
1 & 1/2 lbs boneless lamb (shoulder or sirloin chops, or leg of lamb)
2 cans pineapple cubes
For the Marinade:
1 cup plain yogurt
3 garlic cloves crushed or minced
1/4 cup melted coconut oil
1/2 tsp pure salt
1 tsp ground black pepper
1 tsp red pepper flakes
8 – 24 hours in advance:
- Cut the lamb into bite sized cubes and place in an 8 x 8 glass pyrex (or similar sized bowl).
- Whisk all marinade ingredients together and pour over the lamb, tossing until well combined.
- Cover and marinate in the refrigerator for 8 hours or overnight.
When you’re ready to cook:
- Preheat oven to 400 degrees.
- Thread the meat and pineapple onto skewers and lay them on a parchment covered cookie sheet.
- Bake 30 – 40 minutes (until done to your liking) turning the kabobs once halfway through.
Serves 4.
_________________________________________________________________________
SIDE NOTES:
~ You can serve these kabobs with a dollop of plain yogurt on the side for dipping if you’d like (we liked).
~ Of course, you can add any number of vegetables to the kabobs as well — cherry tomatoes, zucchini, onions, bell pepper, mushrooms, (etc) which would eliminate the need for a side dish.
~ I did have a 4th kabob, but omitted it for the photo because it was all meat, as I ran out of pineapple and it didn’t look as pretty (I thought the one can I had on hand would be enough).
We were all enamored by these kabobs — extremely delish and very easy to make. Hope you enjoy them too!
Dairy Free, Gluten Free, Egg Free, Nut Free, Sugar Free, If eating dairy free, use a non-dairy yogurt.Vegan, Grain Free, Raw
Storing Greens for Ease
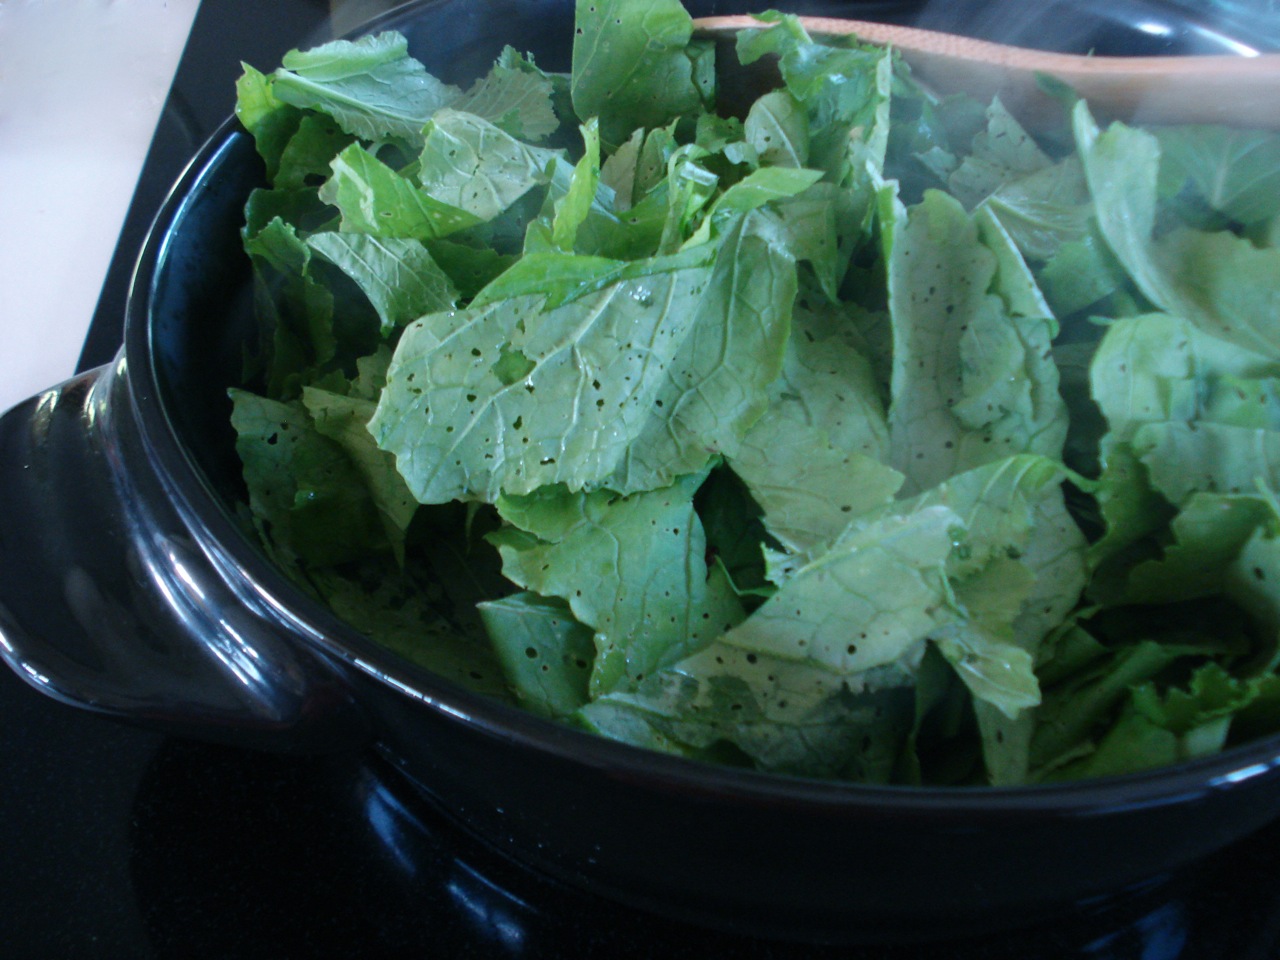
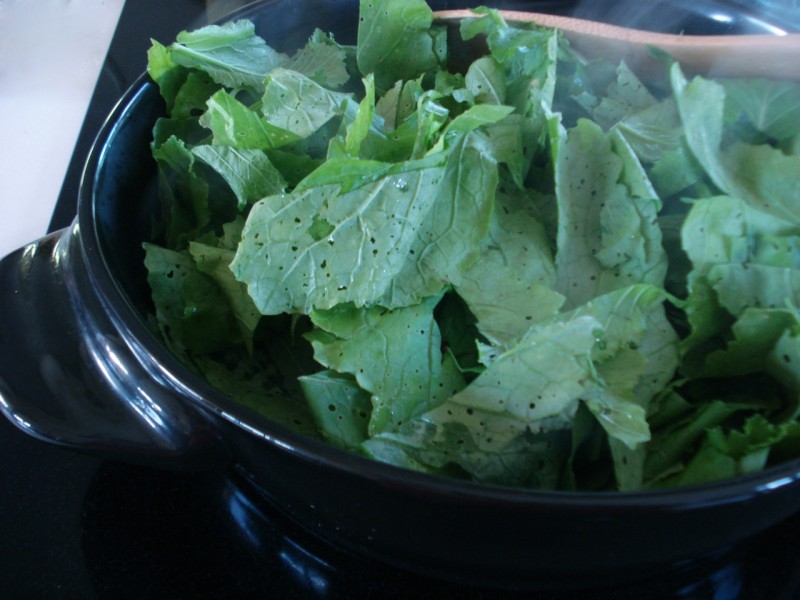
I’m not always in the mood (or don’t always have the time) to wash, stem, and chop greens on the fly. For busy days, a home cooked dinner can only happen if I have a few things on hand that I can grab and just toss into a pan.
When I came home from the farmer’s market last week with 2 beautiful bunches of fresh kale and 2 bunches of beets (w/ greens attached), this is what I did to make life easy for the rest of the week….
______________________________________________________________________________
I removed the stems (simply lay each leaf down with the stem facing right & the leaves facing left to do this with one easy slice).

Then I used my hands to roughly tear up the leaves and tossed them into a large, over-the-sink-colander. After rinsing the leaves thoroughly in cool water, I spun them in a salad spinner to remove most of the water (you can also gently pat them down with a clean towel or paper towels).
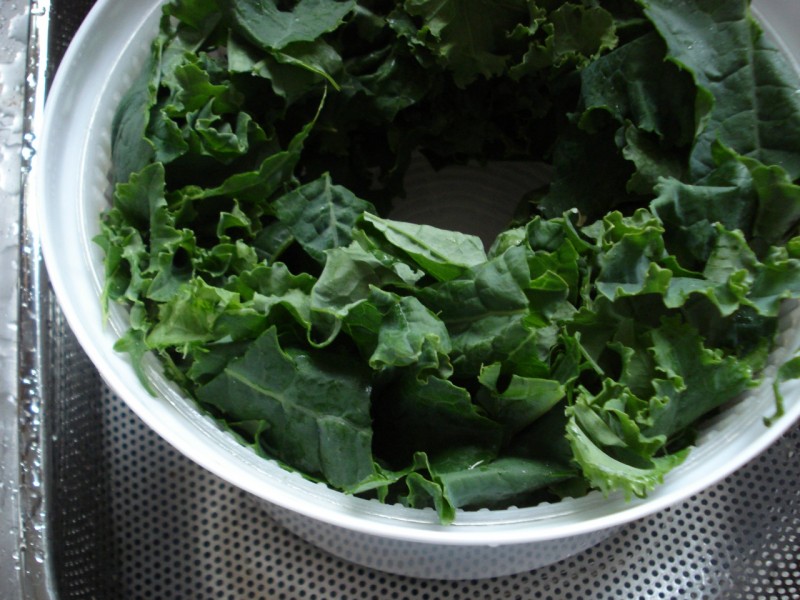
I then lined a gallon sized storage bag with paper towels (use 2 paper towels – still attached to each other).
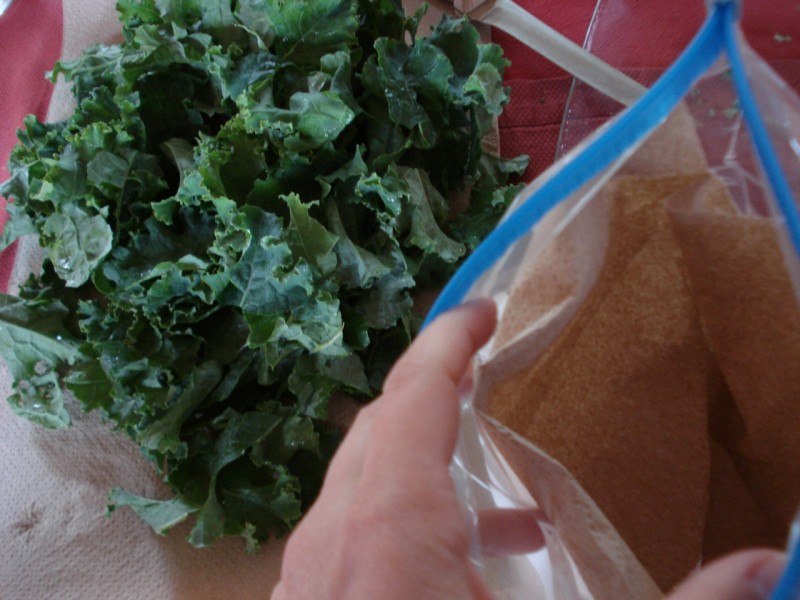
And then, of course, I placed the leaves in the bag for easy use throughout the week.
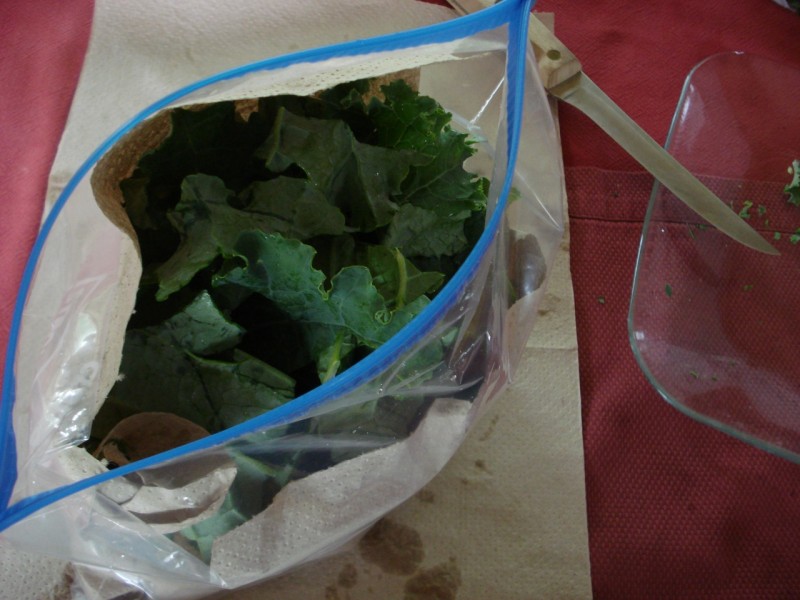
1 large bunch of kale will yield roughly two 6 oz bags of greens, so including my beet greens, I ended up with 5 bags of greens — stemmed, chopped, washed, dried, and ready to go.
______________________________________________________________________________
A few ways I’ve recently used my “just toss ’em in a pan” greens…..
- Roasted bone-in/skin-on chicken breasts and legs with balsamic-roasted-beets and sautéed beet greens w/ garlic
- Lamb stew with vegetables – including kale (I’ll be posting this recipe soon)
- Peppers-onions-kale-&-eggs (I simply used sautéed kale & garlic in place of the lamb sausage that I originally suggested in my recipe). Of course, all of my recipes can be altered any way you’d like — depending on what you have on hand and what you’re in the mood for…
- Simple-stovetop-chicken-breast with a side of buttery-rice-w-greens
- Potatoes-greens-rosemary-&-garlic (shown below)

Sausage, Peppers, & Eggs
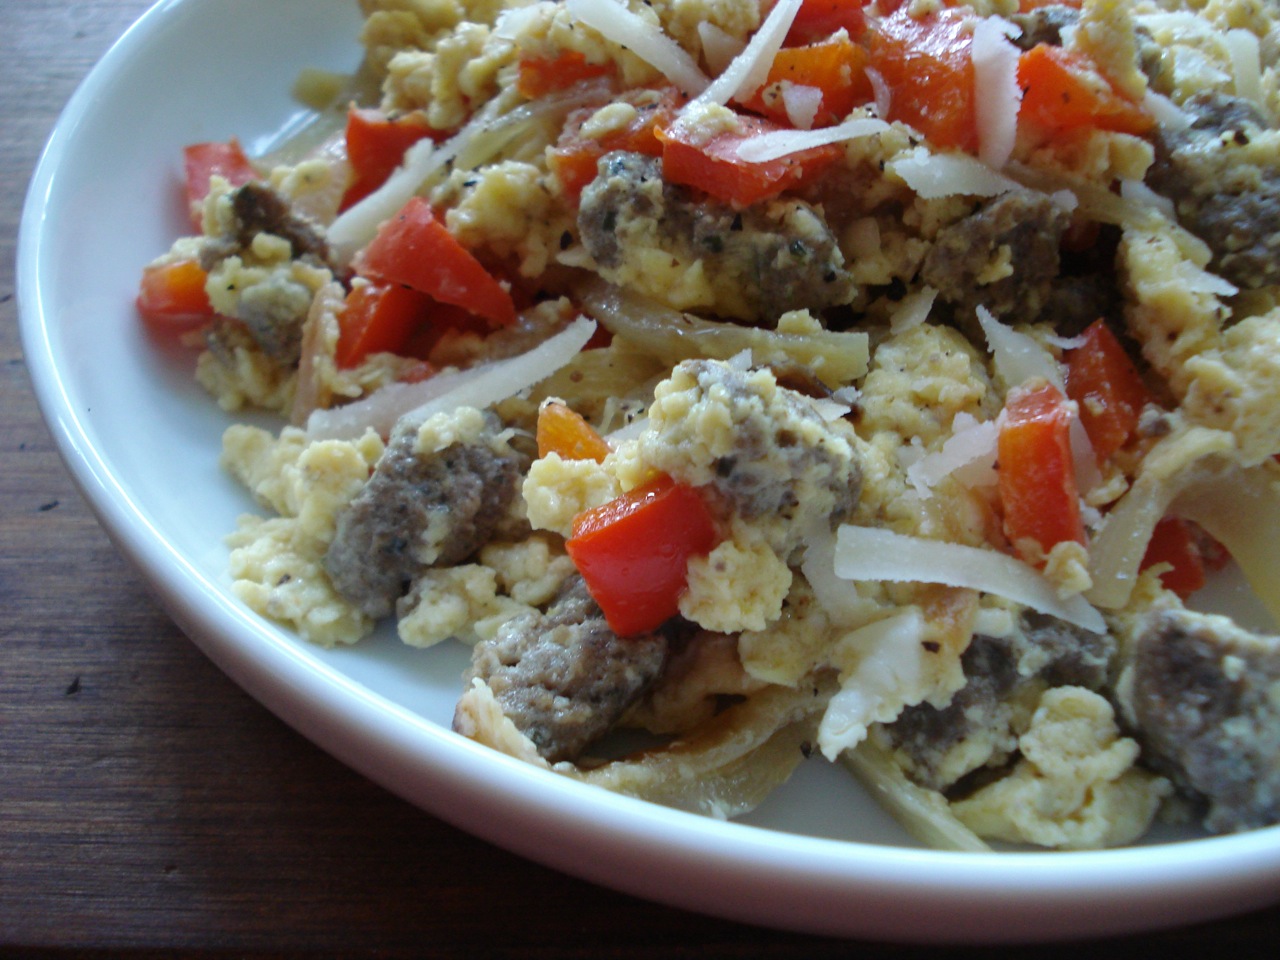

2 TBSP butter, ghee, or coconut oil
approx 12 oz high quality lamb sausage, removed from casing
1 medium onion, thinly sliced
1 bell pepper, diced
pure salt and pepper to taste
6 pastured eggs
freshly grated parmesan cheese (optional)
- Heat the butter or oil in a large skillet over medium heat.
- Add the sausage, and using a wooden spoon, break it apart in the pan as it cooks until it’s browned (about 4 minutes).
- Add the onion, bell pepper, salt and freshly ground black pepper to taste.
- Stir to combine, then cover the pan until the vegetables are softened, about 10 mins.
- Beat eggs in a separate bowl and sprinkle in a little salt and pepper.
- When vegetables are soft, pour the eggs into the skillet and scramble for a few minutes until cooked through.
- Serve immediately with some cheese over the top if desired.
Serves 3.
_________________________________________________________________________
SIDE NOTES
~ We had this for dinner last night, but of course, it can be breakfast, brunch, or lunch just as easily.
Enjoy!
Dairy Free, Gluten Free, Egg Free, Nut Free, Sugar Free, Grain Free, Vegan, Raw
If eating dairy free, use coconut oil instead of butter and omit the parmesan cheese.