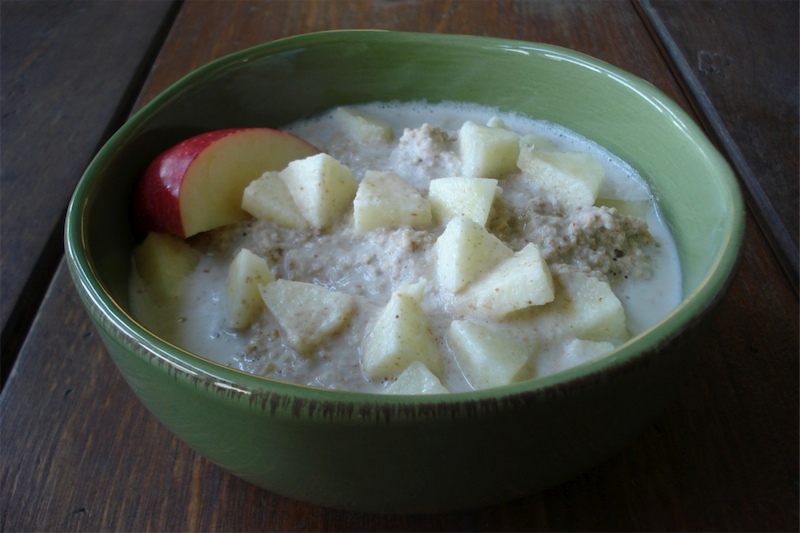
Summertime Oatmeal

1 & 1/2 cups whole oat groats or steel cut oats, soaked
1/2 apple, peeled & chopped
2 TBSP pure maple syrup (or liquid stevia to taste)
2 TBSP water
1/2 tsp cinnamon
1/2 tsp pure vanilla extract
1/4 tsp pure salt
1/2 cup milk of choice
extra chopped apple (optional)
raisins (optional)
- Soak oats in water overnight (8 – 12 hours).
- In the morning, drain oats & add the first 7 ingredients to a food processor (down to & including the salt).
- Process until smooth (or smooth-ish), stopping occasionally to scrape down the sides of work bowl.
- Serve with milk, extra chopped apple & raisins if using.
Serves 3.
________________________________________________________________________
SIDE NOTES:
~ Adapted from “Raw Food Made Easy.”
~ This is like apple pie for breakfast! So easy & good.
~ FYI – most oats are not raw, as they’re either toasted, roasted, and/or steamed after harvest to extend shelf life. That said, they’re still quite nutritious with lots of fiber, vitamins, and minerals. However, if you prefer truly raw oats, here are 3 sources I know of: www.cayugapureorganics.com/oatgroats
www.sproutpeople.org/seeds/oats
www.sprouthouse.com/Oat_Groats_RAW
~ If using whole oat groats (as opposed to steel cut), you may need a double soak if the consistency turns out too chewy for you (the groats may need more soak time to soften enough for your taste preference). In this case, soak for 8 – 12 hours, drain, add fresh water & soak for an additional 8 – 12 hours. For instance, if you’re planning to have this on Sunday morning, place the groats in water anywhere between 8 am & noon on Saturday. At about 8 pm Saturday night, drain, add fresh water & let soak overnight. In the morning, drain & continue w/ the recipe.
~ Use about double or triple the amount of water (compared to oats). You’ll need one of those fine mesh strainers to drain the oats or they’ll slip through the holes in a regular colander.
~ If using liquid stevia, don’t combine it with the other ingredients. Once you serve the oatmeal, each individual can stir in as many drops as they want (about 6 drops per serving should do it).
Dairy Free, Gluten Free, Egg Free, Nut Free, Sugar Free, Vegan, Raw, Grain Free
If eating dairy free, use coconut milk or another non-dairy option. If eating gluten free, use certified gluten free oats and choose your vanilla carefully. If eating strictly raw, be sure to use truly raw oat groats, whole vanilla bean, some type of raw milk, and raw honey instead of maple syrup. If avoiding sugar, use stevia or lakanto as the sweetener.
Hot Breakfast Quinoa


1 cup quinoa
2 cups water
pure salt (about 1/2 tsp)
1/2 cup of either chopped apples/pears/dates/almonds/raisins (optional)
milk of choice
drizzle of maple syrup (or mix in a few drops of liquid stevia)
sprinkle of cinnamon
a few pinches of toasted, shredded, (unsweetened) coconut
- Rinse quinoa in a fine mesh strainer & drain.
- Place the quinoa in a saucepan over high heat, add the water & salt & bring to a boil.
- Reduce heat & simmer covered for 5 mins.
- Add whatever fruit you desire, & continue to simmer until all the water is absorbed (15 mins, give or take a few).
- Add milk, cinnamon, toasted coconut shreds & a drizzle of maple syrup.
________________________________________________________________________
SIDE NOTES:
~ From “Grains for Better Health”
~ We like this with chopped apples (I remove the skin & chop into very small pieces)
~ I keep shredded coconut in a mason jar in the freezer. To toast, just put some in a dry skillet & toast for a few minutes over medium-low heat. The coconut may seem like a garnish, but it’s the favorite ingredient for all 4 of us. I don’t recommend skipping it!!
Dairy Free, Gluten Free, Egg Free, Nut Free, Sugar Free, Vegan, If eating dairy free, use coconut milk or other non-dairy option. If avoiding sugar, use stevia instead of maple syrup.Grain Free, Raw
Cinnamon Pear Smoothie
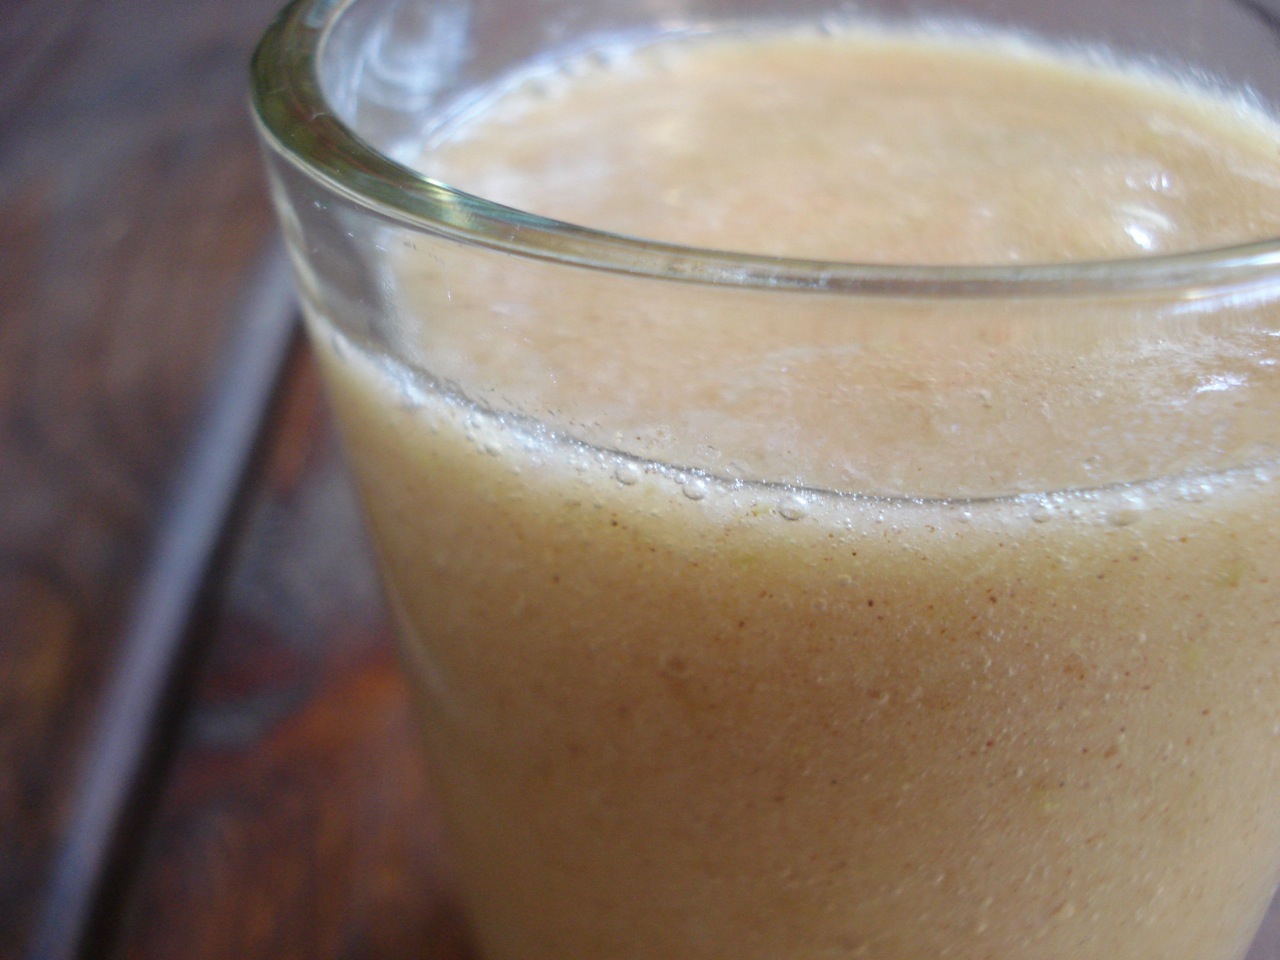

2 pears, cored, peeled & roughly chopped
1/2 cup orange juice (freshly squeezed is best!)
1 tsp cinnamon
- Blend in blender.
Yields approx 16 ounces.
________________________________________________________________________
SIDE NOTES:
~ This smoothie is sooooo good & sooooo easy.
~ If you have a vitamix, you don’t need to peel the pears. If you’re thinking about purchasing one, feel free to use my distributor code 06-004158 for free shipping (and I get credit for the referral – Thx!)
~ Although there’s no added sugar, this recipe contains lots of natural sugar (via the orange juice).
Dairy Free, Gluten Free, Egg Free, Nut Free, Sugar Free, Grain Free, Vegan, Raw Keep in mind, if eating raw, you need to use freshly squeezed OJ.
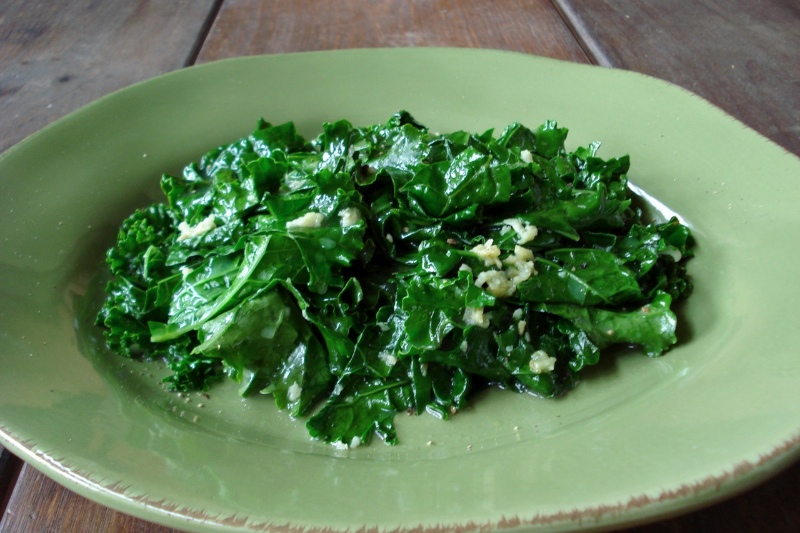
Garlicky Greens

2 or 3 TBSP coconut oil, butter, or ghee
2 large garlic cloves, crushed or minced
1/8 tsp ginger powder (optional)
1/8 tsp pure salt
1 large bunch of greens, stems removed & roughly chopped
freshly ground black pepper
lemon wedges for serving (optional)
- Heat the ghee in a large saute pan over medium heat.
- Add the garlic, ginger (if using) & salt and saute 1 – 2 mins (try not to let the garlic brown).
- Add the greens & saute until cooked to your liking.
- Remove from pan, add black pepper & squeeze lemon over the top if desired.
______________________________________________________________________________________
SIDE NOTES:
~ VERY EASY basic recipe but SOOOO GOOD. Any type of greens can be used but I typically use kale, beet greens, or turnip greens).
~ As a side dish, this is great on its own or tossed with a cooked grain.
Dairy Free, Gluten Free, Egg Free, Nut Free, Sugar Free, Grain Free, Vegan, RawIf eating dairy free, use coconut oil instead of butter.
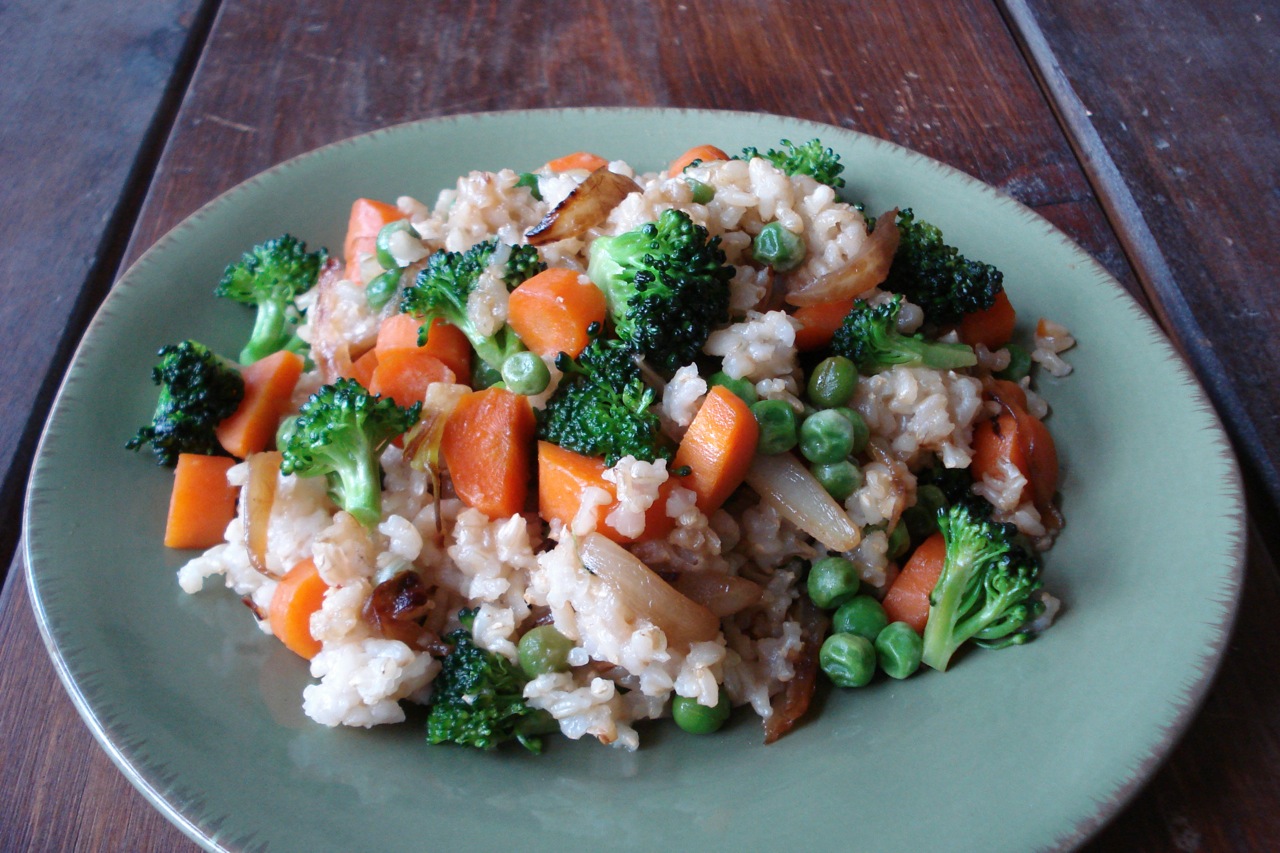
Vegetable Fried Rice

coconut oil, butter, or ghee
1 medium onion, diced
3 medium carrots, diced
3/4 cup frozen peas (if you think of it ahead of time, let them thaw)
1 small head of broccoli, chopped into small florets
2 cups cooked brown rice
2 TBSP tamari/soy sauce
a few scrambled eggs, coarsely chopped (optional)
pure salt & pepper to taste
- If not using left over rice, get that going first (1 cup dry makes 2 cups cooked).
- Heat oil in a large skillet & saute onions a few mins until softened.
- Add carrots & cook another few mins until softened.
- Add broccoli and saute a few mins more.
- Finally, add peas and tamari & cook until peas are heated through (will take a few mins longer if they’re straight out of the freezer).
- Meanwhile, scramble a few eggs in a separate skillet if using.
- Stir in cooked rice (and chopped egg if using), and season with salt & pepper.
______________________________________________________________________________________
SIDE NOTES:
~ This is a great way to use up left-over rice. Even though fried rice is commonly served as a side dish at Chinese restaurants, we find it perfectly acceptable (and delicious/easy) as a one dish meal. You’ve got whole grain, veggies, legume, and egg. Works for us.
~ If you’re missing one of the veggies, that’s fine – just use whatever you have in the fridge.
Dairy Free, Gluten Free, Egg Free, Nut Free, Sugar Free, Grain Free, Vegan, RawIf eating gluten free, be sure to use a gluten free tamari. Of course, omit the egg if necessary.
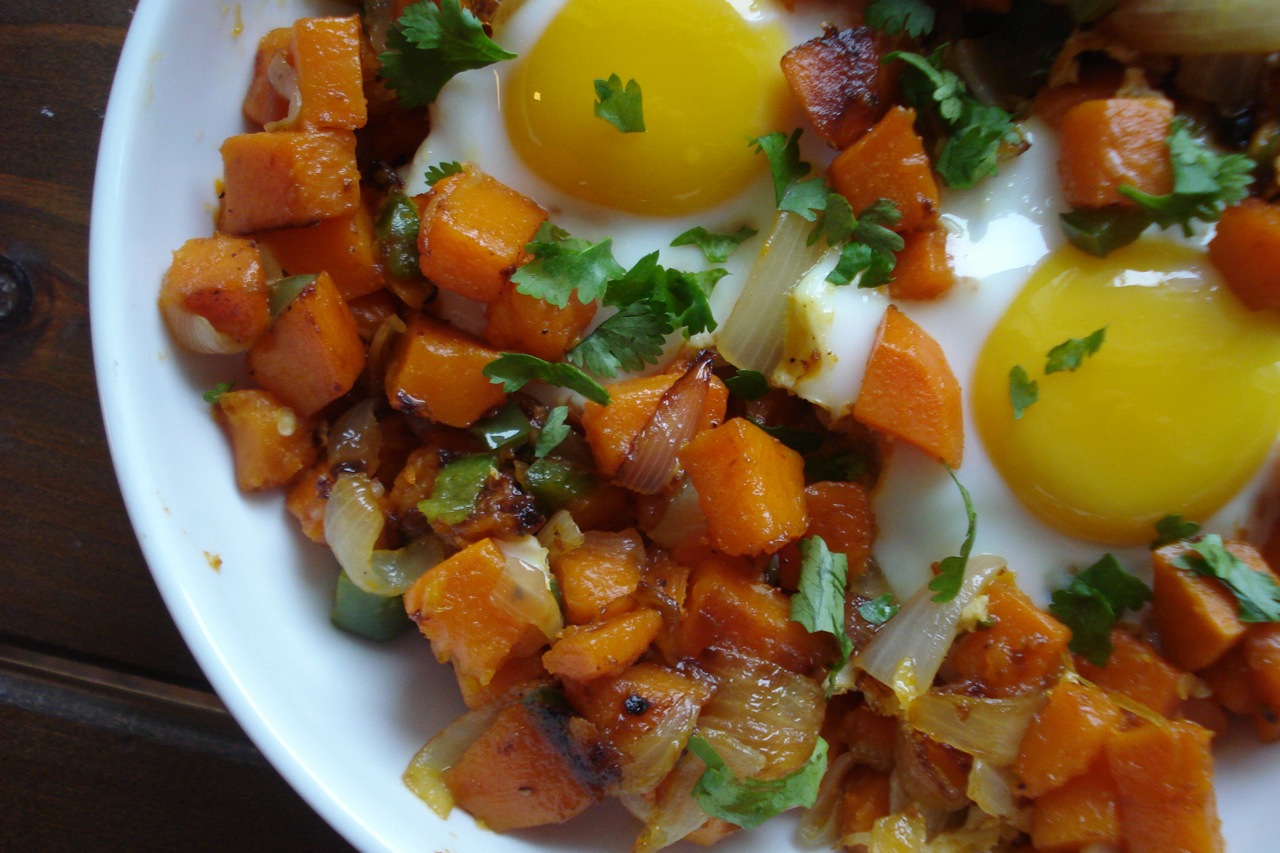
Spicy Sweet Potato Hash w/ Eggs

3 TBSP coconut oil (or oil of preference)
2 large sweet potatoes, peeled & cut into small dice (about 3 cups)
1 onion, chopped (between 1 and 1.5 cups)
1 garlic clove, minced
1 jalapeno pepper, minced (with seeds) (less if you like it milder)
4 eggs
pure salt to taste
freshly ground black pepper (optional)
minced cilantro (optional)
- Preheat oven to 400.
- Heat oil in a large oven-proof skillet over medium heat.
- Add potatoes & onions & cook about 10 mins (or until potatoes are tender & cooked to your liking).
- Add garlic, jalapeno, a few shakes of salt, & cook just 1 to 2 minutes longer.
- Break eggs directly over potatoes (but not on top of one another). Place pan in the oven and bake 10 – 12 minutes.
- Remove, and garnish with black pepper & cilantro if using.
Yields 2 generous servings.
________________________________________________________________________
SIDE NOTES:
~ This is a family favorite, and my son actually ranks it higher than pizza. It’s his absolute favorite, # 1 meal.
~ Some jalapenos are spicier than others. You can have a big one that’s surprisingly mild, or a tiny one that looks so cute & innocent, but ends up being killer. Once you start chopping it, take notice if your eyes or nostrils start to burn from the aroma – indicating it’s a hot one! Then add as much as you want according to your taste preference.
~ Most stainless steel skillets are oven-proof, provided the handle is also stainless, but check with the manufacturer to be sure.
~ Be very careful after taking the skillet out of the oven. Of course, it’s common sense to use an oven mitt when removing anything from the oven. BUT…..once you place it on the stove top, don’t forget that the handle is scorching hot. Even though I tried to remind myself, I burnt my hand several times (at least the first 3 times I made this). It’s easy to place the hot skillet on the stove, carefully with an oven mitt, then remove the oven mitt, turn to do something else, come back to the pan to scoop the potato mixture onto plates, forget the handle is practically on fire, and grab it for leverage as you scoop (ouch). I recommend that you immediately drape a kitchen towel over the handle, or slide the oven mitt itself over the handle. I picked up one of these handy-dandy little things specifically for this purpose – http://www.amazon.com/Lodge-Temp-Handle-Mitt-Black/dp/B00063RWG6/ref=sr_1_1?ie=UTF8&s=home-garden&qid=1271514603&sr=8-1
Dairy Free, Gluten Free, Nut Free, Sugar Free, Grain Free, Vegan, Egg Free, Raw
Coconut Mufferoons
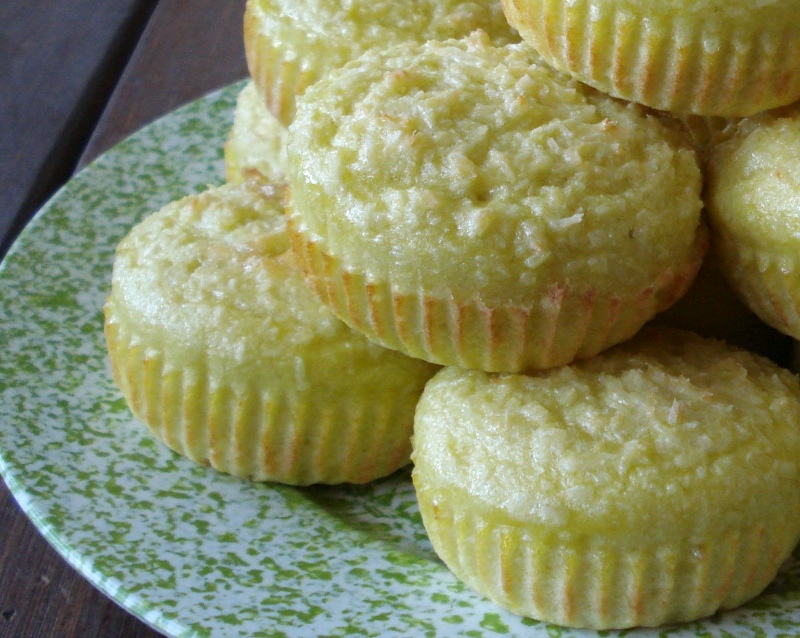

6 eggs
1/2 cup coconut milk (regular, not “lite”)
2 TBSP natural sugar, or 1/2 tsp liquid stevia**
1/2 tsp pure salt
1/2 cup coconut flour, sifted
1/2 tsp baking powder
1/2 cup (more or less) unsweetened shredded coconut
- Preheat oven to 400 degrees.
- Mix together eggs, coconut milk, sugar (or stevia), and salt.
- Combine coconut flour with baking powder & whisk into batter until there are no lumps (batter may be on the thin side – this is ok).
- Pour batter into 12 greased muffin cups (or simply line the cups with unbleached muffin paper).
- Sprinkle shredded coconut on top of each muffin.
- Bake for 15 mins.
______________________________________________________________________________________
SIDE NOTES:
~ These have become once a weekers for school snack over the past 6 months. Of course, if you’re not a coconut fan – don’t bother! Bruce Fife, author of “Cooking with Coconut Flour” calls them coconut milk muffins, but to us, they’re really a cross between a muffin & a macaroon, so I was compelled to rename them. Whatever you call them, they’re delicious – very light, fluffy & tasty (& ridiculously easy to make). They may not look like they’re done after 15 mins, but they are (they’re lighter in color than other muffins). Take them out of the muffin tray & cool on cooling rack. I store them in the freezer & just pull out as needed.
Dairy Free, Gluten Free, Egg Free, Nut Free, Sugar Free, Grain Free, Vegan, Raw
If eating sugar free use stevia.
~ Did you know that coconut flour is THEEE highest fiber flour you can eat. People mostly think of products like wheat bran and oat bran when thinking fiber. Coconut flour has more than double the fiber of either (coconut = 61%, wheat bran = 27%, oat bran = 16%). It’s also gluten free, much easier to digest than grain based flours, very low carb, and an additional plus is that unlike wheat/oat bran, coconut flour does not taste like saw dust. It’s good! Look for high quality, organic coconut products for the best health attributes.
Coconut Pancakes
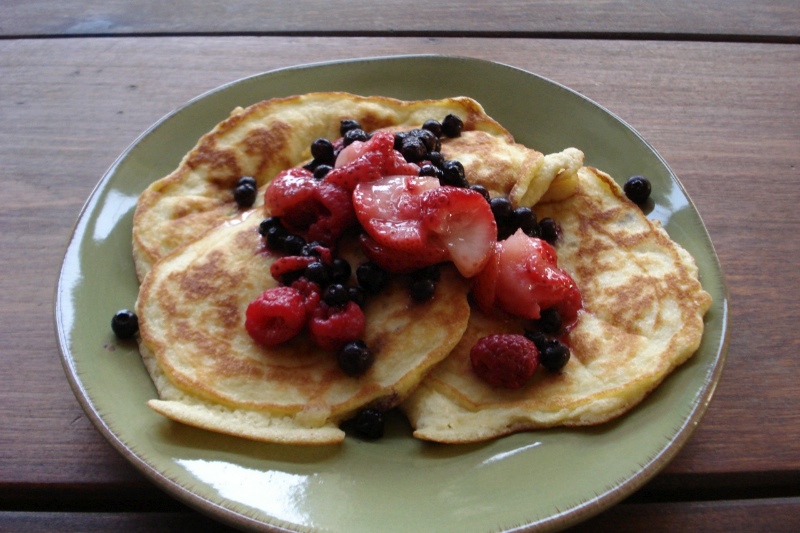

4 eggs
4 TBSP coconut oil (or butter, or ghee), melted
1/2 tsp pure vanilla extract
2/3 cup coconut milk
1/4 tsp pure salt
6 TBSP coconut flour, sifted
1/4 tsp baking powder
organic berries
- Mix together eggs, oil, vanilla, coconut milk & salt.
- Combine coconut flour w/ baking powder (I put them both into the sifter together), and whisk into wet ingredients until well combined (no lumps).
- Spoon batter onto either a dry hot, or lightly oiled skillet (depending on what kind of a pan you’re using) & cook for a few mins on each side.
Makes 8 to 10 crepe-like pancakes.
________________________________________________________________________
SIDE NOTES:
~ This is another recipe we have in regular rotation, adapted from “Cooking w/ Coconut Flour.” One of the things I like about this book is that you can bake gluten free without having to use a mixture of 3 or 4 different flours to make it work. Makes it simpler/faster to prep, less expensive, and more wholesome!
~ For those sensitive to guar gum (an additive often used in canned coconut milk), or just making an effort to avoid additives as much as possible……I use “Let’s Do Organic” brand creamed coconut to make my own coconut milk. It’s condensed, whole coconut, & comes in a small 7 oz box. I warm up 14 oz of water (get it hot, but not boiling), turn off heat, and add the entire contents of the box. Let sit for a little while & when the coconut is softened, whisk together. When refrigerating the extra milk, I use a glass mason jar. When ready to use next time, the milk will be separated and somewhat solidified. I simply let the mason jar sit in a bowl of hot water for a few minutes & then shake it or mix it up.
~ I mentioned a long time ago that I despise sifting & just don’t do it. However, I have been sifting since I started using coconut flour (has the tendency to be lumpy). Thought I’d mention that I really like the William Sonoma sifter. It’s pretty effortless to use, but what I like most about it is that it doesn’t have 3 separate layers of mesh that the flour is pushed through (instead – only one). I did not like the 3 layer system in my old sifter, as chunks of flour would get trapped between the layers & were impossible to get out. Who wants old flour lumps in the bottom of the sifter every time they go to use it – yuck.
~ Also, remember to look for ALUMINUM FREE baking powder. Rumford & Bob’s Red Mill are 2 brands that I know of. Or, you can easily make your own using 2 TBSP baking soda, 4 TBSP arrowroot flour & 4 TBSP cream of tarter (which is a white powder found w/ the spices @ your regular grocery store). Put ingredients through a sifter 4 or 5 times until thoroughly combined, then store in a small glass jar in a cool, dry space. Again, this is for people allergic to or avoiding additives.
~ It’s difficult to get organic berries year round (especially at a decent price). I use organic frozen berries when I can’t get fresh, (and in fact sometimes prefer them, as the fresh ones are sometimes already old, mushy & growing mold by the time they appear at the store). If I know I’ll be using them with the next day’s breakfast, I take out what I need the night before, put them in a small bowl w/ lid & place in refrigerator over night. By morning, they are perfectly thawed. If you’re not in a rush in the morning, you can just take them out of the freezer in the a.m. & let sit on the counter for 30 – 60 mins.
Dairy Free, Gluten Free, Nut Free, Sugar Free, Grain Free Vegan, Egg Free, Raw
If eating gluten free, careful with your choice of vanilla.
Almond Butter
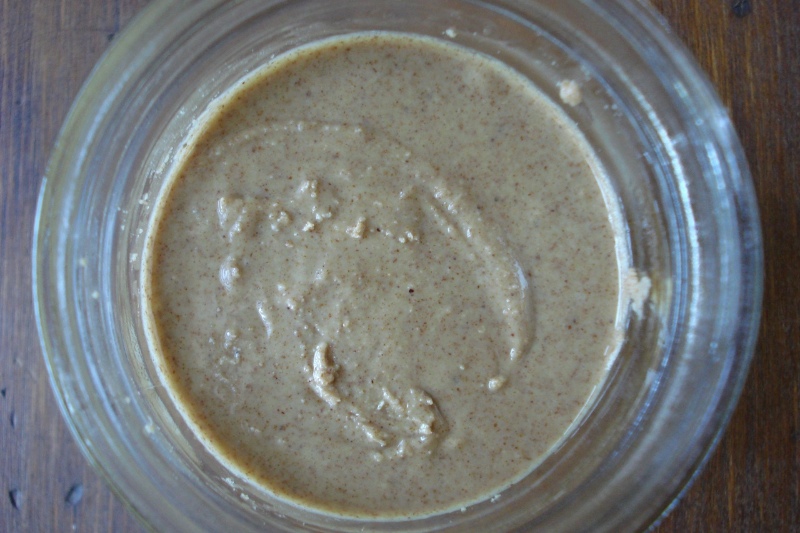

3 cups of almonds
vitamix blender
- Pour almonds into vitamix, turn machine on, quickly turn dial to 10 and flip to high-speed.
- Use the tamper to continually push the almonds into the blade area as it’s running.
- Blend until you’ve got butter. (Takes roughly 2 to 3 mins – Will first turn powdery, then creamy.)
If necessary, see demonstration video posted below….
______________________________________________________________________________________
SIDE NOTES:
This is the way we like it, but you can add anything you want, such as sea salt, honey, maple syrup, cinnamon, coconut oil….etc.
I make this once a week, usually on monday mornings & feel like wonder-woman as I pack up the kids lunch (even though all I did was dump some almonds in a blender & flip the switch) =)
Try freshly ground almond butter on a sandwich with sliced apples and a sprinkle of cinnamon and/or toasted sesame seeds. So good!
You can of course experiment using any type of nut/seed (or any combination) to make a creamy butter.
Dairy Free, Gluten Free, Egg Free, If on a strictly raw diet – use truly raw, unpasteurized (preferably germinated) nuts and careful that they don’t heat up as you’re blending. In my experience, it’s very difficult to keep this recipe raw, as the machine has to run so long to create almond butter – all the while heating up the contents as it’s running. It can be done though if you stop the blender often throughout the process so that it doesn’t heat up very much. Good luck!Nut Free, Sugar Free, Vegan, Grain Free, Raw
Hope the following demonstration video is helpful. It was spur of the moment, and I didn’t realize until after the fact about the *belly thing* So sorry about that, but I don’t have time to re-do things to perfection. I was still wearing my jammy t-shirt & it was quite comfy! For video #2, I’ll try to remember to grab a look in the mirror first =)
Please make note: For safety reasons, it’s important to completely remove the blending carafe from the base of your blender before reaching in to scoop out food. I inadvertently forgot to do this in the video. You wouldn’t want your hand anywhere near the blade in the event of a malfunction or an inadvertent flip of the switch. This safety rule applies to any type of blender or food processor. The place my Vitamix normally sits for daily use is on a counter that’s higher (than the table in the video) with a cabinet right above it, which makes it impossible for me to dip into without first removing the carafe from the base. So in daily practice, I always remove the carafe from the base when blending is complete which is what I recommend you do as well.
______________________________________________________________________________________
A FEW EXTRA HINTS on successful almond buttering:
~ USE SLIGHTLY WARM ALMONDS. This helps to get the right consistency. I’ve tried it before with almonds straight out of the freezer & it didn’t work out. (Too bad it took me about 3 or 4 tries to figure out it was because the almonds were cold – Argh)
~ IF USING PASTEURIZED ALMONDS, you can roast them prior to making into tasty butter by placing them on a cookie sheet for about 10 – 12 mins at 350. Let sit out to cool until they’re just warm to the touch before blending. (FYI – Almost all almonds are pasteurized these days – you’d have to go out of your way to get truly raw, unpasteurized almonds – so just assume any almonds you buy at the grocery store or health food store are pasteurized unless clearly stated otherwise. In fact, even if it says “raw almonds”, or “raw almond butter”, it’s not actually raw unless it uses both words *raw* & *unpasteurized*).
~ I USE GERMINATED ALMONDS (unpasteurized almonds that were soaked overnight & dehydrated). I won’t go into the reasoning behind this now, but feel free to research the topic if interested. In any case, you need a dehydrator to do this at home (mine is an Excalibur), and you need to make sure the almonds are BONE DRY through & through before trying to make into butter – as any hint of moisture will mess things up (Dry at lowest temperature setting for 2 days minimum, and up to 5 days). For those who are interested, but don’t want to bother soaking & drying themselves, you can purchase pre-germinated, dried almonds from a few companies online. livingnutz.com is where I go for my nutty needs. ***MAKE NOTE *** Many people have commented that using germinated almonds is the key to success. If you can’t get this recipe to work using raw or roasted almonds, give it a try with germinated before giving up.
~ If you do use pre-germinated almonds, I don’t recommend roasting them before making into butter (lends to a burnt taste that we don’t like very much). Warm them up for just a few minutes on the lowest temperature setting in the oven. Or – if you have a dehydrator, heat them up for about 10 mins at 100 degrees, then add directly to blender.
~ As I’ve mentioned before, these details might be boring to some, but I only share them because I’ve made many mistakes in the beginning while experimenting, and know how frustrating it can be to waste time, energy, money & end up dumping a pile of dusty paste into the garbage. I hope your first batch comes out perfect! =)
~ If you’re looking to purchase truly raw, almond butter, the only 2 brands out there are Artisana & International Harvest. Unfortunately, you have to be a food detective to know these things, as it’s perfectly legal for companies to label almonds “raw” when they’re not (after the pasteurization process, they’re no longer raw). What the companies mean by “raw” in this instance is “unroasted”, and that would be a more accurate term to use on their labels. The following companies sell almond butter incorrectly labeled raw…..Marathana, Tree of Life, Once Again, and Woodstock Farms. I don’t mean to imply that these brands of almond butter aren’t good, or healthy. I’m just noting that they’re not raw, as I think people have the right to know what they’re purchasing.
______________________________________________________________________________________
MACHINERY INFO: THE VITAMIX
~ I’ve heard you can use a food processor to make almond butter. I tried this with several batches a few years ago, and just couldn’t get the almonds to turn into butter – was more like that powdery paste mentioned above. If you do want to try it with a food processor, you’ll have to let the machine run something like 15 or more minutes for a fair chance. Hopefully, you have better luck than me – some people on the internet seem to be able to make it work.
~ YOU DO NOT NEED A VITAMIX for “regular” day-to-day blending. However, if you make any of the following (or would like to), the vitamix is indispensible….
~ Makes nut & seed milks really easily without leaving any pulp to strain (1 – 2 mins)
~ Makes nut butters really easily without the need to add any oil (less than 2 mins for almond butter)
~ Makes ice cream really easily (1 min)
~ Makes fresh, homemade flours really easily (1 min) (need a separate “dry mix” carafe)
~ Makes the most delicious, raw, applesauce (about 1 min)
~ Blends all sorts of small seeds completely smooth into smoothies (can’t even detect raspberry seeds)
Maybe if you talked to another vitamix owner, they’d have a different list of things they use it for, but this condensed list is the summary of my love affair with a machine. If you’re not intending to make these sorts of recipes, don’t buy a vitamix. However, if this type of stuff happens to float your boat – feel free to use my distributor code to receive free shipping when ordering (& I get credit for the referral – thx!). 06-004158