Italian Chickpea Stew
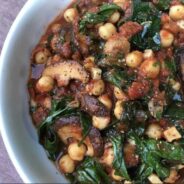
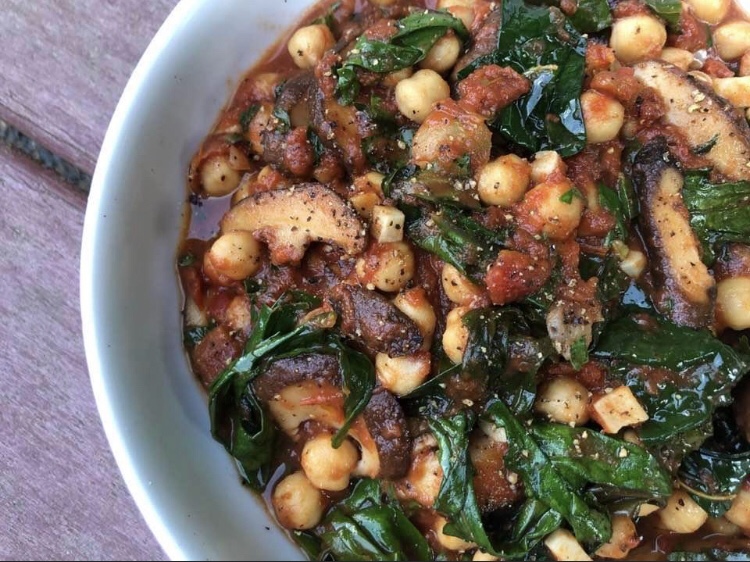
2 TBSP [real] butter
7 oz shiitake mushroom, chopped (give or take), or mushroom of choice
8 cloves of garlic, chopped into chunks
1/2 tsp crushed red pepper
1 dollop of chopped, jarred, sun-dried tomatoes
28 oz can [or box] chopped or crushed tomatoes
2 cans of chickpeas, rinsed & drained
1 bunch of kale (or greens of choice), about 12 large leaves
Fresh basil (large handful), chopped
Generous drizzle of extra virgin olive oil
Salt & pepper to taste
- Melt butter in a stock pot over medium heat and sauté chopped mushrooms until cooked down a bit (about 5 mins)
- Add chopped garlic, a spoonful of sun-dried tomatoes, and crushed red pepper; sauté for 2 minutes longer
- Add crushed tomatoes and chickpeas, and once everything warms, let simmer about 15 minutes
- Toss in chopped greens and basil and stir until just wilted
- Add a few swirls of high quality EVOO
- Season to taste with salt and pepper
Serves 2-4, depending on portion size.
__________________________________________________________________________________________
SIDE NOTES:
~ I made this one up when I was in the mood for something sauce-y, but didn’t want pasta.
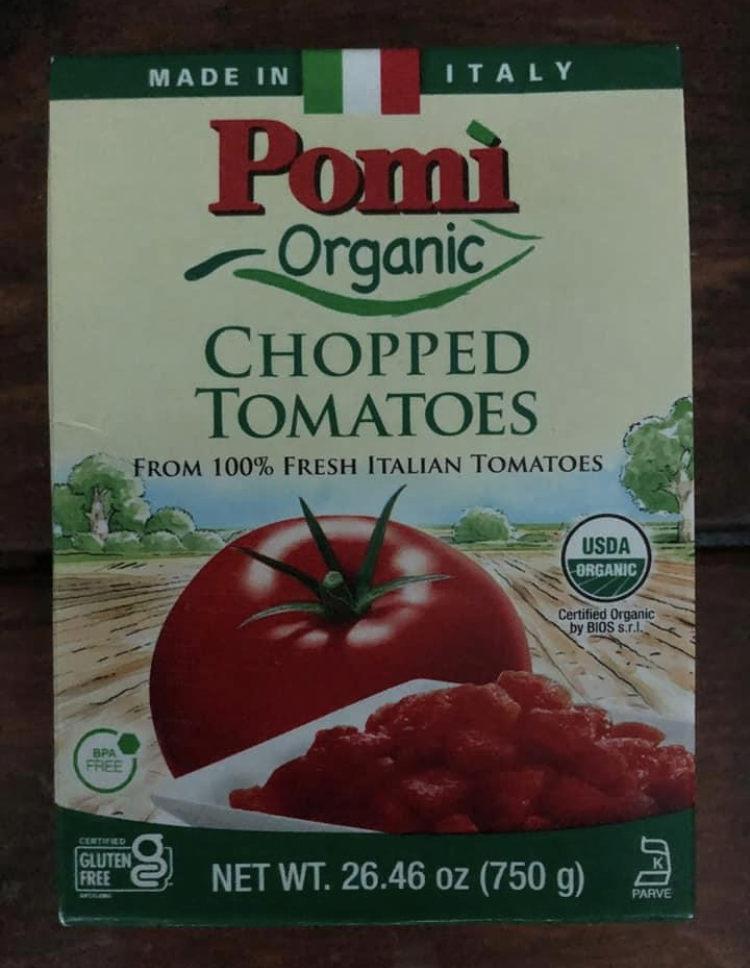
~ My favorite brand of “canned” tomatoes doesn’t come in a can (tomatoes and metal aren’t the best combination). And there’s only 1 ingredient <3
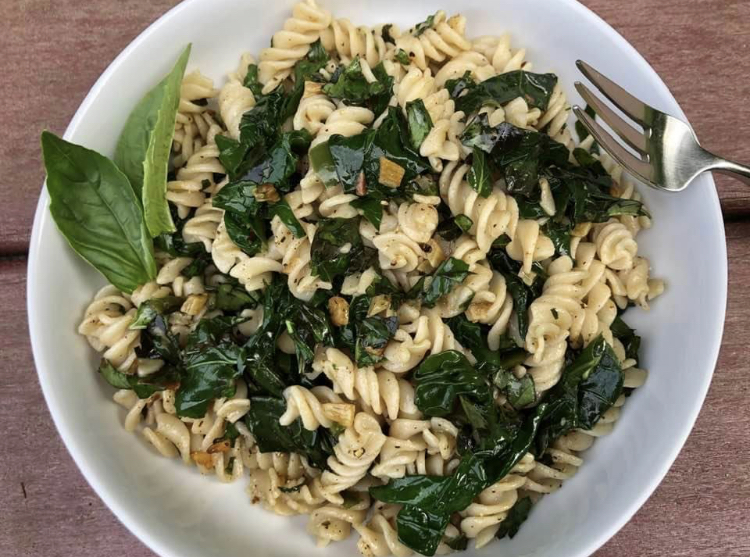
Pasta and Greens with Garlic, Jalapeño & Basil
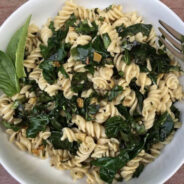
2 TBSP [real] butter
4 cloves of garlic, chopped into chunks
1 jalapeño pepper, diced, with seeds (optional)
1 bunch of kale (or greens of choice) stems removed & torn into pieces (6-12 leaves)
Fresh basil (large handful), chopped
6 oz pasta of choice, cooked al dente
Generous drizzle of extra virgin olive oil
Salt & pepper to taste
- While bringing pasta water to a boil, prep the vegetables (chop garlic, jalapeño, greens, and basil).
- While pasta is cooking, melt butter in a large sauté pan over medium-low heat, and sauté chopped garlic for about 2 minutes – until just starting to change color.
- Remove garlic from pan with slotted spoon and set aside (leaving as much of the garlicky butter in the pan as possible).
- Add chopped jalapeño (if using) to the same pan, and sauté about 2 minutes, until softened.
- Add chopped kale (or greens of choice), and sauté 5-10 minutes longer, until just wilted (add more butter if necessary).
- Turn off the heat and stir in the basil, along with the garlic that was set aside and a little salt & pepper.
- Drain pasta and toss with the greens.
- Add a generous drizzle of high-quality olive oil and adjust salt & pepper if necessary
Serves 1.
__________________________________________________________________________________________
SIDE NOTES:
~ This is my go-to ,weeknight dinner at least once per week during the summer. I love grabbing the fresh greens, basil, and jalapeño from my garden.
This. Is. Heaven. <3
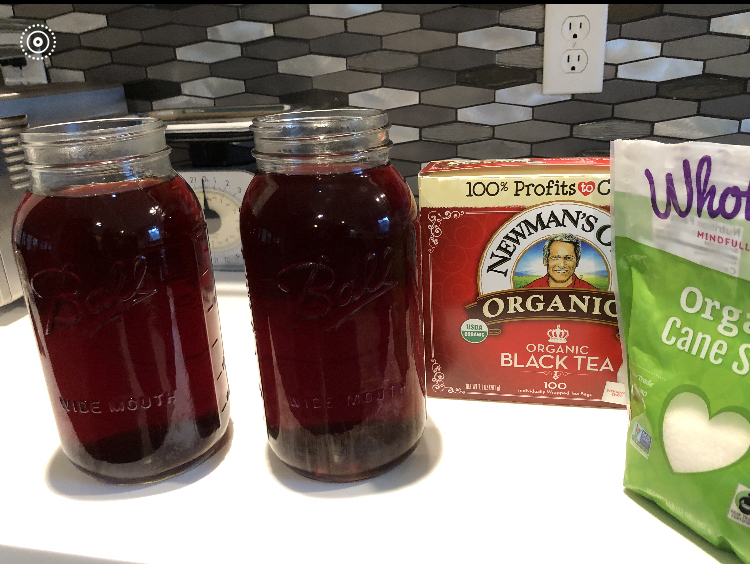
Basic Iced Tea (slightly sweet)
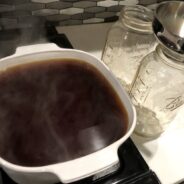
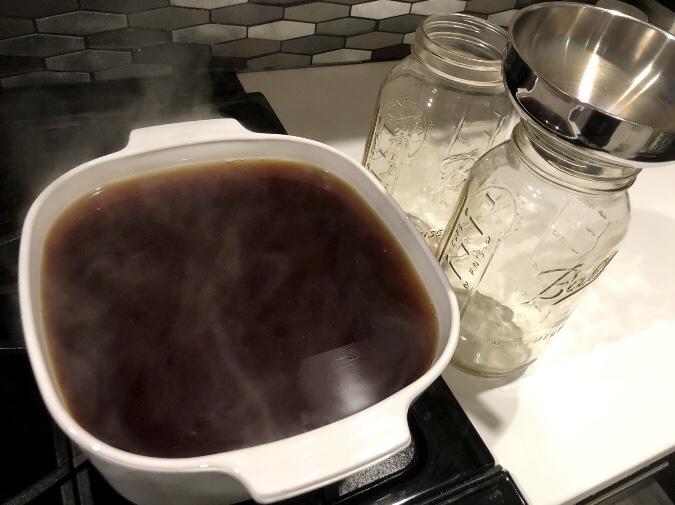
1 gallon of water (16 cups)
14 tea bags
10 TBSPs natural sugar
- Bring water to a boil in a large pot.
- Turn off heat, add tea bags, cover, and let steep for 5 minutes.
- Remove tea bags and stir in sugar until dissolved.
- Pour into pitcher(s) (allow to cool first if they are plastic) and refrigerate.
_____________________________________________________________________
SIDE NOTES:
~ I’ve been making this often over the past several months, but I had to figure out (again) how many tea bags and how much sugar to use to get it the way I like it (I had gone a long time without making it). I was just about to write it down for safe keeping, when I realized I should just post it here. It’s not a fancy recipe, but – I figured others might like their iced-tea the way I do too… It’s at least a starting point – then you can adjust according to your tastebuds 🙂
~ I use organic black tea, but of course – use any kind of tea you want. Add lemon, mint leaves (etc.) – whatever floats your boat!
~ I transfer to 2 half-gallon mason jars, and use a jam funnel to ladle it in – to avoid a mess.
Enjoy! 🙂
Pasta & Peas
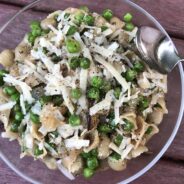
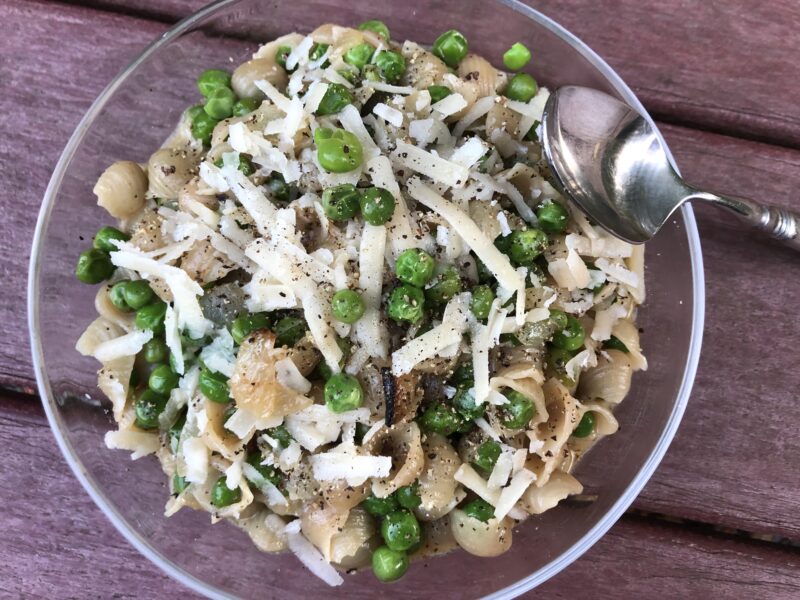
Butter
1 large onion, chopped
2 cups broth of choice
1/2 lb pasta (small shape like shells / elbows / ditalini, etc)
1 tsp pure salt
1 lb frozen peas
1/2 cup freshly grated parmesan cheese
Swirl of olive oil & freshly ground black pepper to taste
- Melt some butter in a medium sized sauce pot.
- Add chopped onion and sauté about 5 minutes (until the onions look good to you – depending on how you like them)
- Add broth, bring to a boil, and stir in pasta and salt.
- Lower heat, cover, and simmer (stirring occasionally to prevent pasta from sticking to bottom of pan).
- Add the peas when there’s about 5 minutes left for the pasta to cook.
- When pasta is cooked al dente, turn off heat and stir in the shredded cheese until melted.
- Add a swirl of olive oil and black pepper to taste.
Serves 2
_______________________________________________________________________________
SIDE NOTES:
~ I make this about twice per month – on busy weeknights when I want a home cooked, yummy meal, but am tired from a long work day. It’s a 1-pot meal. It’s fast (prep work is minimal / only chopping an onion and grating some cheese). And it’s amazingly yummy (to me, anyway) – I always look forward to it!
~ I use bone broth for added protein and nutrition. Of course – using veggie broth makes this meal suitable for vegetarians.
~ The pasta will barely be covered by the broth when you add it to the pot, but that’s okay.
~ Nowadays, it’s easy to find bone broth at the store – but here’s how to make it from scratch if that’s something you’re interested in: http://realfoodtastesgood.com/2012/10/10/chicken-or-beef-broth/
~ The peas can be added straight from the freezer.
~ I recommend grabbing a good hunk of Parmigiano Reggiano – the KING of parmesan. Mama-mia.
~ I always shred extra cheese to add at the table.
~ Note to self: For Tinkyada brown rice shells, cook pasta for 7 minutes, then add peas and cook for 4 minutes longer.
~ Enjoy! 🙂
Easy Beef Stroganoff
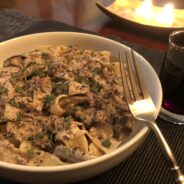

1 lb ground beef
1 onion, chopped
4 cloves (or more) garlic, chopped
8 to 10 oz mushrooms, sliced (I use shiitake)
1 cup broth (chicken, beef, or veggie)
1 cup (8 oz) sour cream (or thick, greek-style yogurt)
1/2 cup (4 oz) cream cheese (I use mascarpone / Italian cream cheese)
4 oz egg noodle pasta, cooked
fresh sage to taste
1 tsp salt (or to taste)
Ground pepper to taste
- Brown meat in a large skillet over medium heat. If meat is very lean, add a TBSP of butter or coconut oil to keep it from sticking to the pan.
- When meat is browned, add chopped onion & garlic & continue to stir until onion is translucent, about 3 minutes.
- Add mushrooms and cook until they reduce / start to give up some liquid.
- Pour in broth and cook, stirring for a few minutes until liquid reduces by about half.
- Stir in sour cream & cream cheese until combined (but don’t boil).
- Add half of the fresh sage, reserving the rest for garnish.
- Add cooked noodles and stir until warmed through.
- Add salt & pepper to taste.
- Serve and add the remaining sage to individual bowls.
Serves 2 – 3
__________________________________________________________________________
SIDE NOTES:
~ You can double the noodles if you want to stretch this out to feed more people, which I sometimes do (works for 4-5).
~ You can use fresh parsley instead of sage. I’m just one of those people who thinks parsley doesn’t have enough of a flavor – I rarely use it. I prefer fresh sage in this recipe.
~ Been making this one for years, but never posted. I just got tired of the photo shoots. I just wanted to sit down & eat – ha. I missed daylight today (daylight makes a better photo), but I’m going to put my perfectionist tendencies aside, and post this anyway. I always have to dig through my draft emails to find it. Now it’s here, where I need it 🙂
Easy comfort food. Enjoy! 🙂
Berry Cheescake Jars
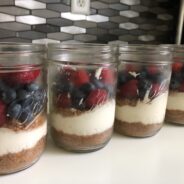
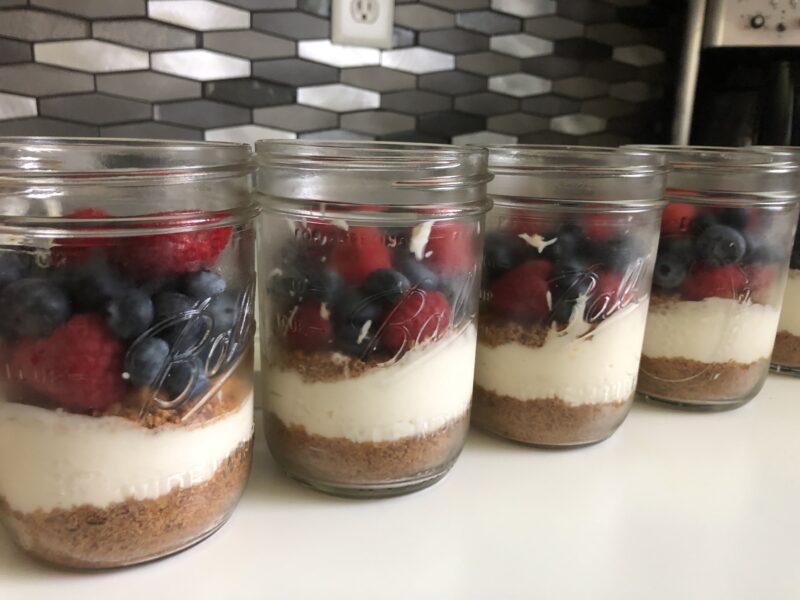
24 ounces of berries (I use a combo of blueberries & raspberries)
For the Graham Cracker Crust Layer:
2 heaping cups of graham cracker crumbs
6 Tablespoons brown sugar
1/2 teaspoon cinnamon
1/2 teaspoon salt
1/2 cup melted butter
For the Cheesecake Layer:
16 ounces cream cheese, room temperature
1 cup sugar
1 cup sour cream (entire 8 oz container)
1/4 cup fresh lemon juice
4 teaspoons vanilla extract
2 teaspoons lemon or orange zest
- Combine all of the graham cracker crust ingredients (mix with a spoon until butter is evenly coated over crumbs).
- Divide about half of the mixture into 8 12-oz mason jars (reserving some of the crumbs to layer on top of the cheesecake filling).
- Press gently into bottom of jars.
- Mix all of the cheesecake ingredients with an electric mixer – whip until smooth and fluffy.
- Divide evenly among the 8 jars, on top of the graham cracker crust layer.
- Add the remaining graham cracker crumbs over the top of the cheesecake layer.
- Top with berries of choice, cover, and refrigerate until ready to serve.
Serves 8
_____________________________________________________________________________________
SIDE NOTES:
~ I’ve made this twice so far – super yummy! And I love a *no-bake* dessert – just whip everything together and refrigerate!
~ To make it easier for myself going forward (to eliminate having to measure the crumbs) – 23 graham crackers (Annie’s organic honey grahams) tossed into a blender seems to do the trick (about 2.5 of the individually wrapped cracker packages inside the box – there are 9 crackers in each individually wrapped package).
~ I use mascarpone (Italian) cream cheese.
~ About 1 lemon’s worth of zest should do it…. and if you’re an efficient lemon squeezer – 1 lemon should get you the 1/4 cup. I squeezed with my wimpy hands, and needed to dip into a second lemon to get enough.
~ Of course, you can use smaller, pint-sized jars if that’s what you have on hand – in which case, you can cut recipe in half for 6 jars, or follow as is for 12 jars.
~ The original recipe (from keyingredient.com) called for “berry filling” instead of fresh berries and whipped cream on top. I think berry filling is just berries and sugar cooked down, and whipped cream adds even more sugar. It’s already sweet enough as is without either of these extra sugar doses. In fact – I might test out reducing the sugar in the cheesecake layer a little next time – as I think it would be fine (& maybe even a little better according to my taste) slightly less sweet.
~ Can be made in advance / day before and stored covered in refrigerator – though best to add the berries day of or just before serving. These will last for several days in the fridge if you make extra.
Enjoy! 🙂
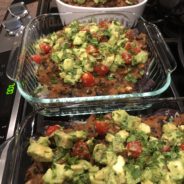
Nachos for Dinner :)
Coconut oil
2-6 cloves of garlic (chopped or minced) – optional
2 jalapeños, chopped (with or without seeds) – optional
1 pound ground beef (see vegetarian substitute below)
2 TBSPs taco meat seasoning
Tomatoes (chopped)
Avocado (chopped)
Cilantro (chopped), divided
Lime juice
Tortilla chips (preferably blue corn)
8 ounces sharp cheddar (shredded)
8 ounces pepper-jack cheese (shredded)
- Preheat the oven to 350.
- Sauté the garlic and jalapeño in coconut oil over medium-low heat for a minute or 2.
- Add the ground beef and crumble it in the pan using a blunt utensil (etc – edge of a wooden spatula).
- Add the seasoning mixture, toss to coat, and cook until meat is evenly browned.
- Turn off the heat and set aside.
- In a large bowl, mix together the tomatoes, avocado, lime juice, and most of the cilantro.
- Place the desired amount of tortilla chips in the bottom of a shallow pyrex (9×11 or two to three 8×8).
- Transfer pyrex to the pre-heated oven for 5 minutes to warm the chips.
- Spread both shredded cheeses over the chips evenly.
- If the meat (or bean) mixture cooled down too much, turn the burner on for a few minutes and toss until heated through.
- Spread the meat (or bean) mixture over the cheesy chips.
- Transfer the pyrex back to the oven for 5 minutes.
- Remove from oven and top with tomato / avocado mixture.
- Garnish with remaining cilantro.
VEGETARIAN VERSION: Instead of beef – after sautéing the garlic and jalapeño for a minute or 2, add 2 15-oz cans of black beans (rinsed & drained), 2 15-oz cans of refried beans, and continue following the recipe (the same 2 TBSPs of seasoning seemed to do the trick).
______________________________________________________________________
SIDE NOTES:
~ Why blue corn chips? Blue foods (minus things like Gatorade and skittles) tend to have more antioxidants than white / yellow foods (think blueberries). Blue corn also has more protein and less starch than yellow. It tastes exactly the same – so why not? 🙂
~ If you’d like to make your own taco seasoning: http://realfoodtastesgood.com/2014/02/26/taco-meat-seasoning/
~ Use whatever kind of cheese you like – doesn’t necessarily have to be cheddar & spicy jack.
~ As for the pico de gallo-ish mixture (tomato / avocado, etc) – it can be prepared many different ways – add a little chopped, red onion and/or olives… omit the avocado – whatever floats your boat. I can’t really offer an exact recipe for this – but I’m sure such recipes exist online if you’d like precise measurements (I used about 5 avocados, one pint of grape tomatoes sliced in half, the juice from 3 limes, and a 0.66-oz bag of cilantro for the vegetarian version I made last night – pictured above).
~ Instead of sautéing jalapeño with the meat (or beans) – you can add fresh jalapeño to the tomato mixture.
~ When I do the beef version, I split this into two 8×8 pyrex dishes. For the vegetarian version – it’s enough for three dishes. I serve each person their own 8×8 dish – but it’s always enough for 2 meals / leftovers the next day.
~ Always get a few more avocados than you think you’ll need, as many of us know – you don’t know what they’re going to look like on the inside once you cut it open – you might get 1 or 2 bad ones!
This is such a fun and tasty dinner…. Enjoy!
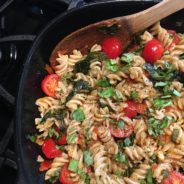
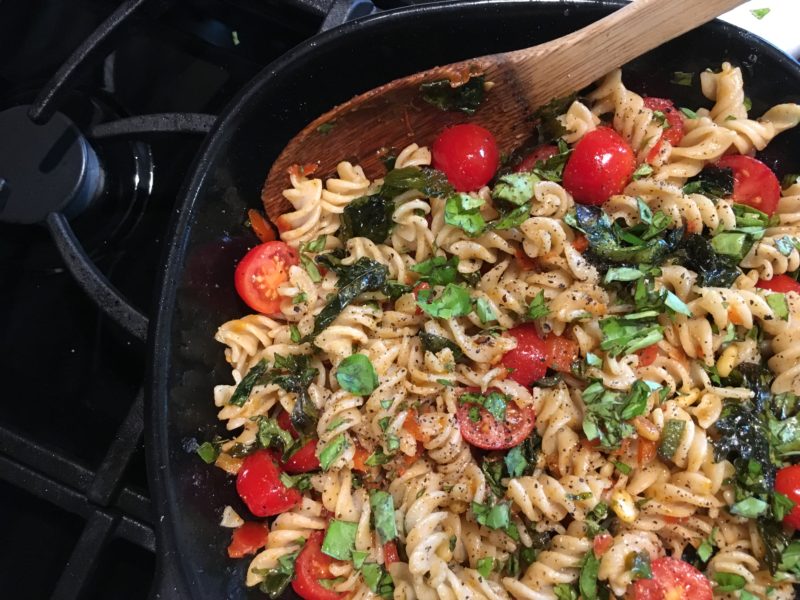
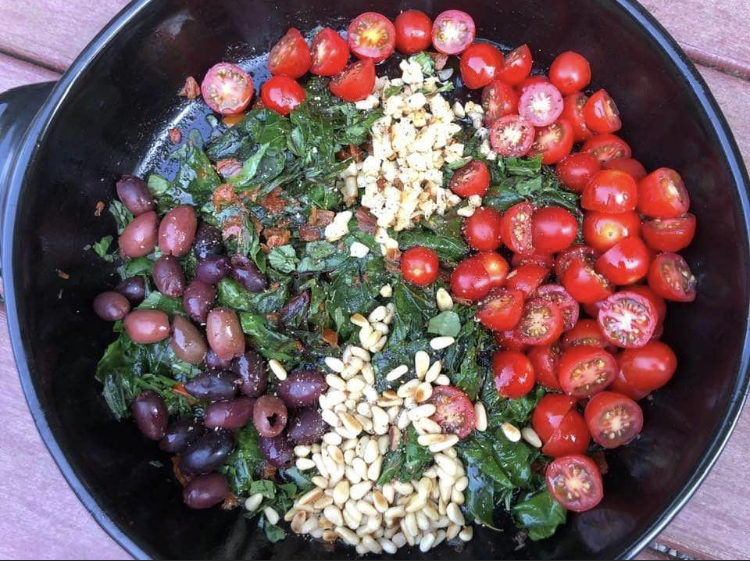
Italian Pasta Primavera
2 TBSP pine nuts, toasted
(Real) butter (a spoonful for sauteing) (or olive oil if lactose intolerant)
4 cloves of garlic, chopped into chunks
1 jalapeno pepper, diced, with seeds (optional)
1 bunch of kale (or greens of choice) stems removed & torn into pieces (6-12 leaves)
2-3 oz chopped sun-dried tomatoes
Fresh basil (large handful), chopped
15 grape tomatoes (give or take), cut in half
Kalamata olives (as much as you’d like)
6 oz pasta of choice, cooked al dente
Generous drizzle of extra virgin olive oil
Salt & pepper to taste
- While bringing pasta water to a boil, prep the vegetables.
- Toast pine nuts in a small, dry pan on medium-low heat for just a few minutes (they can burn quickly, so keep your eye on them! –Once they become aromatic and begin to brown slightly, remove them from pan to cool.)
- While pasta is cooking, melt butter in a large saute pan over medium heat, and saute chopped garlic until beginning to brown. Remove garlic from pan with slotted spoon and set aside (leaving as much of the garlicky butter in the pan as possible).
- Add chopped jalapeno (if using) to the same pan, and saute just a few minutes, until softened.
- Add chopped Kale (or greens of choice), and saute 5-10 minutes until just wilted (add more butter if necessary).
- Add half of the chopped basil, all of the sun-dried tomatoes, and saute a few minutes longer.
- Drain cooked pasta and toss into the pan with the vegetables.
- Turn off the heat, add the grape tomatoes, Kalamata olives, toasted pine nuts, garlic, and toss to combine.
- Add a generous drizzle of high-quality olive oil, salt and pepper to taste, and toss again.
- Garnish with remaining fresh basil.
Serves 1.
__________________________________________________________________________________________
SIDE NOTES:
~ Why did it take me this long to come up with such an easy and to-die-for pasta dish like this? Not sure, but I am in love. It’s simple but Earth-shattering at the same time. This is 1 very hearty serving. Double, triple, or quadruple to feed your favorite peeps.
~ For convenience, you can use pre-washed, boxed baby kale.
~ I always keep a jar of Delallo’s Sun-dried tomato bruschetta on hand (and use a few big spoonfuls for this).
~ You can’t use too much basil, so if you have a bunch of it – just pile it in!
The photo at the top of this page was taken just before I realized I had Kalamata olives in the fridge. I tossed quite a few of those in! I hope you enjoy this as much as I do!! 🙂
Sweet & Tangy Stir-Fry Sauce
1/4 cup balsamic vinegar
1/3 cup natural ketchup
1/8 cup honey
1 TBSP worcestershire
1/2 TBSP mustard
1/8 tsp salt
1/8 tsp pepper
1 TBSP butter
- Add everything to a small pot, bring to a boil, reduce to low heat and simmer, uncovered, for about 15 minutes (stirring occasionally) as it reduces & thickens. Mix a little into your stir fry, and save the rest for dipping or drizzling over the top.
__________________________________________________________________________
NOTES:
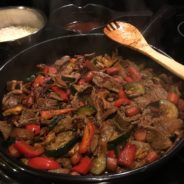
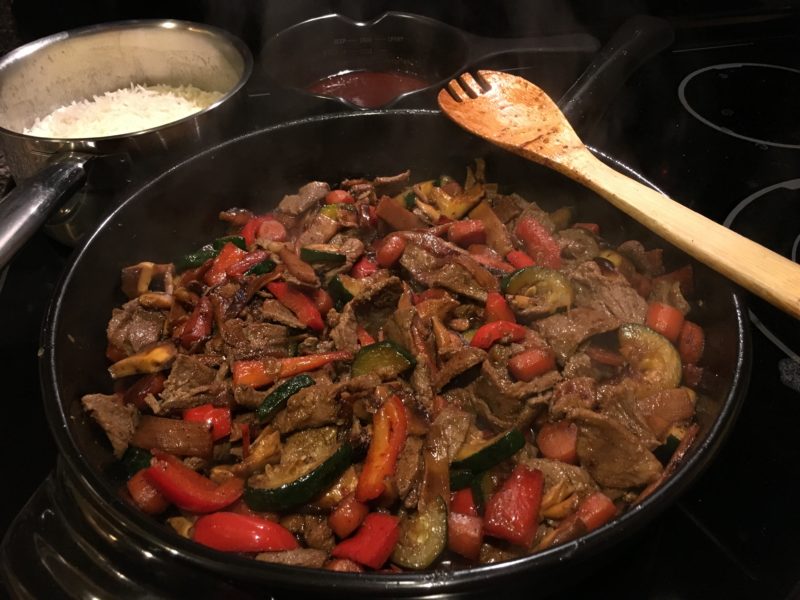
~ It’s all about the sauce… am I right!? 🙂 This one is very intense! Drizzle it on whatever. I used to call it my *steak sauce*, but I never use it on *real* steak. Well, I kind of do. I use “minute steak” (also called “shaved steak”) for my stir-fries, and this is the sauce I use to go with it. I posted my “beef stir fry” many moons ago ( http://realfoodtastesgood.com//?s=beef+stir+fry&x=0&y=0 ). It’s that, with this sauce. Use whatever veggies you’d like – and cook some rice or noodles to line the bowl. This time, I used onions, carrots, bamboo shoots, red bell pepper, zucchini, & shiitake mushrooms.
~ This is probably half of a recipe. You might want to consider doubling it. The sauce was enough for 2 big servings, but we have leftover stir-fry and no more sauce. Easy enough to make, so I’ll whip up a little more tomorrow 🙂
Enjoy!
Creamy Chicken w/ Mushroom, Onion & Wine Sauce

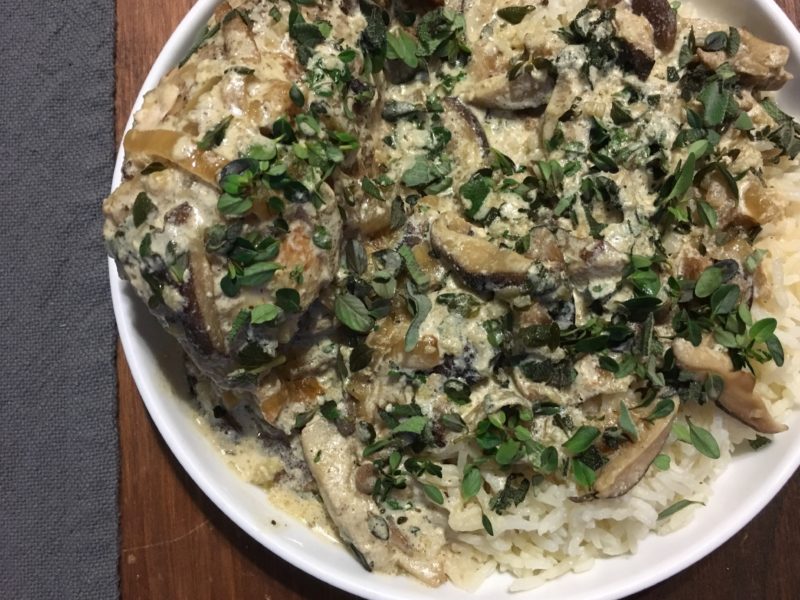
Real butter
Bone-in / skin-on chicken parts (enough to feed 4 people)
Salt / pepper to taste
1 large onion, thinly sliced
10 oz (give or take) sliced mushrooms (I use shiitake)
Lots of fresh sage & thyme, roughly chopped (reserving half for garnish)
Lots of garlic, crushed (I use a whole head because I’m ridiculous)
1 cup dry white wine
1 cup chicken broth
2 cups cream or half & half
- Melt butter in a large skillet
- Add chicken parts, coat both sides with butter, and sprinkle both sides with salt & pepper
- Brown chicken on both sides and remove from pan (doesn’t need to be cooked through)
- Add onion to the same pan (add more butter if needed) and saute until beginning to brown
- Add mushrooms, 1/2 of the sage / thyme, and saute until cooked to your liking
- Crush garlic into the pan and saute for a minute or 2 more
- Add wine and let simmer for a few minutes
- Add broth and return to a simmer
- Add cream or half & half
- Once liquid is hot & bubbly again, return chicken parts to pan, lower heat, cover and let simmer for about 20 minutes
- Serve chicken with rice or pasta with cream sauce over everything
- Garnish with remaining sage / thyme
- Add salt / pepper to taste
SIDE NOTES:
~ Been making this one a long time. The only reason I have avoided posting it is because I can never get the picture right. It always just looks like a blob of food – not very pretty! But I’m over it because it’s too good not to share!
~ You can use 2 breasts, 2 thighs & 2 legs, or 4 large breasts, or really whatever you have on hand that would feed 4 people.
~ The fresh herbs (which are available at most grocery stores) really push it over the top.
Enjoy! 🙂