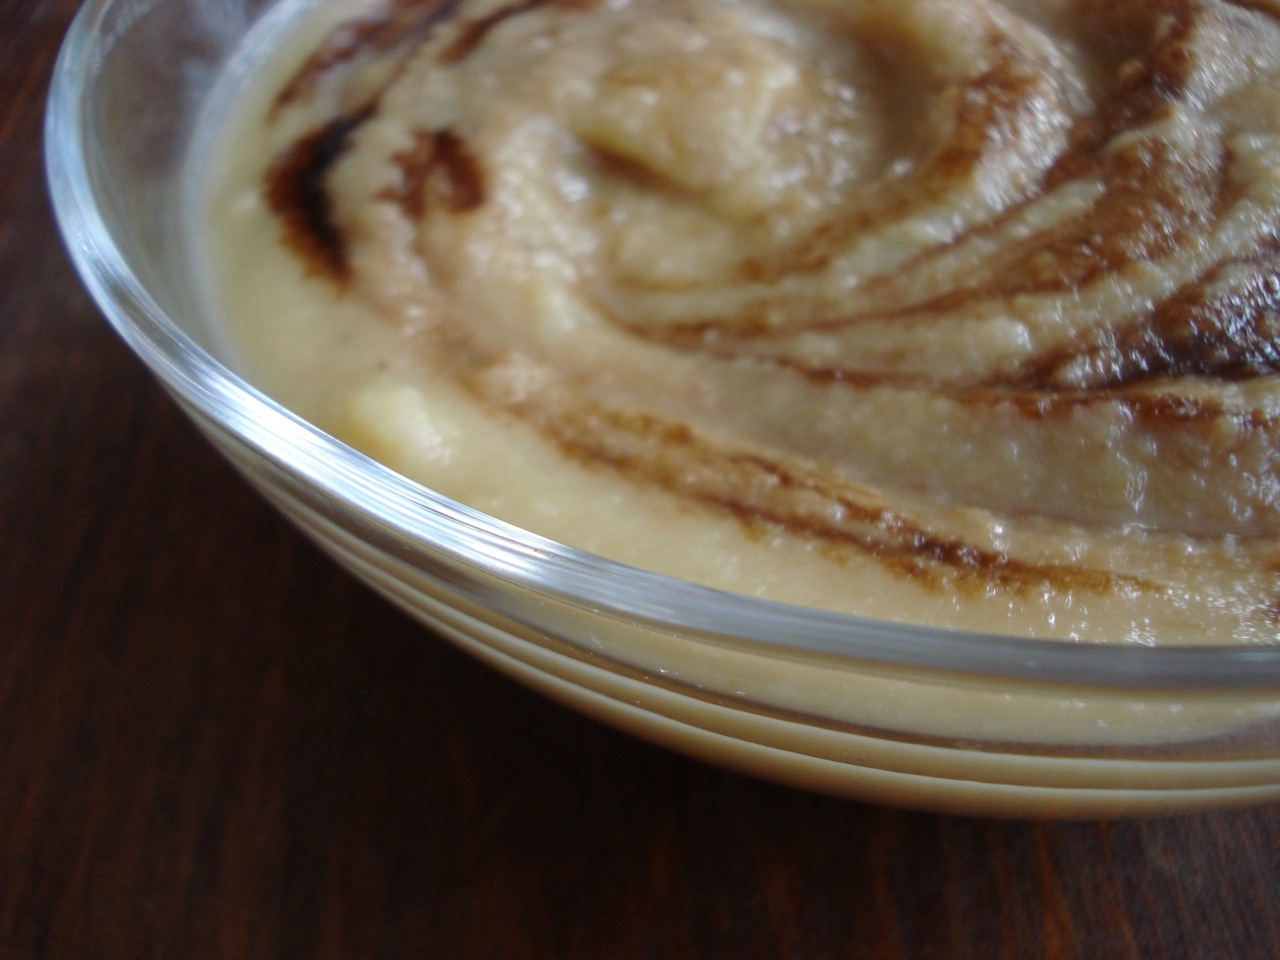
Roasted Parsnip & Pear Soup

2 pounds parsnips, peeled
2 pears, peeled and roughly chopped
1 small onion, peeled and roughly chopped
2 TBSPs coconut oil
1 tsp pure salt, divided
1/4 tsp freshly ground pepper
1 cup balsamic vinegar
2 cups broth (veggie, chicken, whatever you like)
2 1/2 cups whole milk
- Position rack in lower third of oven and preheat to 450.
- Roughly chop parsnips and toss with, pears, onion, oil, 1/2 tsp salt, and pepper in a roasting pan (9×11 pyrex works well).
- Roast, stirring approx every 10 mins, until very soft and starting to brown (about 40 mins).
- Meanwhile, boil vinegar in a small saucepan until syrupy and reduced to about 1/4 cup (10 to 20 minutes, depending on how high the heat is) and remove from heat. Watch the syrup carefully during the last few minutes to prevent burning.
- Transfer the roasted parsnip mixture to a large pot, add the broth, milk, and remaining 1/2 tsp salt.
- Use immersion blender to puree until smooth & creamy (or transfer to a regular blender in batches).
- Warm gently over medium-low heat for about 5 mins.
- Ladle into bowls and drizzle the balsamic syrup over each serving.
Serves 4.
______________________________________________________________________________________
SIDE NOTES:
~ This is a masterpiece! Adapted from www.eatingwell.com. I’ve had a lot of milk on hand lately, so have been making lots of delicious creamy soups like this.
~ When my daughter asked earlier in the day, “What’s for dinner?” and I told her roasted parsnip & pear soup, she said something like “That sounds kind of weird – I don’t think I’m gonna like it.” At first glance, this recipe actually really appealed to me, but did seem like it could go either way. In the end, holy parsnips… was it good. I mean, jaw dropping. Maybe it’s just us, but myself & both kids were in love with it (husband traveling so hasn’t had the pleasure yet). It’s also very simple to make. Nothing to it, especially if you have an immersion blender.
~ Of course, if you don’t have an immersion blender, you can puree in 2 batches in a regular blender. Add half of the roasted veggies to the blender with the broth. Blend and transfer to a large pot. Then blend the remaining veggies with the milk, add to the pot and heat through.
Always check the labels of any packaged goods you’re using (such as broth) if eating gluten and/or sugar free.Dairy Free, Gluten Free, Egg Free, Nut Free, Sugar Free, Grain Free, Vegan, Raw
~ When heating the pureed soup, if the heat is too high, it tends to splatter because of how thick it is. Keep your eye on it and reduce heat if necessary.
~ I’ve never attempted to reduce balsamic vinegar before. It did reduce, but didn’t really get syrupy. It didn’t seem to matter though, as the flavor was nicely condensed and blended so beautifully with the rest of the flavors in the soup.

How to make Garlic Salt
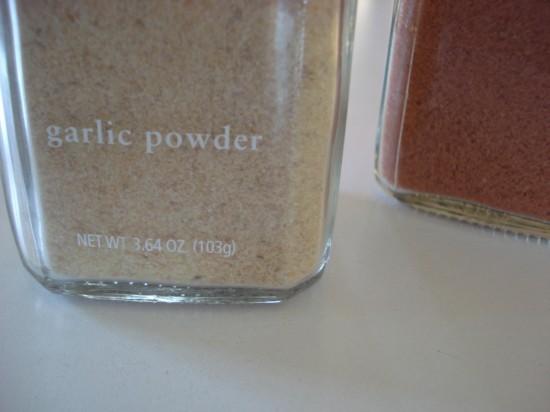

Combine 3 parts salt with 1 part garlic powder.
For example, if you need 1 tsp of garlic salt, simply use 3/4 tsp salt and 1/4 tsp garlic powder.
That’s all =)
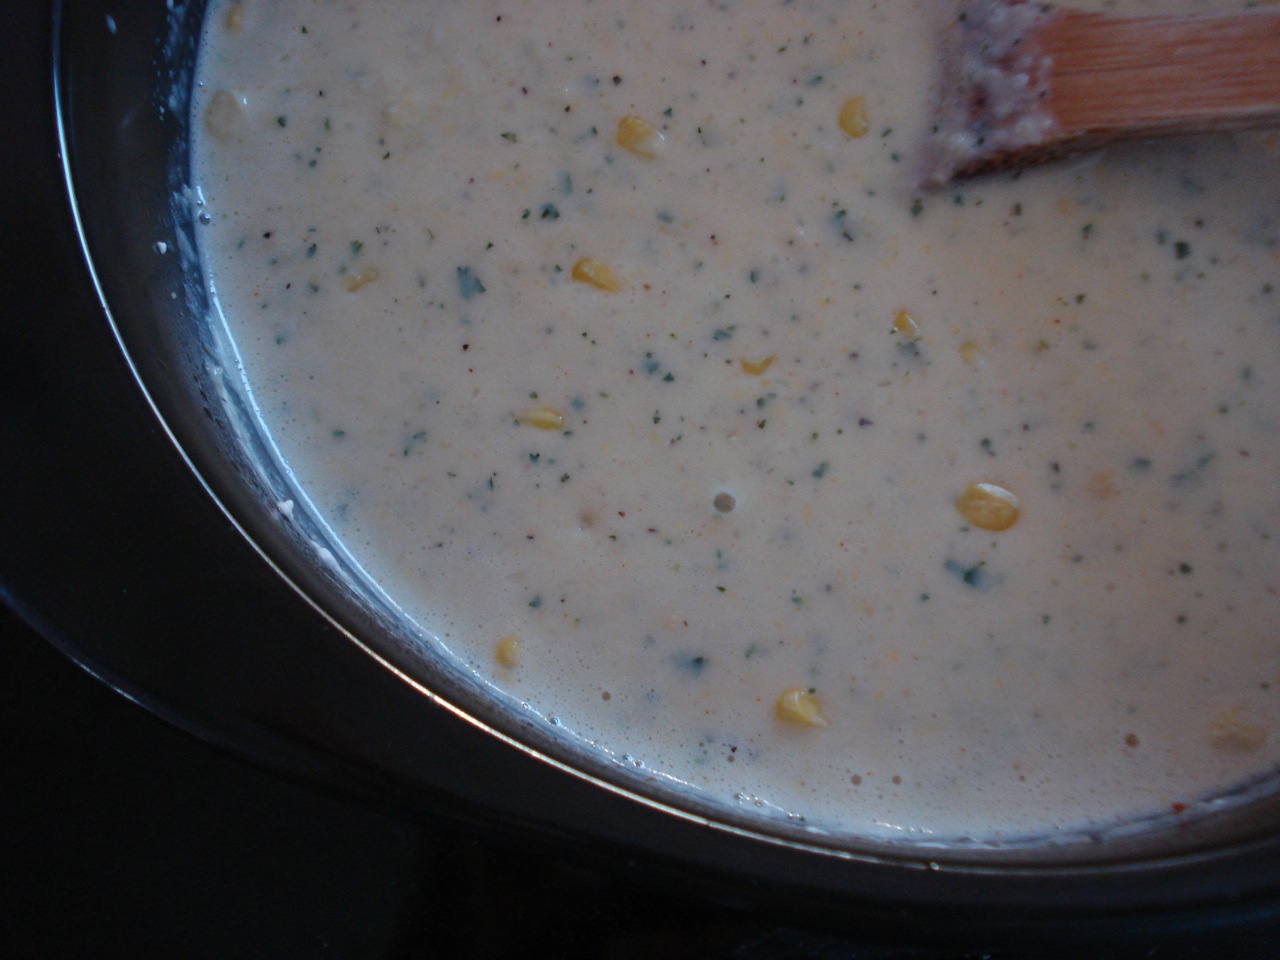
Creamy Corn Soup

1 TBSP butter or ghee
1 small onion (or 1/2 of a large)
1 clove garlic, minced or crushed
1/4 cup fresh parsley, chopped
3 TBSPs flour (whatever kind you have on hand)
2 & 1/2 cups whole milk
1 cup broth (veggie, chicken, whatever you like)
24 ounces frozen corn kernels (divided in half)
2 & 1/2 TBSPs cream cheese, softened
1 tsp garlic salt (or 3/4 tsp salt + 1/4 tsp garlic powder)
1 tsp ground black pepper
1/8 – 1/4 tsp cayenne pepper (optional)
- Heat butter in a medium pot (3 & 1/2 qt pot works well) over medium heat.
- Add the onion, garlic, parsley, and saute for about 5 minutes (until onions are tender).
- Add the flour, stirring well to make a pasty mixture.
- Add the milk and broth, and continue cooking, stirring occasionally.
- When the mixture is very warm, add half of the corn (about 12 oz) and the cream cheese and allow to heat through.
- Puree mixture right in the pot with an immersion blender (or transfer to regular blender).
- Add the rest of the corn, garlic salt, black pepper and cayenne pepper.
- Stir to combine and serve.
(Serves 3 to 4).
______________________________________________________________________________________
SIDE NOTES:
~ If the season allows, use fresh corn if you’d like.
~ If you don’t have an immersion blender, transfer to a regular blender in batches to puree. If this step annoys you, know the ease of an immersion blender is only 30 bucks away. Alternately, you don’t have to puree it at all.
~ Using 1/4 tsp of cayenne adds quite a kick, but this is how we like it. Use less or omit if you don’t like spicy.
~ Can use the double boiler method to soften the cream cheese. You don’t need an official double boiler set, just one small pot with boiling water in it on the bottom, and a pot large enough to sit securely on top for the cream cheese. You don’t have to worry too much about this because you’ll be pureeing the soup anyway, but it will be easier if the cream cheese is on the soft side first. FYI – Double boilers are used when you need to melt something that would otherwise burn if put directly on the stove top.
~ I tend to use oat flour for things like this.
~ Adapted from http://allrecipes.com/recipe/creamy-corn-soup/
Dairy Free, Gluten Free, Egg Free, Nut Free, Sugar Free, Grain Free, Vegan, RawIf you’re eating gluten free, be sure to use a gluten free flour. Always check the labels of any packaged goods you’re using (such as broth) if eating gluten and/or sugar free.
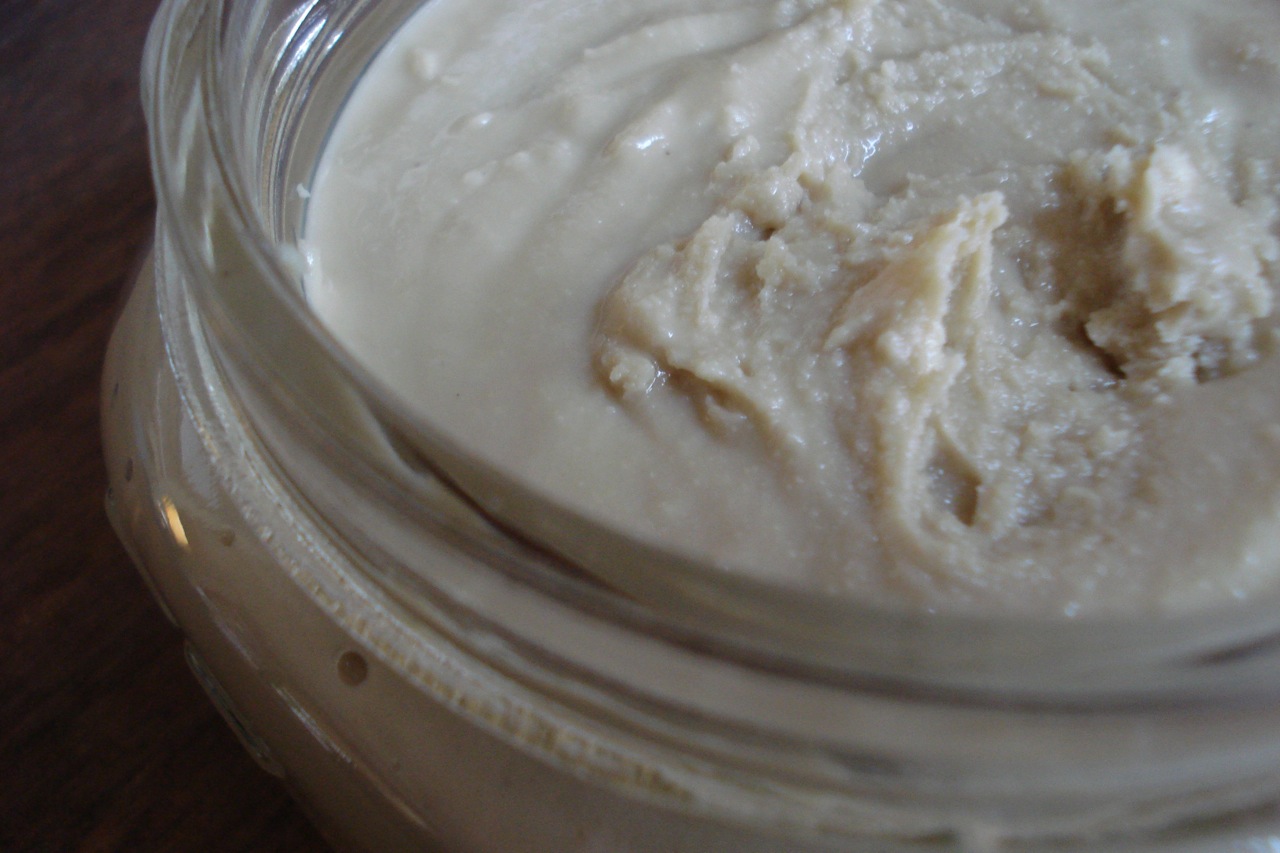
Macadamia Nut Butter
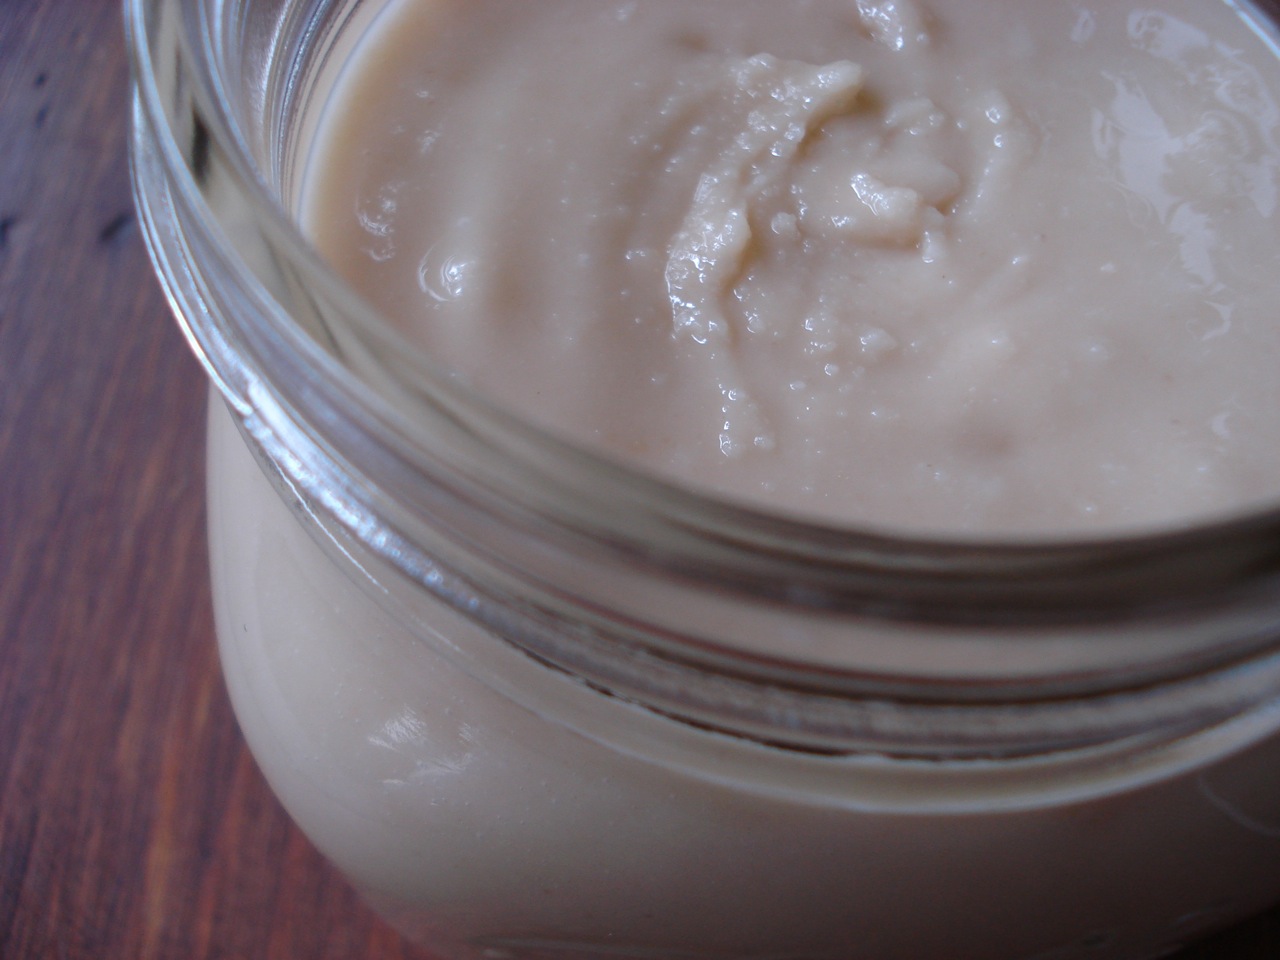

2 cups macadamia nuts
1/4 tsp pure salt
- Add to your food processor or Vitamix and process until creamy.
______________________________________________________________________________________
SIDE NOTES:
~ Macadamia nuts easily blend into a nice, creamy, tasty butter. We like to change-up our nut butters for variety. They’re all so good, and nutritionally speaking – each of them will offer us a little something different (not to mention we’re all more prone to developing a sensitivity to a food we eat over & over on a daily basis – changing it up now & then is a good idea). FYI – Macadamia nuts contain minerals and fiber, and their oil is 80% monounsaturated (higher than any other nut). This is the same type of healthy fat found in the Mediterranean diet, which has been shown in virtually every research study to be associated with lower levels of heart disease and cancer, as well as a longer life span in general.
~ We like our almond butter and pecan butter plain – no salt, but find that cashew butter and macadamia butter need just a little bit for the best flavor. This is a personal preference, so feel free to omit the salt if you’d like.
~ If using a VITAMIX, use the tamper to push the nuts into the blade area as it’s blending. Make note – If using the large, 8 cup carafe, I would increase this recipe to 3 cups (so there are enough nuts in the machine to get things going). I happen to also have the optional small carafe which works well with 2 cups of nuts. Either way, it will only take 1 or 2 minutes to process (depending on desired consistency – the longer you process it, the creamier it will get). If using a FOOD PROCESSOR, be sure to stop the machine occasionally to scrape down the sides. It will take longer, but just keep at it until it’s creamy – it will get there.
~ If you’re starting with raw macadamias, I recommend either roasting them (on a tray in oven at 300 degrees for about 8 minutes, stirring once half way through), or germinating (soak overnight at room temp, then let dry at low temperature in dehydrator for a few days). Both methods make the nut more digestible, but the germinating method allows it to retain all of its nutrients and enzymes (whereas the heat from roasting destroys some of these benefits). If you like the idea of retaining nutrients, but don’t want to soak and dry yourself, you can buy pre-germinated nuts at www.livingnutz.com.
Dairy Free, Gluten Free, Egg Free, If on a strictly raw diet – use raw (preferably germinated) nuts and don’t let them heat up as you’re blending.Nut Free, Sugar Free, Vegan, Grain Free, Raw
~ For best results, these are the 2 most important things to know in regard to making homemade nut butters….
1 – It’s best if the nuts are just warm to the touch when you add them to your blender (or food processor). At this temperature (about 100 degrees), the nuts can more easily release their oils, creating a creamy nut butter with the right consistency. So – if you’re roasting, let them cool off (until just warm to the touch) before processing (if the nuts are too hot – right out of the oven, they will be reluctant to give up their oil and they are not likely to blend into a creamy consistency). Likewise, if they’re cold or room temp, just warm them up in a dehydrator for 5 – 10 minutes. If you don’t have one, put them in the oven set to the lowest allowable temperature, and let them warm up just for a minute or 2 (can leave the oven door open to prevent them from getting too hot if necessary).
2 – The nuts need to be bone dry (so if you’ve soaked them yourself, be sure to dry them thoroughly).
______________________________________________________________________________________
FOR THOSE USING A VITAMIX (or other blender that allows use of a tamper)….
After making nut butters is the BEST time to make a smoothie. This puts the last remnants of the nut butter (stuck to the sides of the carafe) to very good use. So yummy, and an easy way to clean the sticky butter out of the carafe. Just add some milk, banana & berries – give it a whirl & enjoy =)
______________________________________________________________________________________
In case anyone is in the market for a VITAMIX, my distributor code is 06-004158 which entitles you to free shipping and I get credit for the referral (thx!).
Cashew Butter

2 cups cashews
1/4 tsp pure salt
- Add to your food processor or Vitamix and process until creamy.
______________________________________________________________________________________
SIDE NOTES:
~ Cashew butter is delicious! In our opinion, it tastes the closest to peanut butter than any of the other nut butters. Keep in mind, it tends to be less oily, and a little more on the pasty side than some of the others. It’s creamy and spreadable at room temp, but a little difficult to work with straight from the fridge. To resolve this, you can either include a little oil in the recipe, or simply let it warm up a bit before spreading (we do the latter). If I’m in a hurry, I just open the door to the toaster oven, turn it on while the cashew butter container is sitting on the opened door (I store my nut butters in glass jars – don’t do this if stored in plastic) and it’s spreadable within a minute or 2.
~ We like our almond butter and pecan butter plain – no salt, but find that cashew butter and macadamia nut butter need just a little bit for the best flavor. This is a personal preference, so feel free to omit the salt if you’d like.
~ If using a VITAMIX, use the tamper to push the nuts into the blade area as it’s blending. Make note – If using the large, 8 cup carafe, I would increase this recipe to 3 cups (so there are enough nuts in the machine to get things going). I happen to also have the optional small carafe which works well with 2 cups of nuts. Either way, it will only take 1 or 2 minutes to process (depending on desired consistency – the longer you process it, the creamier it will get). If using a FOOD PROCESSOR, be sure to stop the machine occasionally to scrape down the sides. It will take longer, but just keep at it until it’s creamy – it will get there.
~ If you’re starting with raw cashews, I recommend either roasting them (on a tray in oven at 300 degrees for about 8 minutes, stirring once half way through), or germinating (soak overnight at room temp, then let dry at low temperature in dehydrator for a few days). Both methods make the nut more digestible, but the germinating method allows it to retain all of its nutrients and enzymes (whereas the heat from roasting destroys some of these benefits). If you like the idea of retaining nutrients, but don’t want to soak and dry yourself, you can buy pre-germinated nuts at www.livingnutz.com.
Dairy Free, Gluten Free, Egg Free, If on a strictly raw diet – use raw (preferably germinated) nuts and careful that they don’t heat up as you’re blending.Nut Free, Sugar Free, Vegan, Grain Free, Raw
~ For best results, in my experience, these are the 2 most important things to know in regard to making homemade nut butters….
1 – It’s best if the nuts are just warm to the touch when you add them to your blender (or food processor). At this temperature (about 100 degrees), the nuts can more easily release their oils, creating a creamy nut butter with the right consistency. So – if you’re roasting, let them cool off (until just warm to the touch) before processing (if the nuts are too hot – right out of the oven, they will be reluctant to give up their oil and they are not likely to blend into a creamy consistency). Likewise, if the nuts are cold or room temp, just warm them up in a dehydrator for 5 – 10 minutes. If you don’t have one, put them in the oven set to the lowest allowable temperature, and let them warm up just for a minute or 2 (can leave the oven door open to prevent them from getting too hot if necessary).
2 – The nuts need to be bone dry (so if you’ve soaked them yourself, be sure to dry them thoroughly).
__________________________________________________________________
FOR THOSE USING A VITAMIX (or other blender that allows use of a tamper)….
After making nut butters is the BEST time to make a smoothie. This puts the last remnants of the nut butter (stuck to the sides of the carafe) to very good use. So yummy, and an easy way to clean the sticky butter out of the carafe. Just add some milk, banana & berries – give it a whirl & enjoy =)
____________________________________________________________
In case anyone is in the market for a VITAMIX, my distributor code is 06-004158 which entitles you to free shipping and I get credit for the referral (thx!).
Chocolate-y Oatmeal
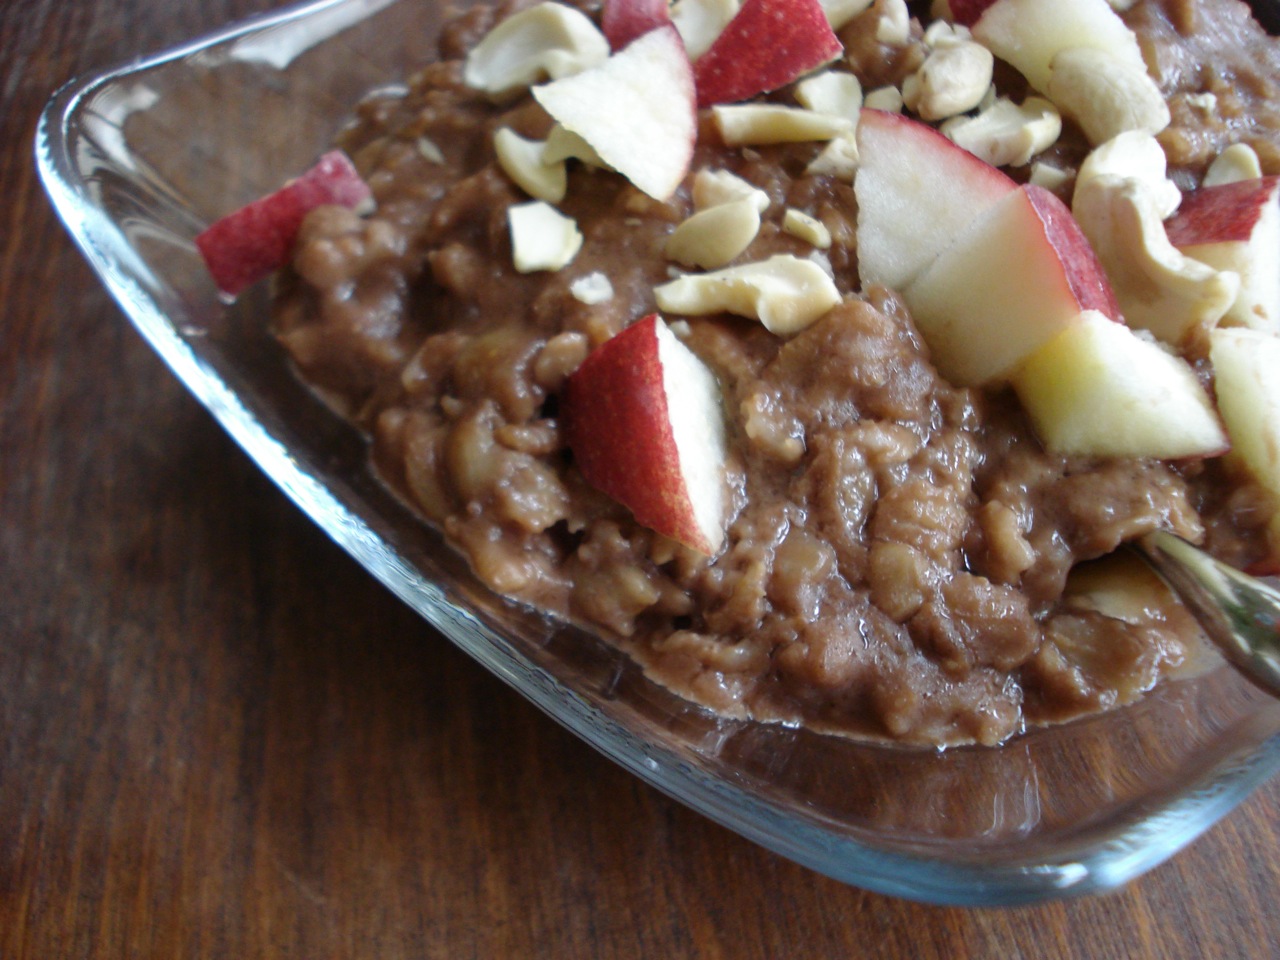

1 cup coconut milk (regular or “classic” – not “light”)
1/2 cup water
2 tsps high quality, cacao (or cocoa) powder
1/2 cup old-fashioned rolled oats
1/4 tsp pure salt
1 banana, mashed
chopped cashews (optional)
- Heat the coconut milk and water in a saucepan until hot (but not boiling).
- Add the chocolate powder and stir until dissolved.
- Add the oats and salt, stir to combine and bring to a low boil.
- Cover and cook at a simmer for 10 minutes, stirring occasionally.
- Uncover the pot, and cook (still stirring occasionally) until it reaches the desired thickness (about 3 mins, give or take).
- Mash a ripe banana in your breakfast bowl, add the chocolate-y oats, and mix to combine.
- Top with chopped cashews and enjoy.
Serves 1 or 2 depending on appetite.
________________________________________________________________________
SIDE NOTES:
~ You or your kids cuckoo for Cocoa Puffs?? Forget that & eat this!
~ But really, chocolate for breakfast?? Maybe not every day, but it’s this type of delicious, guiltless, treat that can prevent someone from having a snickers bar at 3:00 pm. Incorporating a high quality, antioxidant and mineral rich chocolate product into a healthy, satisfying meal is definitely the better option =)
~ This is a yummy treat for the kids (or any chocolate lover), and if they are normally opposed to eating oatmeal, this one will change their mind. This recipe may be 1 or 2 servings, depending on appetite. If splitting into 2 servings, mash half of a banana in each bowl. My kids really love this. And it’s another one of those breakfasts that can easily double as dessert. In fact another good name for this dish would be Chocolate Oatmeal Pudding. Sometimes it’s all in the name – make it something fun =)
~ Of course, swap out the cashews for any nut you’re in the mood for. Chocolate, banana & cashews just happen to go really nicely together (but I guess, what nut wouldn’t go well with chocolate & banana??).
~ Although coconut milk has a mild sweetness, it’s really the mashed banana that’s sweetening this dish. If you don’t have a ripe banana on hand, simply mix in 2 or 3 teaspoons of natural sugar (or a few drops of liquid stevia).
~ Doubling this recipe serves 3 nicely (after mixing in the banana, yields about 4 cups). If doubling, it might be helpful to note that 1 can of coconut milk is about 1 & 3/4 cups, so simply use 1 can and about 1/4 cup extra water (1 & 1/4 cups water total) to compensate (would be silly to crack open another can for only 1/4 cups worth of milk).
~ Soaking the oats overnight will yield a quicker cook time in the morning, and make the grain more digestible (this of course is a win/win situation and the preferred method). Additionally, some like to ferment the grain by including a TBSP of plain yogurt to the soak.
[I realize there are various levels of nutrition, so like to offer options to make everyone comfortable. I’d hate to turn someone away from a recipe simple because I mention soaking or fermenting the oats right up at the top. It’s easy to add that additional information down here for those who are interested.]
~ If you prefer to soak your oats overnight, simply mix the oats with water (1/2 cup of each) in the pot you’ll be using to cook in the morning, cover, and leave in a warm place overnight (inside an oven with only the oven light on works well). In the morning, heat up the coconut milk in a separate pot until hot, but not quite boiling (careful because coconut milk is thick, and you don’t want the bottom to burn – be sure to stir it a bit as it’s warming up). Mix the chocolate powder into the coconut milk and stir until dissolved. Add the chocolate milk to the oats, mix in the salt, and when it begins to bubble, lower heat, cover and cook for 5 minutes. Uncover and cook for another 2 or so minutes (until done to your liking). Proceed with mashing the banana into a bowl (or bowls) and add cashews.
Dairy Free, Gluten Free, Egg Free, Nut Free, Sugar Free, If eating strictly gluten free, be sure to use only certified gluten free oats. And of course, omit the cashews if you can’t eat nutsGrain Free, Vegan, Raw
In addition to the cashews, this oatmeal is also very tasty with berries or chopped apple over the top.

ENJOY =)
______________________________________________________________________________________
Upscaled to feed a family of 4:
2 & 2/3 cups coconut milk (about 1 & 1/2 cans)
1 & 1/3 cups water
5 & 1/2 tsps cacao (or cocoa) powder
1 & 1/3 cups old-fashioned rolled oats
2/3 tsp pure salt
2 & 2/3 bananas, mashed (give or take depending on size of bananas)
chopped cashews to taste (optional)
Steel Cut Oats w/ Caramelized Apples
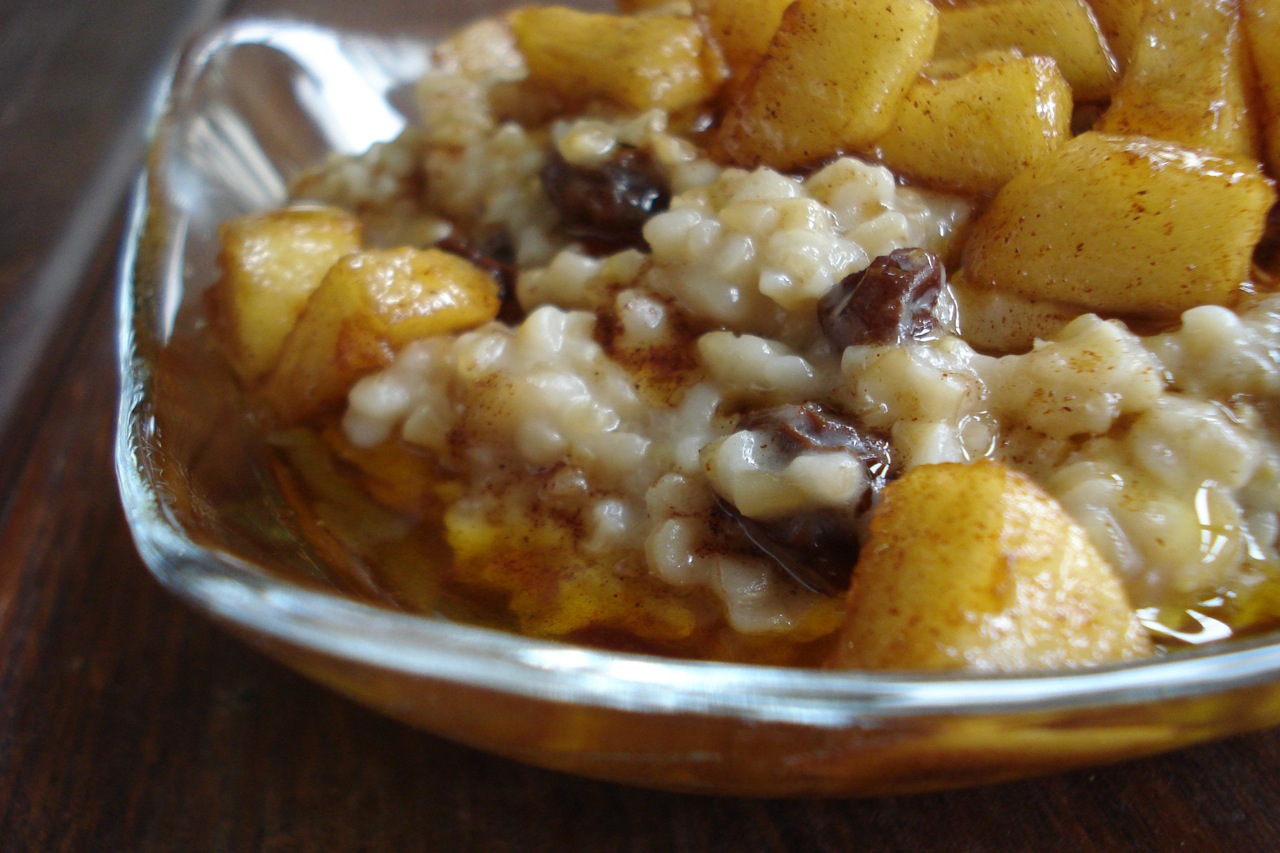

1 cup milk of choice
1/2 cup water
1/2 cup steel-cut oats
1/4 tsp pure salt
2 TBSPs raisins (optional)
1 apple, peeled and diced
2 TBSPs ghee, butter, or coconut oil
2 TBSPs natural sugar (or lakanto)
1/2 tsp cinnamon
FOR THE OATS:
- Heat the milk and water in a saucepan.
- When hot, stir in oats and salt and let cook over med-low heat for about 10-15 minutes, stirring occasionally.
- Add the raisins (if using) and continue cooking about 10 – 15 minutes more, stirring regularly until oats are done to your liking.
FOR THE APPLES:
- While the oats are cooking, peel and dice the apple.
- Melt the ghee or butter in a skillet over medium-low heat (set to about 4 on an electric range top).
- When the butter is warmed, add the apple and stir to coat.
- Sprinkle in the sugar and cinnamon and stir until all the apple pieces are coated evenly.
- Cook for about 5-10 minutes – until the apples start to soften but still retain a bit of crunch.
- Divide the oats into two bowls and top with warm apples. Don’t forget to drizzle some of the sweet, golden, cinnamon-y butter over the top as well.
Serves two. Enjoy!
________________________________________________________________________
SIDE NOTES:
~ Steel cut oats are oat groats that have simply been chopped into 2 or 3 pieces (as opposed to “rolled” oats that are steam pressed with a roller to flatten). If you’ve never tried them before, you’re in for a treat, as they are delicious, with a chewy and hearty texture.
~ If it starts to get dry before the oats are done to your liking, add a splash more milk or water.
~ There are many ways you can prepare steel-cut oats including soaking the oats overnight in water at room temp (with or without a little added yogurt) which helps to make the grain more digestible and makes it a shorter cook time in the morning (approx 10 minutes total). Alternately, you can soak the oats overnight in the refrigerator with milk which will also shorten the cook time. Another version is to melt ghee or butter, and saute the dry steel-cut oats for a few minutes in the morning before you stir in the water/milk (in this case, I wouldn’t saute the apple in butter – I’d just cook the apples, cinnamon and sugar right in the pot with the oats and milk, or simply slice the apples up, raw & crisp, over each individual serving after it’s done cooking. And of course, there are so many optional add-ins like pecans, walnuts, almonds, sunflower seeds, flax, bananas, peaches, dates…etc. The point is, you can play with something like this, adapting it to what’s most appealing to you and what works best with your morning schedule.
~ If you would like to do the overnight soak method, simply mix the oats with the water (1/2 cup of each), cover (in pot you’ll be using to cook in the morning), and put in a warm place overnight (I put the pot in my oven with only the oven light on which keeps the oats toasty warm all night). In the morning, add the milk, salt and raisins, and simmer, uncovered for about 10 minutes. Saute apples as described above and drizzle over oats.
Dairy Free, Gluten Free, Egg Free, Nut Free, Sugar Free, Vegan, If eating strictly gluten free, be sure to use only certified, gluten free oats. If avoiding dairy, use coconut milk and coconut oil. If avoiding sugar, use lakanto.Grain Free, Raw

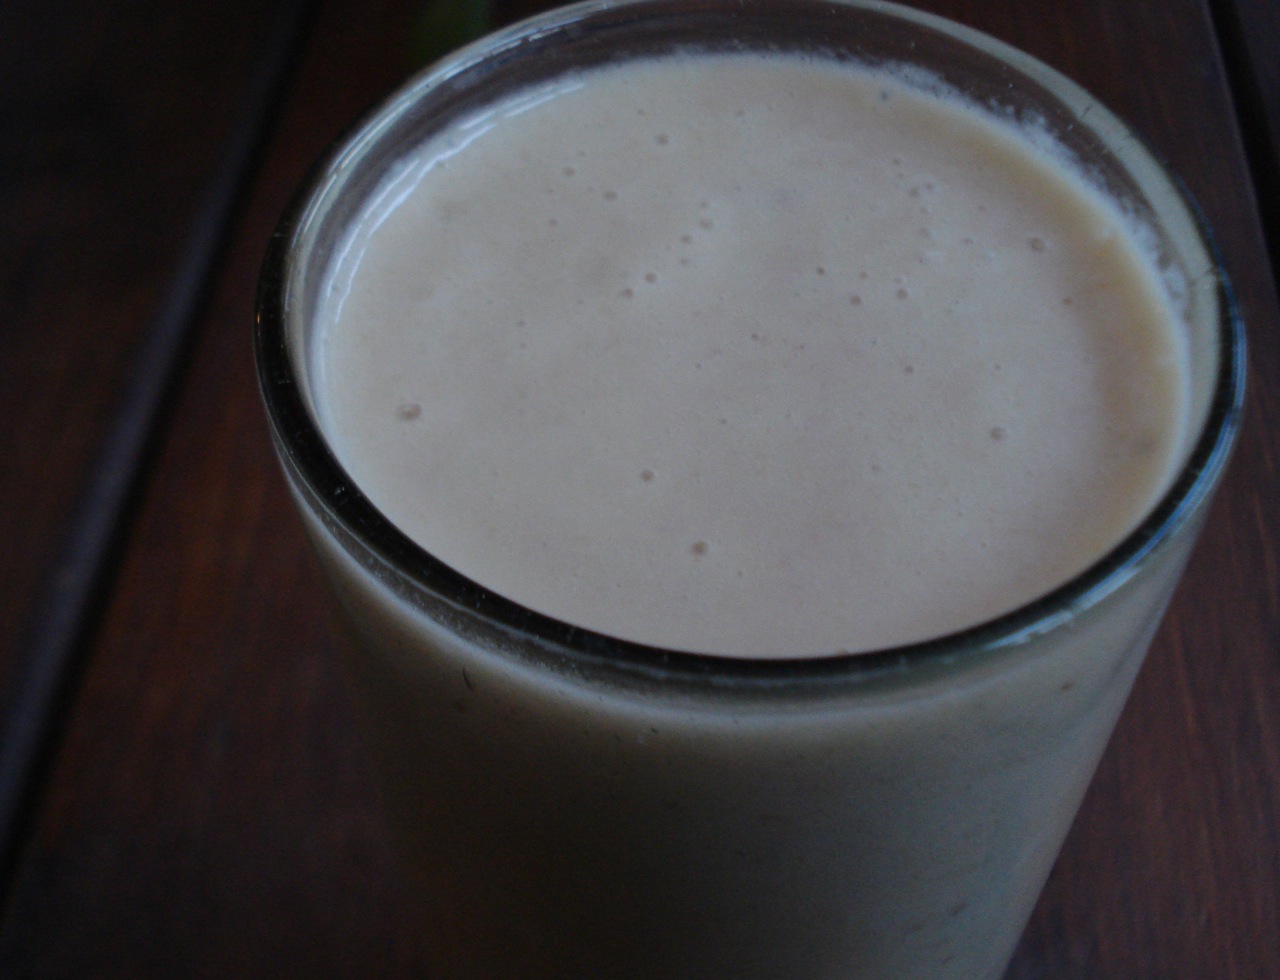
Coffee Smoothie


2 bananas (preferably speckled), sliced and frozen
3/4 cup plain, whole milk yogurt
3/4 cup high quality, black coffee
Optional Add-ins:
1/4 tsp cinnamon
1/2 tsp high quality cocoa (or cacao) powder
- Slice the bananas and place them in a single layer on a small tray lined with parchment (or wax) paper.
- Freeze them over night.
- In the morning, make coffee (or set your automatic timer so it’s ready when you wake up).
- First add the yogurt to the blender, then the frozen banana slices (and any optional add-ins if using), then pour in the coffee (hot from the carafe) and blend immediately.
Serves 1.
___________________________________________________________________
RECIPE SIDE NOTES:
~ Freezing the bananas is key to getting the right consistency (I found that using fresh bananas makes it too watery). The ice-cold bananas offset the hot coffee so that the end result is a medium-cool drink (personally, we don’t like ice-cold smoothies or drinks). It also works using one frozen banana and one fresh banana, but in this case, you’d have to make your coffee ahead of time and cool it off in the fridge. It’s just easier to use 2 frozen bananas since you have to freeze one anyway – this way you don’t have to wait for the coffee to cool off. Another option (if you prefer) is to use 2 fresh bananas, but add a cup or more of ice cubes. The ice will thicken the smoothie, but as far as I’m concerned, if I can just freeze the bananas, and get the same consistency, I’d rather not water down the rich flavor with ice. Of course, do whatever works best for you – I’m just laying out all the possible options. Keep in mind, if you want this to be the consistency of a thick milk shake, chill the coffee in the fridge ahead of time and use frozen bananas.
~ Can use vanilla yogurt if you prefer, but nutritionally speaking, you’d be better off using plain (as flavored yogurts are full of sugar). If necessary, you can always add a drop of liquid stevia (or whatever type of sweetener you prefer). Keep in mind the speckled bananas sweeten the smoothie nicely on their own (while still being a whole food as opposed to a condensed sweetener). Up to you, your taste buds, and your personal health standards.
Dairy Free, Gluten Free, Egg Free, Nut Free, Sugar Free, Grain Free, Vegan, Raw
Can use a dairy free yogurt if avoiding milk products.
Eggnog Smoothie

Eggs are such a powerful super-food. If your kids (or you) don’t enjoy eating them with toast (and there are no existing allergies or sensitivities), you might want to try getting in a few a week this way:
1 ripe banana
1/2 cup whole milk (or coconut milk)
2 egg yolks
1 tsp vanilla extract
1 TBSP (more or less) pure maple syrup (optional)
pinch or 2 of ground nutmeg or cinnamon (optional)
- Puree all ingredients in blender.
____________________________________________________________
SIDE NOTES:
~ This old “egg yolk trick” in the milk shake is one of the best ways to get solid nutrition into finicky eaters (or to simply add extra protein when needed).
~ Keep in mind, an egg yolk or two can be blended into any smoothie for extra protein and nutrition (and no one will even know it’s there). You don’t have to try to make it taste like eggnog. Add berries, yogurt, coconut oil, whatever you typically like in a smoothie. This is just one idea.
~ Some people may worry, but personally, I don’t think twice about eating raw eggs because I’m confident in my source (clean, healthy chickens lay clean, healthy eggs). Believe it or not, raw is actually the healthiest way to eat them, next best would be poached, soft-boiled, or over easy (yolk still runny), but of course, even fully cooked eggs – hard-boiled, scrambled, over hard (etc) offer significant nutrition – so eat them however you like them! The only thing I’d avoid is something like scrambled eggs that have sat out at a breakfast buffet for an unknown period of time. The longer the egg yolk is exposed to air, the more it becomes oxidized, and it then becomes something detrimental to our health and best avoided. Another reason to shy away from the buffet scramble is the fact that sometimes, it’s not real egg, but some sort of powdered egg substitute that has been boiled in giant batches – right in a plastic bag (a friend of mine who used to be in the catering business had shared that unappealing piece of information with me). Boiled plastic residue is not something I want as part of my breakfast (let alone powdered eggs)! Ok – back to the issue at hand – eating raw eggs – When all is said and done, there’s still always a chance raw eggs can carry bacteria, but keep in mind this risk is virtually non-existent if using high-quality, farm fresh eggs from healthy, free-range chickens. FYI, in the event there is bacteria, it would be in the egg white (not the yolk). This is why I recommend using yolks only when consuming raw eggs. If you’re not confident in your source, I don’t recommend eating raw eggs at all.
~ If using coconut milk, you may prefer to add a bit of water if the smoothie consistency seems too thick for you (depending on how you like it). Alternately, you can use COCONUT-MILK-TONIC as a substitute (which is simply coconut milk and water at a ratio of 1:1), or any other milk you prefer.
Dairy Free, Gluten Free, Nut Free, Sugar Free, Raw, Grain Free, Egg Free, Vegan
Can omit the maple syrup (or substitute stevia) if avoiding sugar, and use raw cow milk (or home-made, raw, almond milk) and vanilla bean if eating raw. Keep in mind, if your banana is ripe enough, it should contribute ample sweetness on its own.
Greek Salad Pita
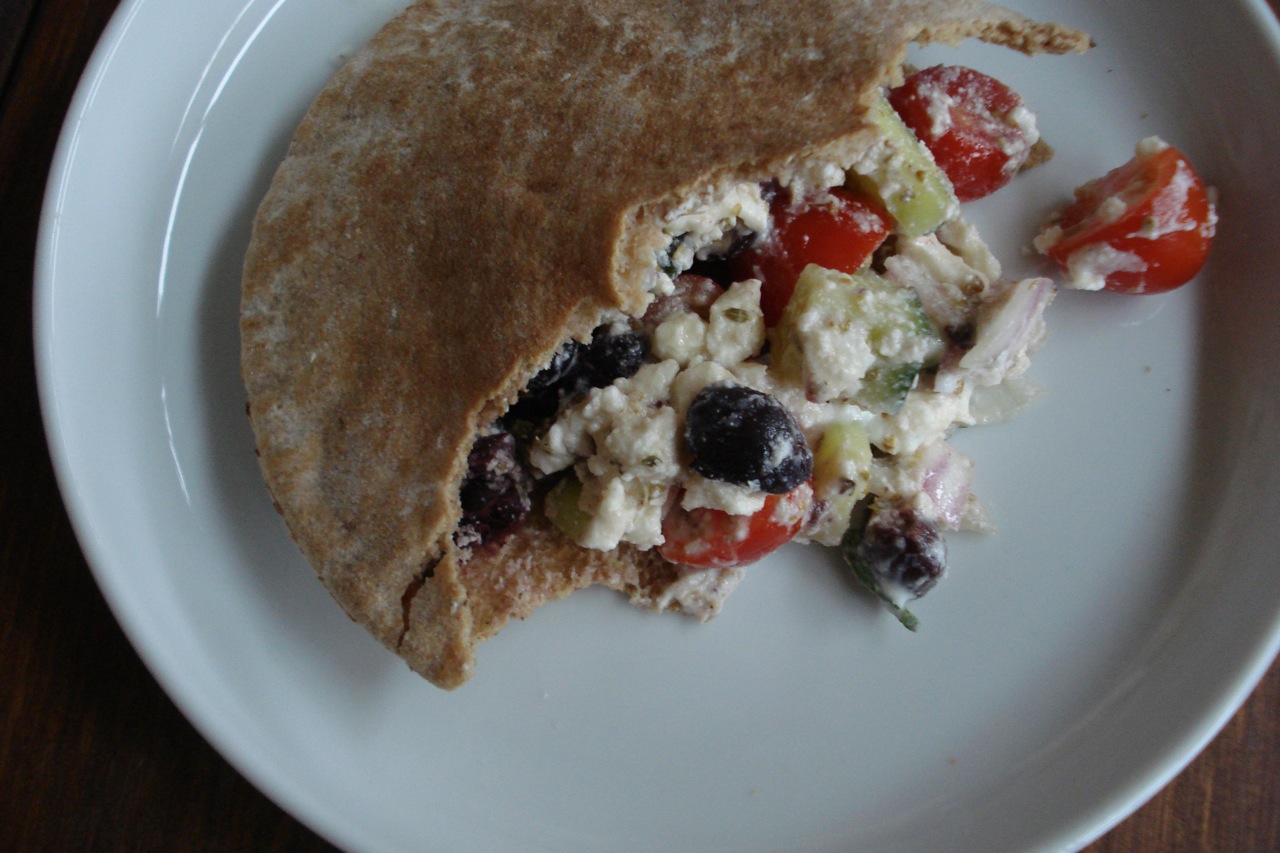

FILLING:
about a quarter of a medium cucumber, diced
10 grape tomatoes (give or take), cut in half
diced red onion to taste (roughly 2 TBSP)
10 black olives (give or take), pitted & cut in half
1/2 cup crumbled feta cheese
2 TBSP lemon juice
1 & 1/2 TBSP extra virgin olive oil
1 tsp dried oregano (or 1 TBSP chopped fresh)
DRESSING:
1/2 cup plain yogurt
1 TBSP chopped, fresh mint leaves
a few dashes of pure salt
freshly ground black pepper
2 whole grain or sprouted pitas
- Mix together filling ingredients and fill 2 pitas.
- Combine dressing ingredients and drizzle into each pita.
____________________________________________________________________
SIDE NOTES:
~ There’s a lot of give and take with this one – as it’s a toss together, drizzle in kind of thing. Don’t really need to count tomatoes or measure if you don’t want to. Just add everything in the amounts that look good to you.
~ If you prefer, you can use red wine vinegar instead of lemon juice. Depending on how much zing you’re in the mood for, be careful that you don’t add too much of either. You can add it little by little and taste as you go if you’re unsure. (My daughter & I like it a bit more lemon-y than my husband & son.)
~ Be sure to have a spoon handy, as it’s a juicy, drippy sandwich that may or may not hold together until the last bite!
Dairy Free, Gluten Free, Egg Free, Nut Free, Sugar Free, Grain Free, Vegan, RawIf you’re eating gluten/grain free, omit the pita and simply eat as a salad (or use gluten free bread if desired). Always check the labels of any packaged goods you’re using (such as olives and yogurt) if eating gluten and/or sugar free.