Lemon Walnut Hummus

1/2 cup walnuts, coarsely chopped
1 (15 oz) can chickpeas, drained
1/4 cup extra virgin olive oil
3 TBSP lemon juice
2 garlic cloves, coarsely chopped
1 tsp cumin
1/2 tsp coriander
1/4 tsp cayenne pepper
1 tsp sea salt or kosher salt
- In a small skillet over medium heat, toast the walnuts for 2 to 3 mins, shaking the pan occasionally to ensure even browning.
- Transfer the nuts to a small bowl to cool.
- In a food processor, combine the chickpeas, oil, lemon juice, garlic, spices & salt until smooth.
- Rub the walnuts in your hands a bit to try & remove/discard some of the papery skin (don’t obsess – just what comes off easily).
- Add walnuts to the processor and puree again until smooth. Add water 1 TBSP at a time if the hummus is thicker than you like (I usually end up adding 2 or 3 tablespoons).
- Season w/ additional salt if necessary & serve with crackers, pita bread or raw veggies.
______________________________________________________________________________________
SIDE NOTES:
~ From “Fresh Food Fast”
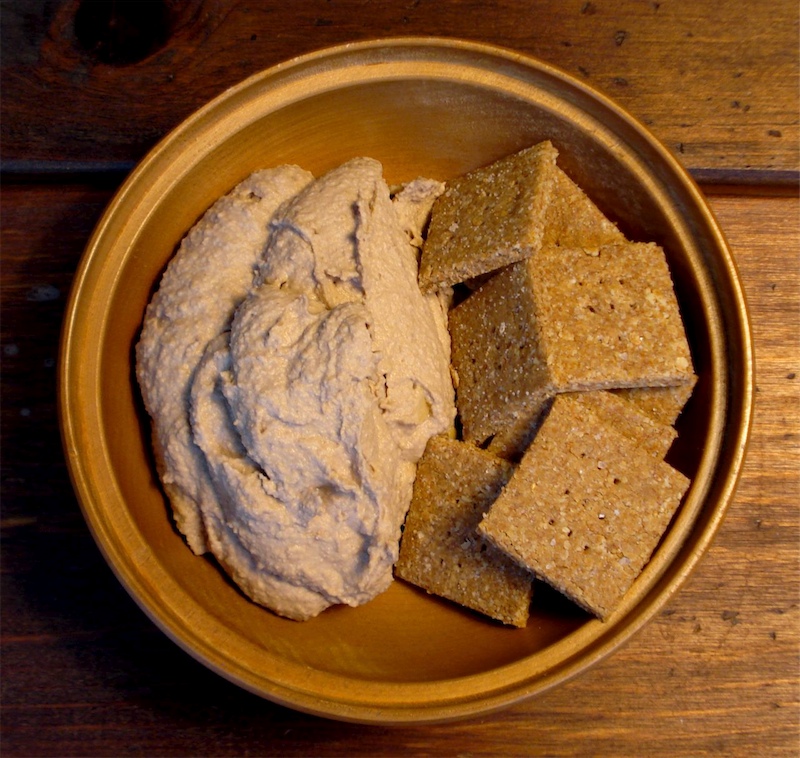
~ I know hummus is a pretty regular recipe these days, but if you feel like putting a little twist on the old stand by….we really like this version (substituting toasted walnuts for the traditional tahini sauce).
~ Shown here with WHOLE-WHEAT-OATMEAL-CRACKERS.
Dairy Free, Gluten Free, Egg Free, Nut Free, Sugar Free, Vegan, Grain Free, RawOf course, if you can’t eat nuts, use the more traditional hummus recipe outlined below.
______________________________________________________________________________________
A more traditional version…
1 can chickpeas, rinsed & drained
1 small garlic clove
1 TBSP tahini
3 TBSP extra virgin olive oil
2 TBSP lemon juice
1/2 tsp sea salt
1/4 tsp pepper
1 TBSP fresh parsley
1/8 tsp cayenne
- Blend all ingredients in food processor until smooth, adding a little water if needed.
Dairy Free, Gluten Free, Egg Free, Nut Free, Sugar Free, Vegan, Grain Free, Raw
Winter Vegetable Pate

water
1 medium onion, diced
1 sweet potato, peeled & cut into 1-inch cubes (anywhere from 1.5 to 2 cups)
1 heaping cup of butternut squash cut into 1 inch cubes
2 TBSP soy sauce, divided
2 heaping TBSPs sesame tahini
butter, coconut oil, or olive oil, drizzled over the top to taste
- Heat a large saute pan over medium heat.
- Add about 1 TBSP water & water-saute the onion until translucent, about 5 mins (add a little extra water if you need to).
- Add sweet potato, squash, 1 TBSP soy sauce & about 1/2 cup water & bring to a boil.
- Cover, reduce heat, & simmer over low heat about 20 – 25 mins, until potato & squash are very tender.
- Add the remaining TBSP of soy sauce & allow to simmer, uncovered, until any remaining liquid has been absorbed.
- Transfer vegetables to a food processor, add tahini, and process until smooth, thick & creamy, adding water only if the consistency appears too stiff.
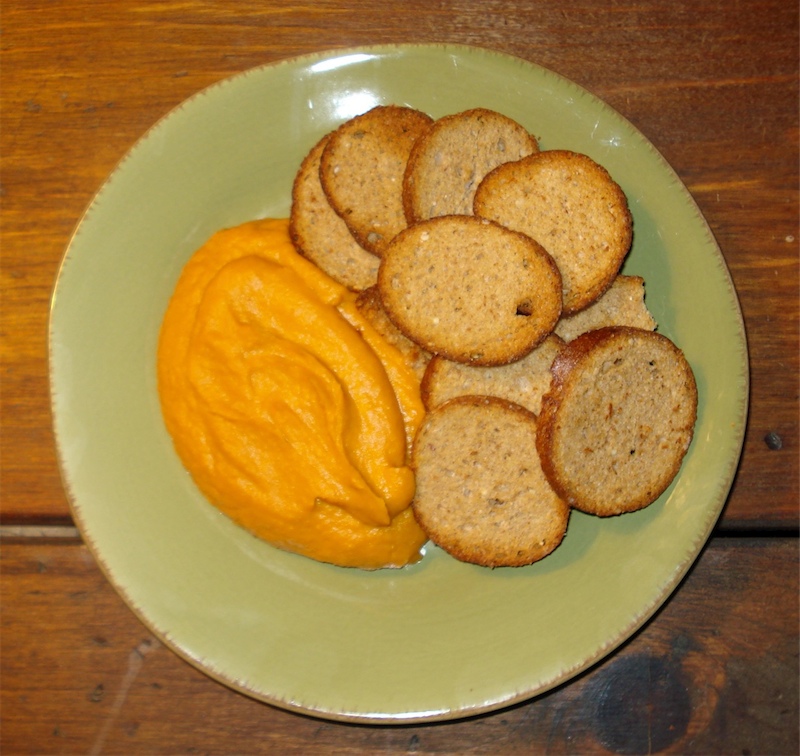
Transfer to a serving bowl & serve as a spread with crusty, whole grain bread or crackers.
______________________________________________________________________________________
SIDE NOTES:
~ From “Cooking the Whole Foods Way” LOVE this dip.
~ I know some people really don’t like peeling & cutting up a butternut squash. Not the easiest vegetable to work with. If this is the case w/ you, look for pre-peeled butternut squash in the produce section of the grocery store (sometimes you can get it peeled and chopped).
~ The kids & I have this for dinner sometimes. Just make a big salad & throw in a few nuts or chickpeas.
Dairy Free, Gluten Free, Egg Free, Nut Free, Sugar Free, Vegan, Grain Free, RawIf avoiding gluten, be sure to use a gluten free tamari/soy sauce.
Sweet Potato Muffins


1 & 3/4 cups whole wheat flour
1/2 tsp pure salt
1/4 cup natural sugar
2 tsps aluminum free baking powder
1 tsp cinnamon
1 tsp nutmeg
2 eggs
2 TBSP melted coconut oil, butter, or ghee
3/4 cup milk (can use non-dairy)
1 cup cooked, mashed sweet potato or pumpkin (or canned)
1/4 cup chopped pecans (optional)
- Preheat oven to 400.
- Grease 12 muffin cups (or line w/ paper cups).
- Combine the flour, salt sugar, baking powder, cinnamon & nutmeg in a mixing bowl.
- In a separate large bowl, combine the eggs, oil, milk, sweet potato & pecans.
- Slowly add the dry ingredients to the wet mixture, stirring until just combined.
- Spoon the batter into the muffin cups & bake 20 – 25 mins or until a toothpick inserted into the center comes out clean.
______________________________________________________________________________________
SIDE NOTES:
~ Great for a school snack. Store them in the freezer and just pull them out individually as needed.
~ If you prefer not to grease the pan, use paper baking cups (“If You Care” makes unbleached version).
Dairy Free, Gluten Free, Egg Free, Nut Free, Sugar Free, Grain Free, Vegan, Raw
If avoiding milk products, use coconut oil and coconut milk (or other not dairy option). If avoiding nuts, omit the pecans.
Sprouted Corn Tortilla Chips

Food For Life Sprouted Corn Tortillas, defrosted
oil of choice (I like coconut oil for this, but olive oil works too)
sea salt
- Preheat oven to 375.
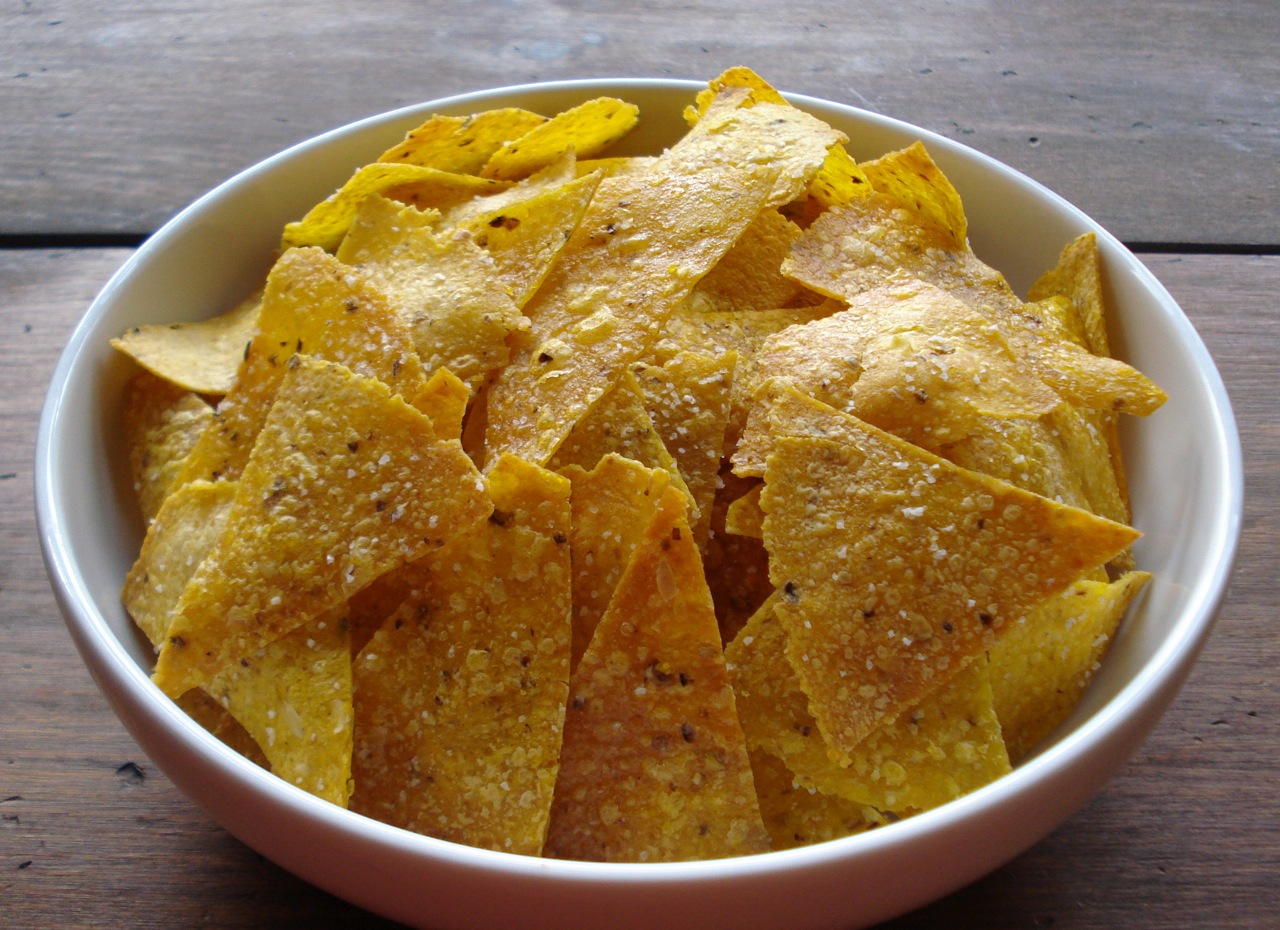
- Cut round tortillas into desired chip size & shape.
- Place cut tortillas in large bowl, and toss with oil to coat (I use 2 packages of tortillas, and maybe 3 TBSP of oil – give or take).
- Spread chips on 2 baking sheets in single layer, and sprinkle with salt.
- Bake for approx 12 mins or until they look good to you.
Depending on how many chips you’re making, you may have to do a second round.
______________________________________________________________________________________
SIDE NOTES:
~ For quick cutting, stack several of the tortillas on top of each other and use a serrated bread knife to cut through all of them at once (I usually cut through the entire stack all at once – extremely quick, especially compared to the first time I made them – cutting each tortilla individually!).

~ These are some good chips! The first few times, I made them in a pan on the stove, but it didn’t work out too well. Oil splattered everywhere, it got really smokey, & it was hard to manage getting the cooked chips out of the pan, sprinkling them with salt while they’re still hot (so the salt sticks), and also getting the next batch of chips in the pan before the hot pan is sitting empty for too long. It was a delicate balance, & even with 2 people, it was messy & annoying. So, I decided to experiment in the oven & it made things much easier & yielded great chips, so this is the method that has stuck for us.
~ If they turn out a bit chewy (as opposed to crunchy), next time, cook them a few minutes longer.
Dairy Free, Gluten Free, Egg Free, Nut Free, Sugar Free, Grain Free, Vegan, Raw
If eating 100% raw, substitute raw honey for the maple syrup and use vanilla bean.
~ Cooking with coconut oil is very easy, as it’s no big deal to scoop out the amount you need & throw it in the pan/pot you’ll be cooking in. However, if you want to toss something with oil, coconut oil is slightly less convenient since it’s a solid at room temp (it has a consistency similar to vegetable shortening).

~ It has to be melted first, which isn’t that big of a deal, but it does take about 1 extra minute of prep. Simply scoop some out into a small steel container (I use a heavy duty measuring cup), set it on the stove over low heat & it will melt into clear oil in about a minute.

~ If you’re tossing it with something cold, the oil may become solidified again as it sits which is no big deal either (Click on photo of chips on tray for a close up look. The chips were cold, as they were just defrosted, so after I tossed them with the oil, it solidified onto the chips. As soon as you put them in the oven, it’s oily oil again – so no problem)

For information on the health benefits of coconut oil, see “health topics” section, or visit www.coconutresearchcenter.com
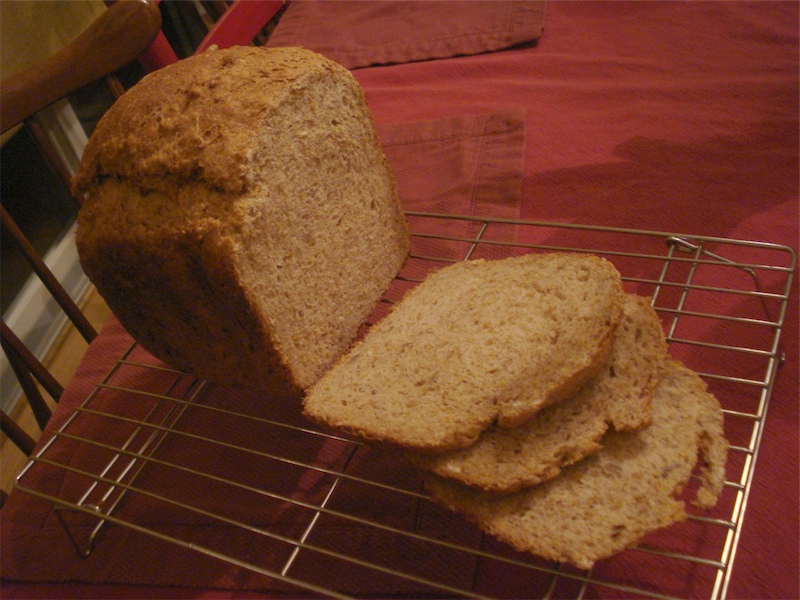
Whole Wheat Bread (machine)

(egg free)
26 & 1/2 oz whole wheat flour
2 & 1/2 tsp sea salt
2 & 1/2 TBSP dry milk**
3 & 1/8 TBSP butter
2 & 1/2 TBSP molasses
17 & 1/2 oz water
1 & 3/4 tsp dry yeast
Place all ingredients in bread machine pan in the order recommended by your machine manual. Set on whole wheat setting.
SIDE NOTES:
~ Baking bread makes the house smell really good =)
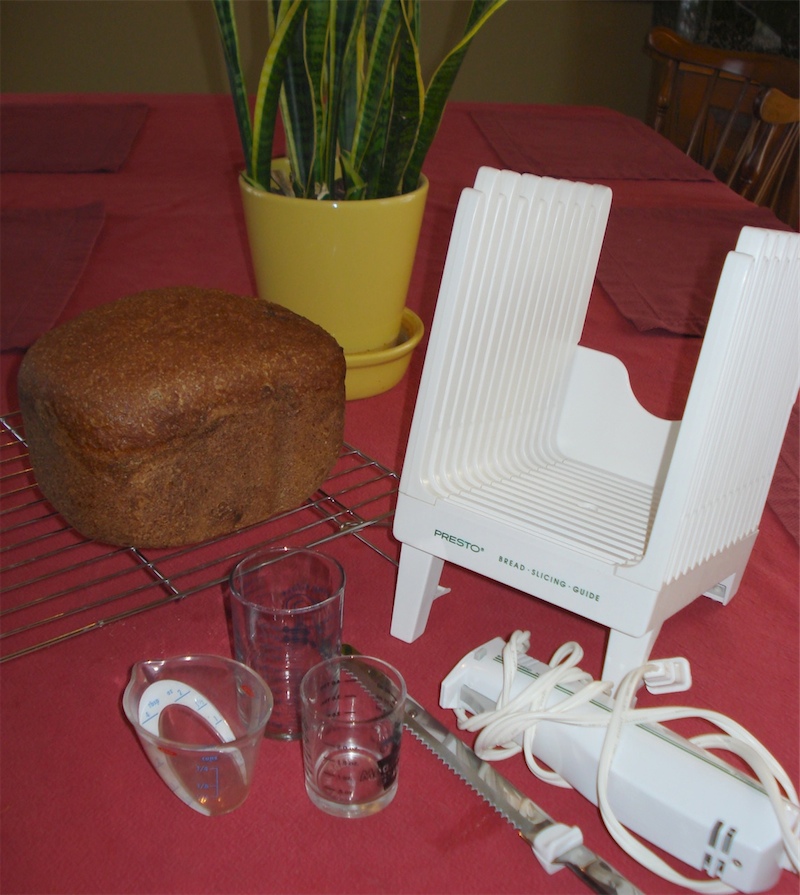
~ Anyone & their brother can do it, so don’t think you have to be some sort of rare breed to make a loaf of bread. It takes about 10 minutes to measure out the ingredients, dump them in the bread pan & push a few buttons. Then, presto, 5 hours later ~ a beautiful loaf of bread. The machine even has a timer if you want to put your ingredients in at night & wake up to fresh bread in the morning. The only thing you have to be careful with is measuring as accurately as possible. With most recipes a little more or a little less is fine. When baking bread in a machine, you want to follow the recipe as closely as possible. If you intend to use the bread for sandwiches, you’ll need a slicing guide & electric knife (see photo above). I went at my first loaf with a regular serrated knife, sawing away. Needless to say, my slices were twice as thick as they should have been and quite lumpy – just doesn’t work w/o the guide. I’ve had a few different bread machines over the years. The one I currently have is awesome & easy to use in every way (Panosonic YS280). Little measuring glasses (as shown above) come in really handy when measuring something like 3 TBSP of honey…etc.
~ When measuring flour (and this goes for any recipe that calls for flour), gently spoon it into your measuring cup. Do not pack it in tightly, nor should you use the measuring cup itself to scoop it out of the flour container as this will give you too much flour.
~ If you have a Vitamix with the dry carafe, you can make your own, fresh flour in 1 minute (literally). And if you want to go the full distance, increasing the nutritional value and digestibility even more, you can soak your wheatberries & dry them in a dehydrator before grinding into flour (more on this another time).
~ These 2 bread machine recipes (multi-grain & 100% whole wheat) are ones I made once a week for years & years. Haven’t made them in a long time though, as we tend to stay away from wheat as much as possible these days. They’re both great recipes if you do well with wheat.
**The only problem I have with this recipe (knowing more now than I did when I used to make this) is the powdered milk which is not a good food choice (powdered milk & powdered eggs contain oxidized cholesterol which is bad news). I honestly don’t know if there’a a viable substitute for powdered milk, but you can try omitting it altogether & see what happens. If anyone knows of a good substitute, please let us know! =)
Multi-Grain Bread (bread machine)

(egg free)
1 & 1/3 cups water
2 TBSP butter, softened
3 TBSP honey
1 & 1/2 cups unbleached, bread quality white flour
1 & 1/3 cups whole wheat bread flour
1 tsp sea salt
1/4 cup flax seeds
1/4 cup sesame seeds
1 tsp active dry yeast
1/4 cup raw sunflower seeds
1/4 cup rolled oats
Place all ingredients (except sunflower seeds & rolled oats) in bread machine pan in the order recommended by your machine manual. Set on a setting that beeps when it’s time to add extra ingredients (during the kneading phase). That’s when you add the sunflower seeds & rolled oats. Makes 1 & 1/2 pound loaf.
SIDE NOTES:
~ Baking bread makes the house smell really good =)
~ Anyone & their brother can do it, so don’t think you have to be some sort of rare breed to make a loaf of bread. It takes about 10 minutes to measure out the ingredients, dump them in the bread pan & push a few buttons. Then, presto, 5 hours later ~ a beautiful loaf of bread. The machine even has a timer if you want to put your ingredients in at night & wake up to fresh bread in the morning. The only thing you have to be careful with is measuring as accurately as possible. With most recipes a little more or a little less is fine. When baking bread in a machine, you want to follow the recipe as closely as possible. If you intend to use the bread for sandwiches, you’ll need a slicing guide & electric knife. I went at my first loaf with a regular serrated knife, sawing away. Needless to say, my slices were twice as thick as they should have been and quite lumpy – just doesn’t work w/o the guide. I’ve had a few different bread machines over the years. The one I currently have is awesome & easy to use in every way (Panosonic YS280).
~ When measuring flour (and this goes for any recipe that calls for flour), gently spoon it into your measuring cup. Do not pack it in tightly, nor should you use the measuring cup itself to scoop it out of the flour container as this will give you too much flour.
~ If you have a Vitamix with the dry carafe, you can make your own, fresh flour in 1 minute (literally). And if you want to go the full distance, increasing the nutritional value and digestibility even more, you can soak your wheatberries & dry them in a dehydrator before grinding into flour (more on this another time).
~ These 2 bread machine recipes (multi-grain & 100% whole wheat) are ones I made once a week for years & years. Haven’t made them in a long time though, as we tend to stay away from wheat as much as possible these days. They’re both great recipes if you do well with wheat.
Scaled up for a larger loaf……
1 & 2/3 cups water
2.5 TBSP butter, softened
3 & 3/4 TBSP honey
1 & 7/8 cups unbleached, bread quality white flour
1 & 2/3 cups whole wheat bread flour
1 & 1/4 tsp sea salt
2.5 oz flax seeds
2.5 oz sesame seeds
1 & 1/4 tsp active dry yeast
2.5 oz cup raw sunflower seeds
2.5 oz cup rolled oats
Spinach & Roasted Red Pepper Pesto


For the Pesto:
2 cups packed spinach leaves
1/2 cup packed parsley leaves
1/2 cup walnuts
1 small garlic clove
1/2 cup extra virgin olive oil
1 tsp pure salt
- Place spinach, parsley, walnuts & garlic in a food processor (a blender won’t work).
- Process until finely chopped (stopping to scrape down sides as needed).
- While motor is running, gradually pour in olive oil and salt.
Serve over whole grain pasta topped with roasted peppers (or use for sandwich spread).
For the Peppers:
1 or 2 red peppers
- Preheat broiler on high.
- Cut peppers in half lengthwise discarding the seeds & pith.
- Place peppers in one layer on broiler safe pan.
- Broil, 4 inches from the heat about 10 mins, until quite charred.
- Turn & cook until the edges of the second side are charred (maybe 3 – 5 mins).
- Remove from oven & let cool.
- Peel & discard skin (skin should slip right off once cooled).
- Chop into small pieces.
______________________________________________________________________________________
SIDE NOTES:
~ From “1000 Vegetarian Recipes” Has been a family favorite for more than 10 years.
~ This is a NO COOK SAUCE (love that). The pesto can be prepared In the time it takes to cook the pasta.
~ Freeze this pesto into cubes using an ice cube tray to use at your convenience as needed. (see my FAVORITE-KITCHEN-TOOLS-&-GADGETS page for tip on this).
~ The original recipe also includes grilled eggplant. Once in a while I’m inspired to include it as it’s really tasty (if you like eggplant). But it does make this otherwise quick meal longer to prepare. If you’re in the mood – peel the eggplant, cut it into circles, brush with olive oil, sprinkle with salt, put them under the broiler (both sides), then cut them into quarters & add them on top with the roasted peppers.
Dairy Free, Gluten Free, Egg Free, Nut Free, Sugar Free, Grain Free, Vegan, Raw
If eating gluten free, be sure to use an appropriate pasta (we prefer brown rice pasta).
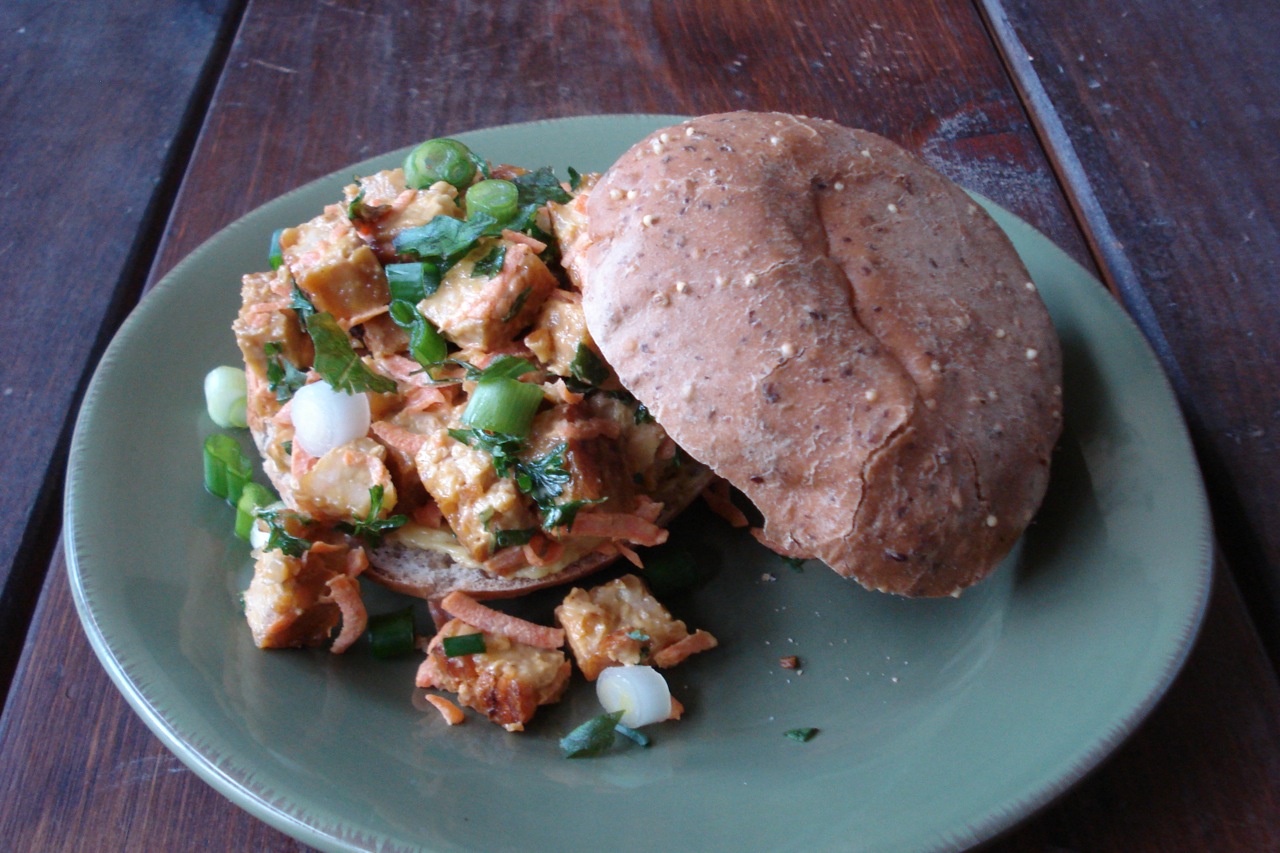
Tempeh Salad Sandwich

coconut oil
8 oz package of soy tempeh, cut into strips
1 TBSP tamari/soy sauce
2 TBSP fresh parsley, chopped (or more)
1 TBSP fresh basil, chopped (or more)
2 carrots, grated
1 scallion, diced
high quality mayo to taste
- Heat the oil in skillet over medium heat and cook the tempeh strips until nicely browned on both sides (adding extra oil as needed).
- Remove from heat, stir soy sauce, and chop tempeh into smaller pieces.
- In a medium mixing bowl, add all the ingredients (including mayo) and mix well.
______________________________________________________________________________________
SIDE NOTES:
~ Adapted from “The Chicago Diner Cookbook”. Can be served warm, right out of the pan, or cold. It’s good on a whole grain bun or in pita bread, but I actually prefer it on its own, as a salad (no bread).
~ A tip for getting the tempeh out of its package if it’s new to you (it’s sealed pretty tightly w/ plastic) – just cut it in half across the belly right through the plastic – then you can gently squeeze it out from the ends. I find it’s easier to cut into long strips for frying as opposed to first cutting into a small dice. It’s easier to flip this way.
Dairy Free, Gluten Free, If you’re eating gluten free, be sure to use a certified gluten free tamari and gluten free bread (or omit the bread and eat this as a salad if avoiding grains entirely). Also, make sure you get SOY tempeh, as I believe the “three grain”, “flax”, and “veggie” tempeh all contain gluten. Check your mayo ingredients if eating sugar free (or make your own).Egg Free, Nut Free, Sugar Free, Grain Free, Vegan, Raw
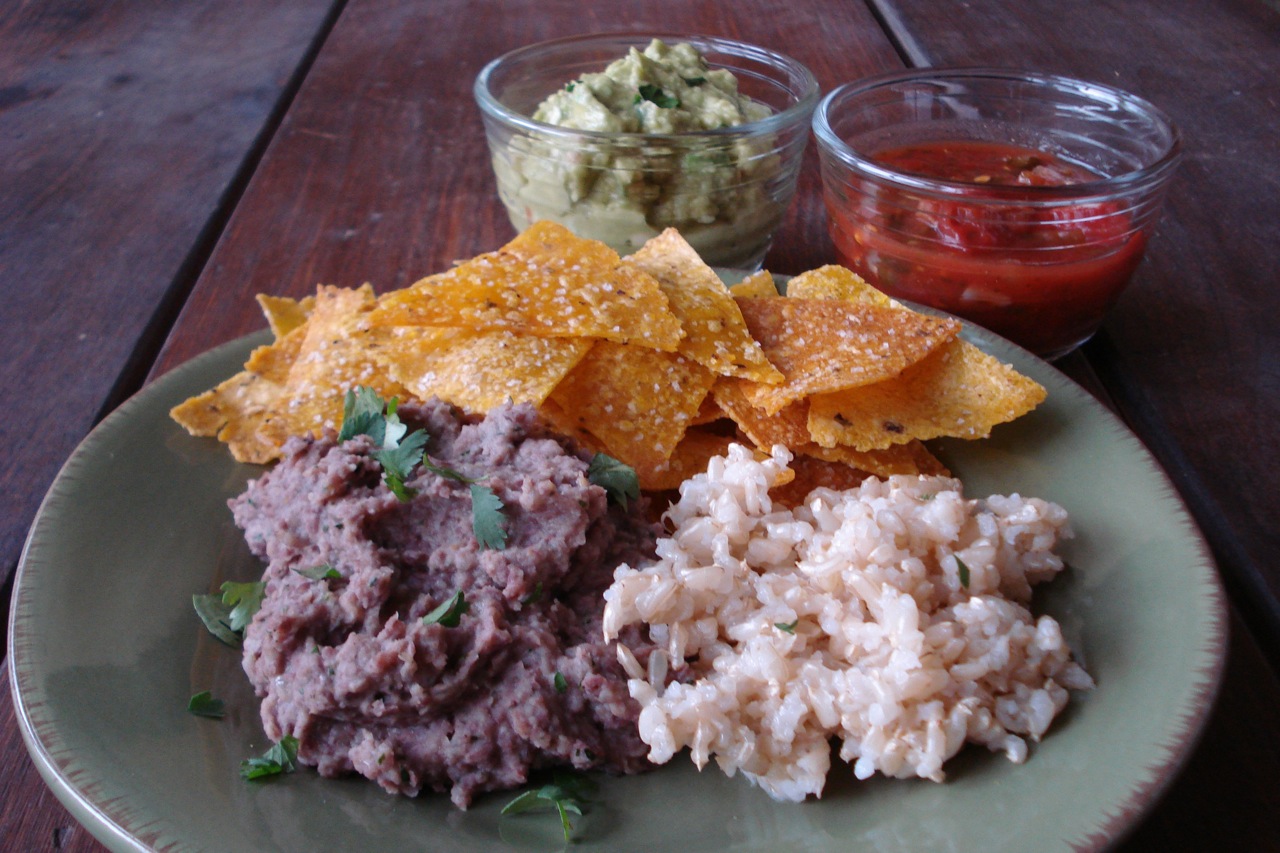
Pureed Beans w/ Garlic, Onion & Cilantro

2 TBSP coconut oil, butter, or ghee
1 medium onion
6 cloves garlic, minced or crushed
1 can adzuki beans (or pintos or black beans)
1 tsp cumin
1/2 tsp pure salt
large handful of fresh cilantro (as much or as little as you want)
- Heat oil over medium low heat.
- Add onion & gently cook about 10 mins, stirring frequently until onion is slightly browned.
- Add garlic & saute about 2 mins.
- Add beans, cumin & salt & cook a few mins longer.
- Transfer mixture to food processor or blender, add cilantro & puree until smooth.
- Garnish w/ extra cilantro if desired.
______________________________________________________________________________________
SIDE NOTES:
~ We all love mexican night & this bean dish is my own, personal concoction.
~ I like using my small food processor to quickly chop up the garlic.
~ Make twice this amount to serve a family of 4 with a little extra.
~ Served here with SPROUTED-CORN-TORTILLA-CHIPS, rice and guac.
~ Can’t give you an exact recipe for the guacamole, as it’s one of those things that’s always just thrown together w/o measuring. In general, here’s what you need – A couple of ripe avocados, a few squeezes of lime juice (I substitute lemon juice if needed), 1 or 2 minced or crushed garlic cloves, a handful of fresh cilantro, a few dashes of sea salt, and a dollop or 2 of your favorite salsa. Mash everything up together & enjoy.
Dairy Free, Gluten Free, Egg Free, Nut Free, Sugar Free, Grain Free, Vegan, RawIf eating dairy free, use coconut oil instead of butter.
Tomato, Basil & Mayo Sandwich
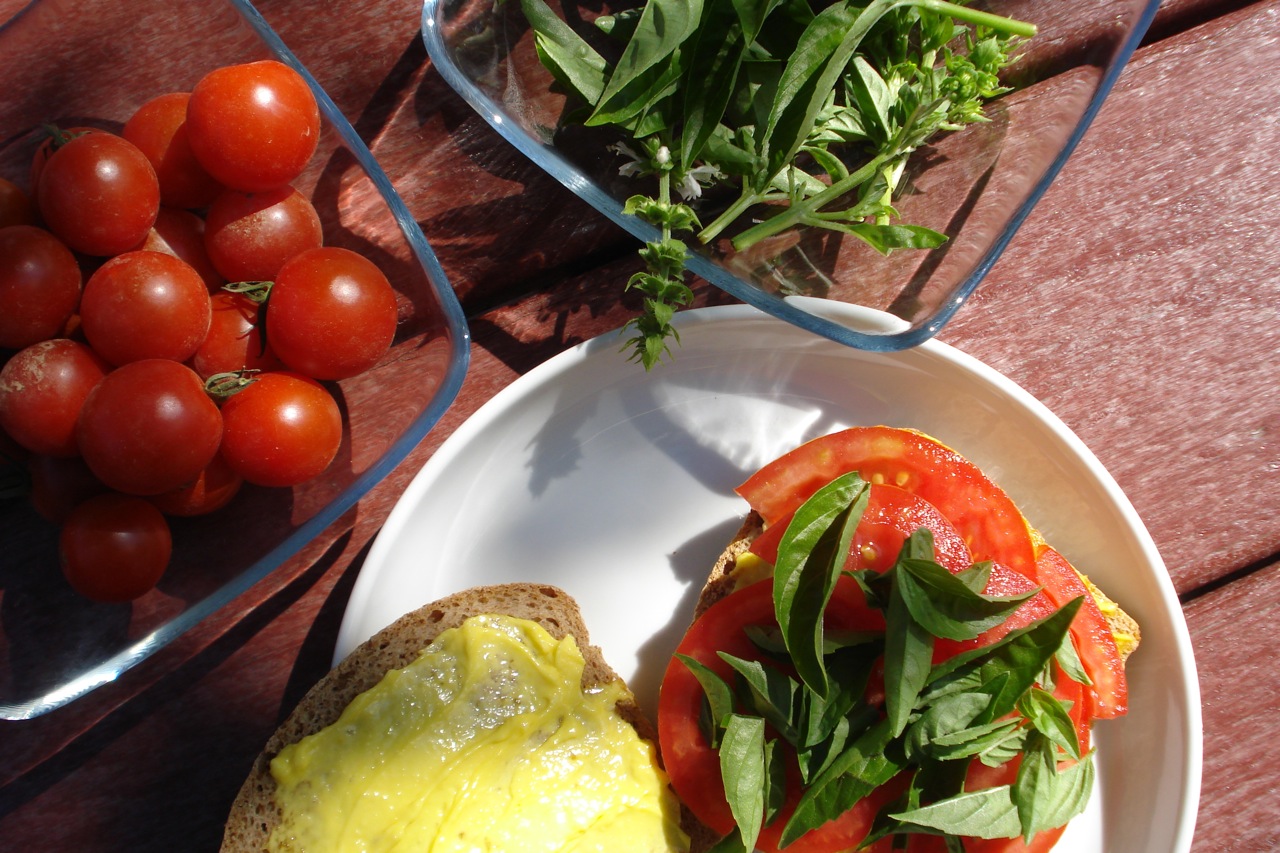

~ This is best in summertime with very fresh tomatoes – right off the vine.
~ This sandwich is particularly nice with garlic-mayo (click HERE if you want to learn how to make your own).
Dairy Free, Gluten Free, If you’re eating gluten free, be sure to use a certified gluten free bread. Check your mayo ingredients if eating sugar free (or make your own).Egg Free, Nut Free, Sugar Free, Grain Free, Vegan, Raw